How to Turn On BitLocker for Your Windows 11 Operating System Drive

Open File Explorer , right-click your C: drive, select Turn on BitLocker, choose your unlock method (PIN, USB key, or TPM), then back up your recovery key to your Microsoft account or a file. BitLocker encrypts your drive immediately.
What is BitLocker?
BitLocker is a built-in Windows 11 security tool that encrypts your main drive (usually your C: drive). If your computer is lost or stolen, nobody can read your personal and work documents without your PIN, USB key or recovery key.
The drive is encrypted as a whole, so you don’t have to protect individual files or folders. New files you save to the drive are encrypted automatically as well. When you copy a protected file to another device that doesn’t use BitLocker, it opens normally there, because the copy is no longer encrypted.
If BitLocker sees something unusual, such as a change to core startup software, it locks the drive. You then need the recovery key to get back in. That is why backing up the key matters so much (more on that below).
You can choose how the drive unlocks at startup:
- Enter a PIN code
- Insert a USB flash drive
- Use a special chip inside your computer called TPM (Trusted Platform Module)
Check whether it is already on before you start.
Before You Start
Check both of these before you begin:
- You must be signed in as an administrator (someone who can make changes to the computer). With a standard account, Windows will ask for an administrator password.
- BitLocker is only available in Windows 11 Pro, Enterprise, and Education editions. Windows 11 Home does not have the Turn on BitLocker option. Some Home devices offer a simpler feature called device encryption instead, if the hardware supports it.
Step-by-Step Guide to Turn On BitLocker
Step 1Open File Explorer
- Press Win+E on your keyboard to open File Explorer .
- Click This PC in the left pane. You should now see your drives listed on the right.
Step 2Find Your Operating System Drive
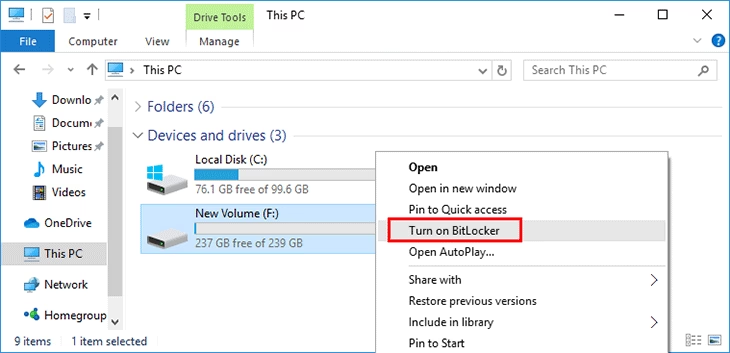
- Find your operating system drive. It is typically the
C:drive and usually shows a Windows logo on its icon. - Right-click it and select Turn on BitLocker. If you don’t see it, click Show more options first, because Windows 11 hides some entries in the full right-click menu .
If the option is missing from both menus, you are most likely on Windows 11 Home. BitLocker has also usually already been turned on if you see Manage BitLocker instead.
Step 3Choose How to Unlock Your Drive at Startup
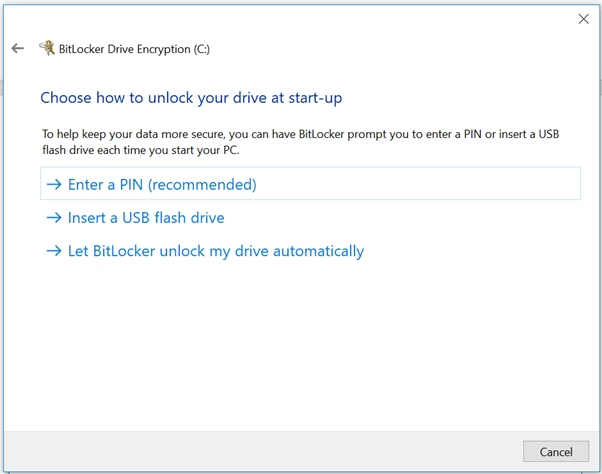
On many PCs, the wizard asks how you want to unlock the drive each time the computer starts. Your options are typing a PIN, plugging in a USB flash drive with a special key, or letting it unlock automatically if your PC has a TPM chip (Trusted Platform Module, a security chip built into your motherboard). If your PC has a TPM and nothing in your organisation’s policy asks for extra protection, this screen may be skipped and the wizard moves straight on to the recovery key.
- Read the options on the screen.
- Select the one that suits you. You should then see the wizard move on to the next page.
- Enter a PIN: You’ll type a 6 to 20 digit number each time your PC starts. Your organisation’s policy may set a different minimum. Pick something you will remember, because forgetting it means you will need the recovery key.
- Insert a USB flash drive: BitLocker will unlock your drive automatically when this USB is plugged in at startup. If the USB is lost or left at home, you can’t start the PC normally.
- Automatically with TPM: BitLocker will unlock your drive without any action needed from you. This is the most convenient option, but anyone who can turn on the PC can reach the sign-in screen.
Step 4Back Up Your Recovery Key
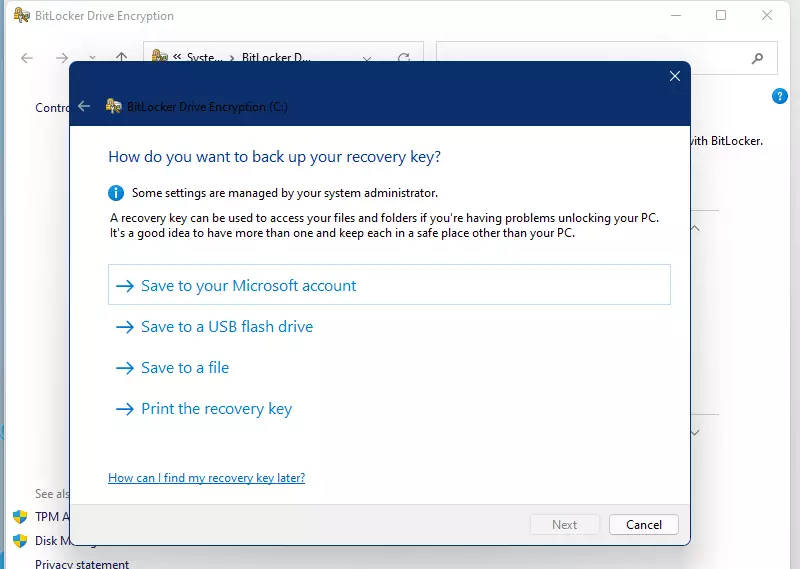
Back up your BitLocker recovery key immediately. Without it, you cannot access your encrypted drive if you forget your PIN, lose your USB key, or if BitLocker locks the drive after a hardware or startup change. You can save this important key to your Microsoft account online or to a file on another device.
You can save your recovery key in one or more of these ways. Using two is a good habit:
- Microsoft Account: Save it online by signing in with your Microsoft account. You can find your key later at https://account.microsoft.com/devices/recoverykey
- Save to a file: Save the key as a text file on another USB or drive. Don’t save it to the drive you are encrypting, because that defeats the purpose.
- Print it: Print the recovery key and keep it somewhere safe, away from the computer
After you have saved the key, click Next. You should see the next page of the wizard.
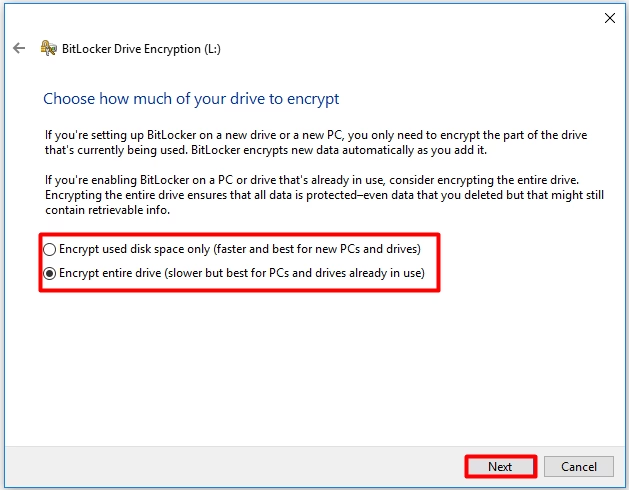
Step 5Choose How Much of Your Drive to Encrypt
Now choose how much of the drive to encrypt. Select one of these:
- Encrypt used disk space only: Faster option. Good if your PC is new or mostly empty. Data you add later is encrypted automatically.
- Encrypt entire drive: Recommended for the best protection, and the right choice for a PC you have been using for a while, since deleted files can still leave readable traces in free space. It takes longer.
Click Next once you have picked one.
Step 6Choose Encryption Mode
If this page appears, choose one of these:
- New encryption mode: Best for Windows 10 or 11 devices. This is the right choice for a system drive that stays in this PC.
- Compatible mode: Use this if you want to use the drive on older Windows versions
Click Next to continue. On some PCs this page doesn’t appear, because it is only shown when the choice applies.
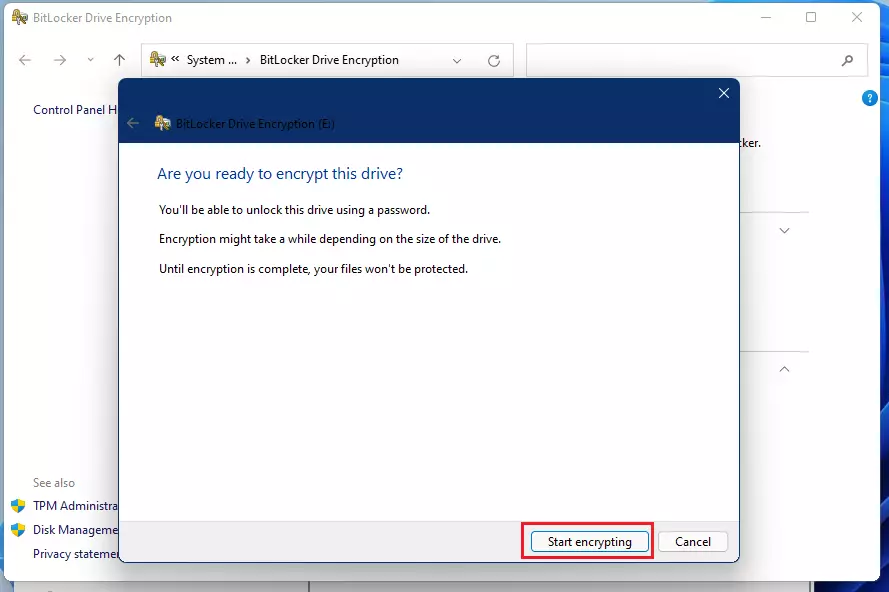
Step 7Run BitLocker System Check
- Ensure the Run BitLocker system check box is checked. This is a good idea, because it confirms that Windows can read the unlock method and recovery key before the drive is encrypted.
- Click Continue.
- Click Restart now when prompted. Save your work and close your apps first, as the PC restarts immediately.
If you chose the USB option, leave the USB drive plugged in for the restart. If you chose a PIN, type it when asked.
⚠️ Flag: Admin privileges required
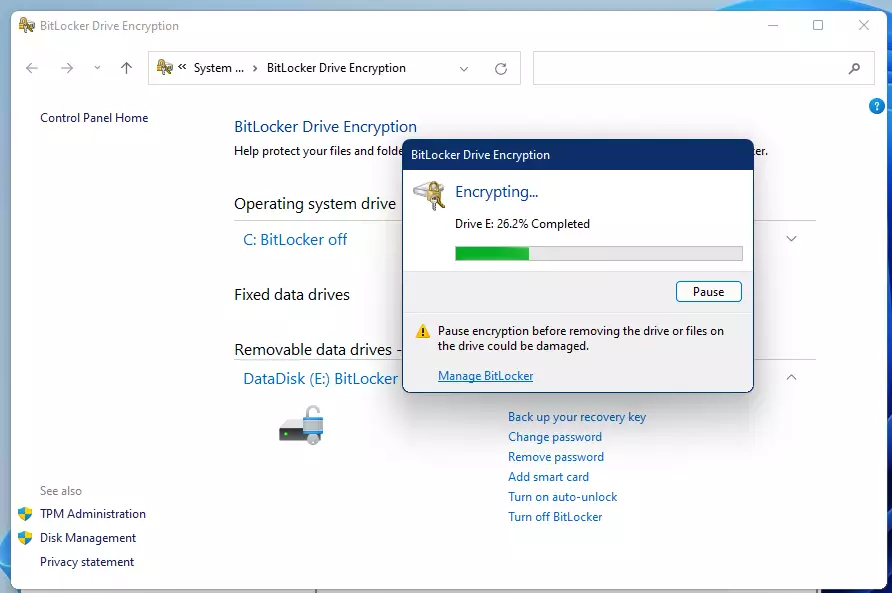
Step 8Encryption Starts
BitLocker encryption for your Windows 11 operating system drive begins after the computer restarts. The time required depends on the size of your drive, the amount of data stored and how fast the drive is. For example, encrypting a 500 GB drive could take over an hour.
You can keep using the PC while it encrypts in the background, though it may feel a little slower. Don't shut it down mid-way if you can avoid it. Leave a laptop plugged in so it doesn't run out of battery.
You can undo this later by turning BitLocker off from the BitLocker settings for the drive. Decryption takes about as long as encryption did.
Step 9Finish
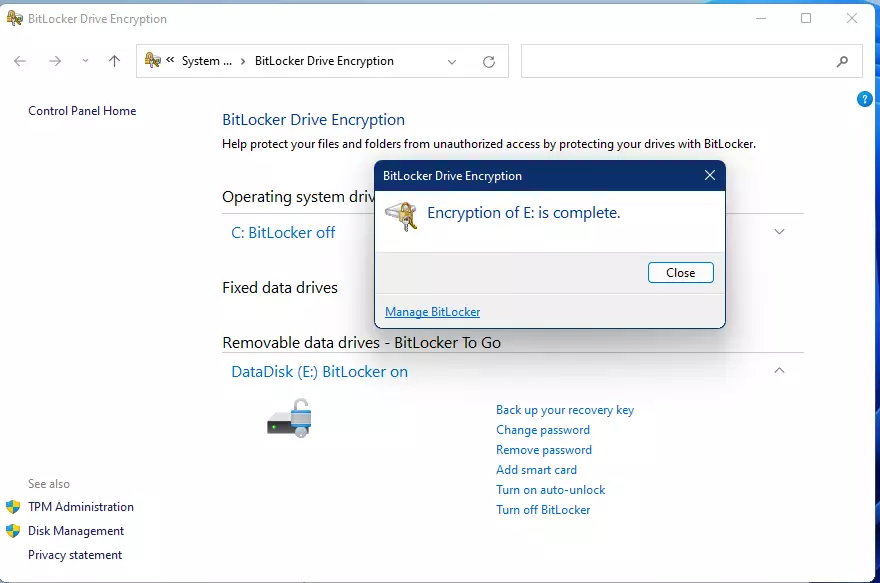
When encryption is done, click Close. The drive icon in File Explorer should now show a lock, which confirms that BitLocker is on.
Summary
- BitLocker protects your files by locking your main drive with encryption
- You need to be an administrator and use Windows 11 Pro, Enterprise, or Education editions
- You can unlock your drive with a PIN, USB key, or automatically with TPM
- Always back up your recovery key safely to avoid losing access to your drive
- Follow these simple steps to turn on BitLocker and keep your data safe
Turning on BitLocker for your Windows 11 operating system drive locks your main drive with encryption, keeping your files safe from unauthorized access. Remember, you need Windows 11 Pro, Enterprise, or Education editions and administrator rights to use it, and you must back up your recovery key. Keep that key in a place other than the encrypted drive, and check that you can find it before you ever need it.
Have a question about this guide?
Answered by AI from this guide. Good questions may be added to this page — please don't include personal details.
Did this guide fix your problem?

About the Author
Richard
Tech Writer, IT Professional
Richard is a writer at Geek Rewind who turns complex IT tasks into clear, step-by-step guides. He draws on years of hands-on experience in system administration and enterprise IT operations, focusing on Windows, Linux and WordPress: the problems people actually run into, and the fixes that work. His server and WordPress guides come from systems he runs himself. Richard builds and maintains the platform behind Geek Rewind, from its Ubuntu servers and Nginx configuration to its custom WordPress plugins. Many new tutorials start with readers' questions, and he's always glad to answer them in the comments.
No comments yet — be the first to share your thoughts!