How to Turn On BitLocker to Protect a Data Drive in Windows 11


BitLocker encrypts the files on a drive so they can’t be read without your password, smart card or recovery key. This guide shows how to turn on BitLocker for a fixed data drive in Windows 11, such as a second internal drive. It also covers the choices the wizard asks you to make along the way.
Open File Explorer , right-click the data drive, select Turn on BitLocker, choose your unlock method (password or smart card), and back up your recovery key to a safe location like your Microsoft account or USB drive. BitLocker then encrypts all new files automatically.
What is BitLocker?
BitLocker in Windows 11 locks your data files so only you can open them, a bit like a secure digital box. When you turn it on for a data drive, any new files you save on that drive are encrypted automatically, which keeps them private if the drive is lost, stolen or removed from the PC.
Why use BitLocker? Your files stay private and secure, even if someone takes the physical drive and plugs it into another computer.
Files you move or copy from the encrypted drive to a drive without BitLocker are not encrypted once they arrive. Keep that in mind when you copy sensitive files to a USB stick or another internal disk.
You choose how the drive is unlocked. Automatic unlocking is available if the main Windows drive is also encrypted. Otherwise you unlock the drive with a password or a smart card.
Before You Start
- You need to be signed in as an Administrator on your PC. [ADMIN REQUIRED]
- BitLocker is only available on Windows 11 Pro, Enterprise, or Education editions. On Windows 11 Home you won’t see Turn on BitLocker for data drives. Home only offers device encryption for the system drive, and only on supported hardware.
- The drive should be a fixed (internal) drive that is already formatted and shows up in File Explorer with a drive letter.
- Have somewhere ready to store the recovery key, such as a USB flash drive, a printer, or your Microsoft account.
Steps to Turn On BitLocker for a Data Drive
Step 1Set Your Preferred Encryption Method (Optional)
This step is optional. You can choose between two encryption types:
- XTS-AES 256 bit – the strongest option
- AES-CBC 128 bit – the older option, which many guides still call the default
If you don’t set this now, BitLocker uses the default method. On current Windows 11 builds the default for fixed drives is XTS-AES 128-bit, while older Windows versions used AES-CBC 128-bit. The encryption strength is normally set through Group Policy, which is available on Pro, Enterprise and Education. Set it before you turn on BitLocker, because changing it later means decrypting the drive and starting again.
Step 2Open File Explorer and Find Your Drive
- Press
Win + Eto open File Explorer . - Click This PC in the left pane. You should see all your drives listed.
- Find the fixed data drive you want to protect, for example drive E:.
- Right-click the drive. In Windows 11 you may need to click Show more options to reach the classic menu.
- Select Turn on BitLocker.
If Turn on BitLocker is missing, check that you are running Pro, Enterprise or Education and that you picked a data drive, not a network location or an optical drive.
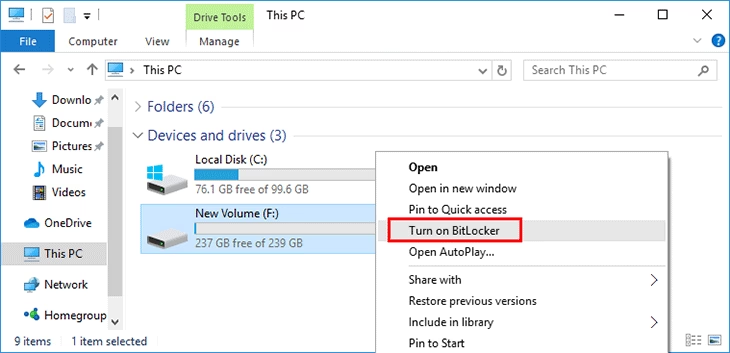
The BitLocker Drive Encryption wizard opens and briefly says it is starting. It then moves on to the screen where you choose how to unlock the drive.
Step 3Choose How to Unlock Your Drive
You have three options:
- Password (must be at least 8 characters)
- Smart card (if you have one)
- Automatically unlock on this PC (only if your main Windows drive is encrypted)
For most home and small-office setups, a password is the simplest choice. Use something long that you can remember but others can’t guess. If you choose the password, type it twice. The wizard won’t continue until both entries match and meet the length requirement.
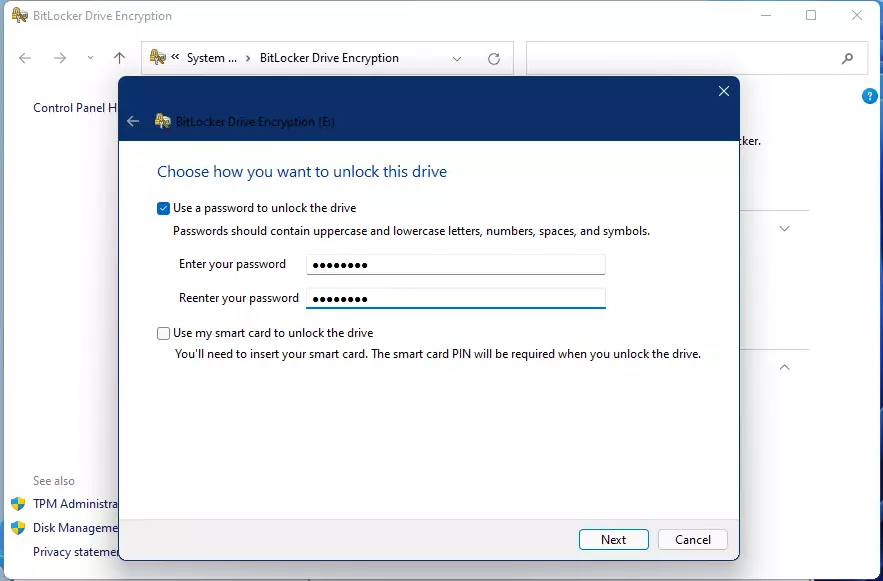
After you have chosen your unlock method and entered the password, click Next to move on to the recovery key.
Step 4Back Up Your BitLocker Recovery Key
Your BitLocker recovery key is essential for unlocking your data drive if you forget your password or Windows has problems. Always keep it safe and separate from your computer. You can save it in any of these ways:
- To your Microsoft account online (if you use one). This option may not appear if you sign in with a local account.
- To a USB flash drive
- As a file on your PC. Windows won’t let you save the file on the drive you are encrypting, so pick a different location.
- Print it on paper
Without the password or the recovery key, nobody, including Microsoft, can get your data back. Saving more than one copy is a good idea.
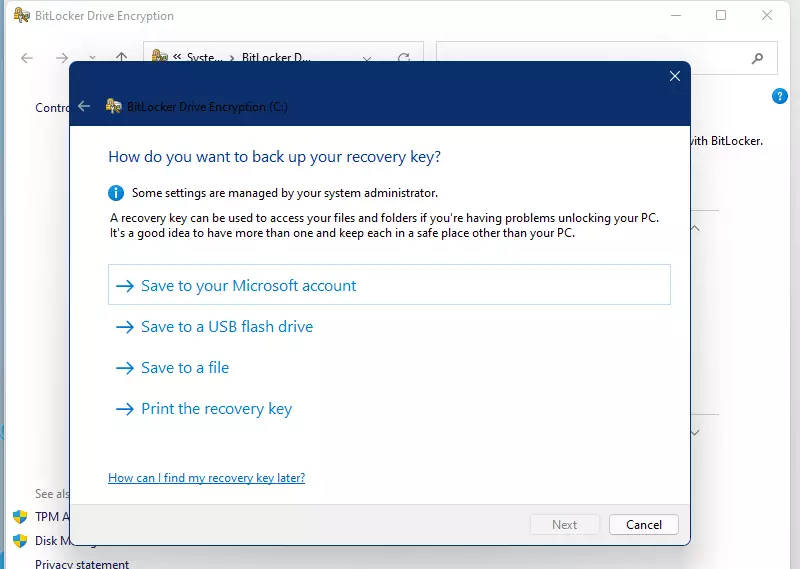
When the wizard confirms the key has been saved, you will be able to continue.
Click Next after backing up your recovery key.
Step 5Choose How Much of the Drive to Encrypt
You have two options:
- Encrypt used disk space only – faster. It encrypts the files already on the drive, and new files are encrypted as you add them. Space that was free earlier is left alone, so data you deleted in the past might still be recoverable. This suits new, empty drives.
- Encrypt entire drive – slower, but it protects everything, including old deleted data (recommended, especially for a drive that has been in use).
Then click Next.
Step 6Pick the Encryption Mode
You have two options:
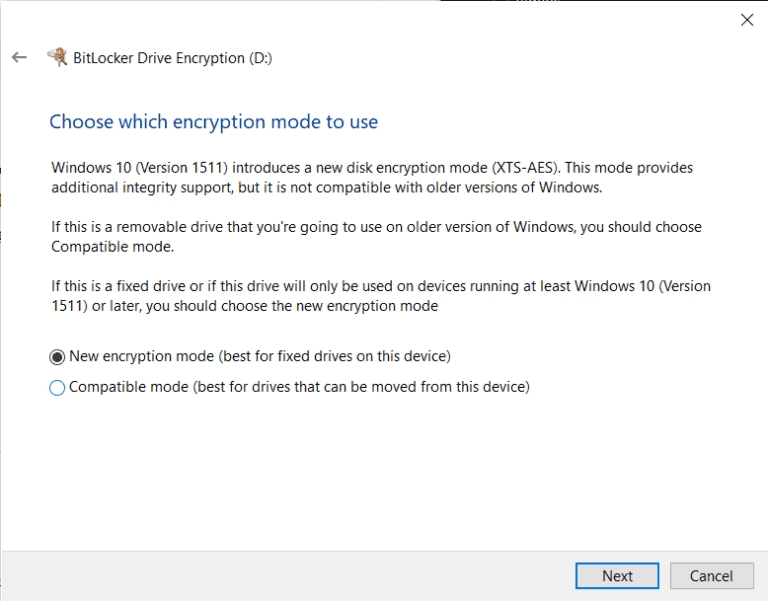
- New encryption mode (XTS-AES 128-bit) – for fixed drives used on Windows 10 or later
- Compatible mode (AES-CBC 128-bit) – for drives that will be used on older Windows versions
If the drive will stay in this PC, or only be used with Windows 10 or Windows 11, pick the new mode. Choose compatible mode only if the drive may be plugged into an older Windows PC. Then click Next.
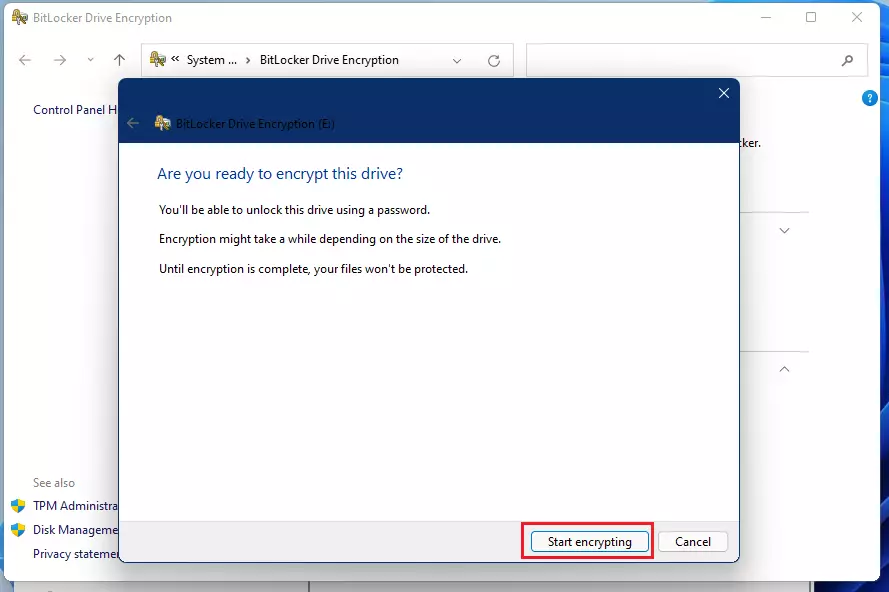
The last screen asks you to confirm. Click Start encrypting to begin.
Step 7Start the Encryption
BitLocker uses the drive’s storage size to estimate how long encryption will take. For instance, encrypting a 1-terabyte drive might take several hours. You can keep using the PC and the drive while it works, though things may feel slower. Leave the PC powered on and plugged in if it is a laptop. If you shut down or restart, encryption pauses and picks up again afterwards.
When encryption finishes, the drive in File Explorer shows a padlock icon. To check the status, change the method, back up the key again or undo the change, right-click the drive and choose Manage BitLocker. From there, turning BitLocker off decrypts the drive, which takes about as long as encrypting it did.
Summary
- Strong Security: BitLocker keeps your data safe from unauthorized access.
- Automatic Protection: New files on the encrypted drive get protected automatically.
- Easy Unlock Options: Use password, smart card, or automatic unlock for convenience.
- Recovery Key Backup: Multiple ways to save your recovery key in case you need it.
- Choose Your Encryption: Pick encryption strength and mode that fits your needs.
- Compatibility: Make sure to select the right mode if you use older Windows versions.
- User Friendly: Simple steps make it easy even if you're new to encryption.
BitLocker in Windows 11 provides strong security to keep your data safe from unauthorized access. It automatically protects new files saved on your encrypted drive. You can unlock the drive with a password or smart card, or let it unlock automatically when your Windows drive is also encrypted. You also have several ways to back up your recovery key, so store at least one copy away from the PC.
If you ever need to undo the change, use Manage BitLocker on the drive and turn BitLocker off. Your files stay in place and are decrypted in the background.
Frequently asked questions
What is BitLocker and how does it work?
BitLocker is a Windows feature that scrambles the files on a drive so nobody can read them without the right unlock method, such as a password, smart card or recovery key. Windows encrypts files as they are saved and decrypts them when you unlock the drive. If someone removes the drive and connects it elsewhere, the data stays unreadable.
What if I skip BitLocker?
If you skip BitLocker, the files on the drive stay unencrypted. Anyone who takes the drive out of your PC and connects it to another computer can open and copy those files. The risk matters most for laptops and for any drive that holds personal or work documents.
Is BitLocker included in 🪟 Windows 11 Home?
No. Full BitLocker, including turning it on for data drives, comes with Windows 11 Pro, Enterprise and Education. Windows 11 Home includes only Device Encryption, which protects the system drive on supported hardware. To encrypt a second drive on Home, you need a different tool or an upgrade to Pro.
Is BitLocker enabled by default?
No, not for data drives. Windows turns on Device Encryption automatically on some PCs that meet its hardware requirements, but that covers only the system drive. Full BitLocker on a second drive stays off until you turn it on yourself from BitLocker Drive Encryption in Control Panel.
Still have a question?
Answered by AI from this guide. Good questions may be added to this page — please don't include personal details.
Did this guide fix your problem?

About the Author
Richard
Tech Writer, IT Professional
Richard is a writer at Geek Rewind who turns complex IT tasks into clear, step-by-step guides. He draws on years of hands-on experience in system administration and enterprise IT operations, focusing on Windows, Linux and WordPress: the problems people actually run into, and the fixes that work. His server and WordPress guides come from systems he runs himself. Richard builds and maintains the platform behind Geek Rewind, from its Ubuntu servers and Nginx configuration to its custom WordPress plugins. Many new tutorials start with readers' questions, and he's always glad to answer them in the comments.
No comments yet — be the first to share your thoughts!