How to Set BitLocker to Unlock Your Windows 11 PC Automatically


BitLocker encryption in Windows 11 protects your personal files by locking your drive. If it was set up with a startup PIN or a USB key, it asks for that every time you start the PC. You can set BitLocker to unlock your PC automatically using the TPM (Trusted Platform Module, a hardware security chip built into your motherboard). The system then boots without extra startup prompts.
This fix works on Windows 11 Pro, Enterprise, and Education, where the full BitLocker Drive Encryption tool is available. You need administrator rights on your PC to change this setting. Windows 11 Home does not include the full BitLocker tool. It has a simpler feature called Device encryption, which unlocks automatically once you sign in with your Microsoft account.
Open Control Panel , go to System and Security, click BitLocker Drive Encryption, select your OS drive, click “Change how drive is unlocked at startup”, choose “Let BitLocker automatically unlock my drive”, then click Finish. Your PC will boot without a PIN or USB key prompt.
Drive types
Operating system drives use your hardware TPM chip automatically at startup. The TPM checks that the boot files have not been changed, then releases the key without asking you for anything. Fixed data drives work differently. They use a stored external key to unlock after Windows boots, so the operating system drive must be unlocked first.
If you are prompted for a PIN or USB key at startup, that is because someone added that protector on top of the TPM. The steps below remove that extra prompt.
Steps to Turn Off USB and PIN Requirements and Enable Auto Unlock
- Open Control Panel : Click the Start button, type Control Panel , and click it from the list. The Control Panel window should open.
Learn more about opening Control Panel .
- In Control Panel , click System and Security, then find and click BitLocker Drive Encryption. If the Control Panel is in Large icons or Small icons view, you can click BitLocker Drive Encryption directly. If you do not see it at all, you are probably on Windows 11 Home. See the note about Device encryption above.
- Control Panel System and Security BitLocker Drive Encryption
- Find your main Windows drive (usually labeled “OS Drive” or “C:”), and click the link that says Change how drive is unlocked at startup. Windows may ask for administrator approval first. Click Yes if it does. Make sure you are working on the Windows drive and not a data drive listed below it.
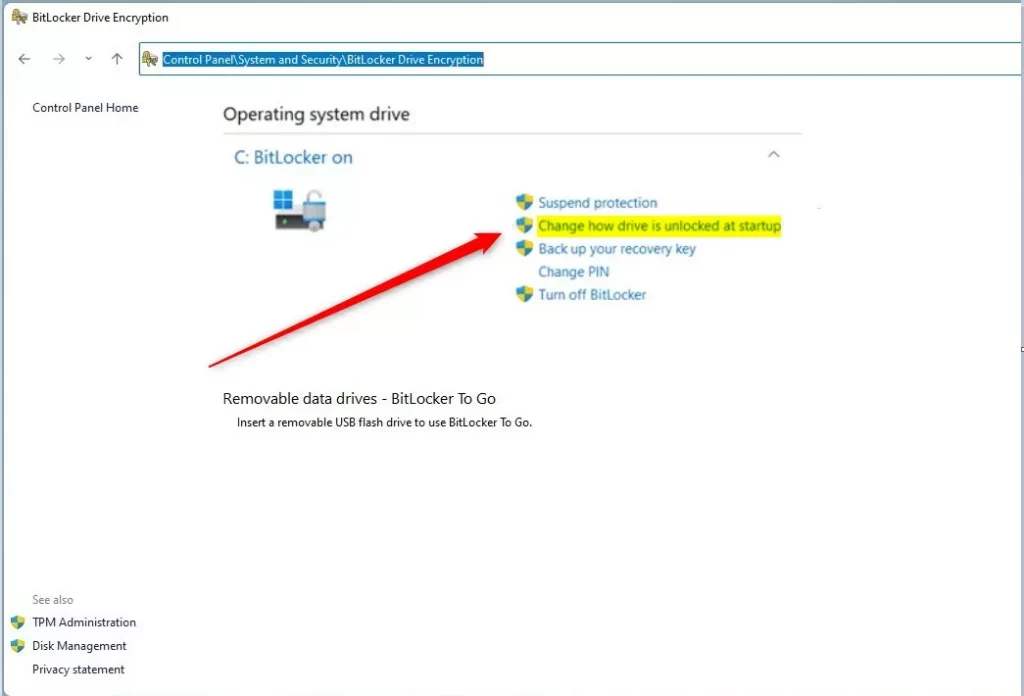 Click “Change how drive is unlocked at startup”
windows 11 change how dirve is unlocked at startup - On the next page, click the option Let BitLocker automatically unlock my drive. This tells BitLocker to rely on the TPM alone instead of asking you for a PIN or USB key.
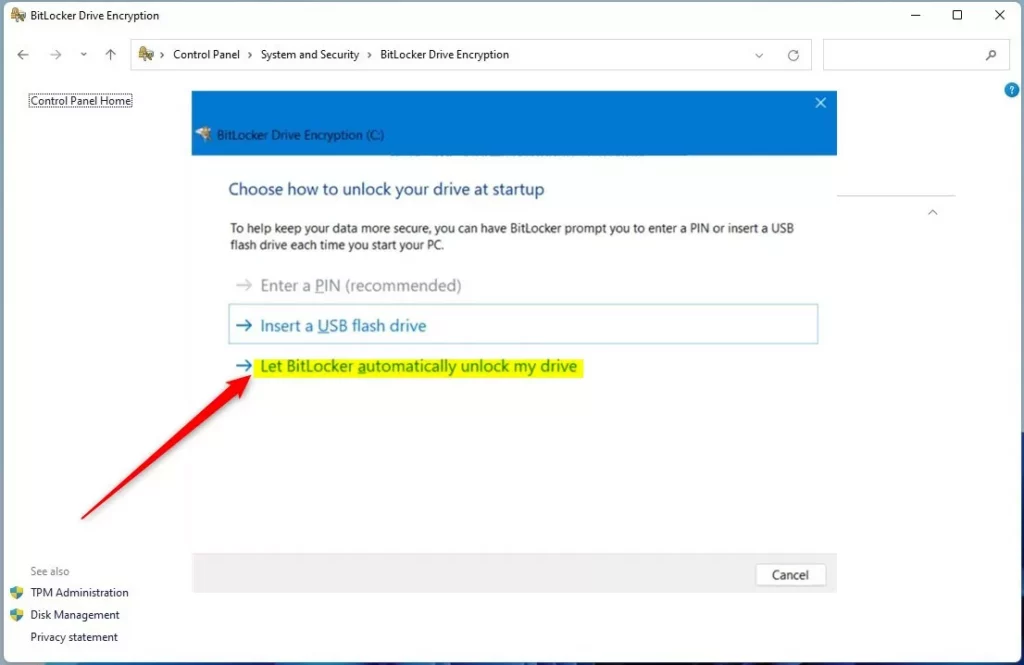
windows 11 let bitlocker automatically unlock my drive link Select “Let BitLocker automatically unlock my drive” - Finally, click Finish to save the changes. Restart the PC to check the result. It should go straight to the sign-in screen without asking for a PIN or key.
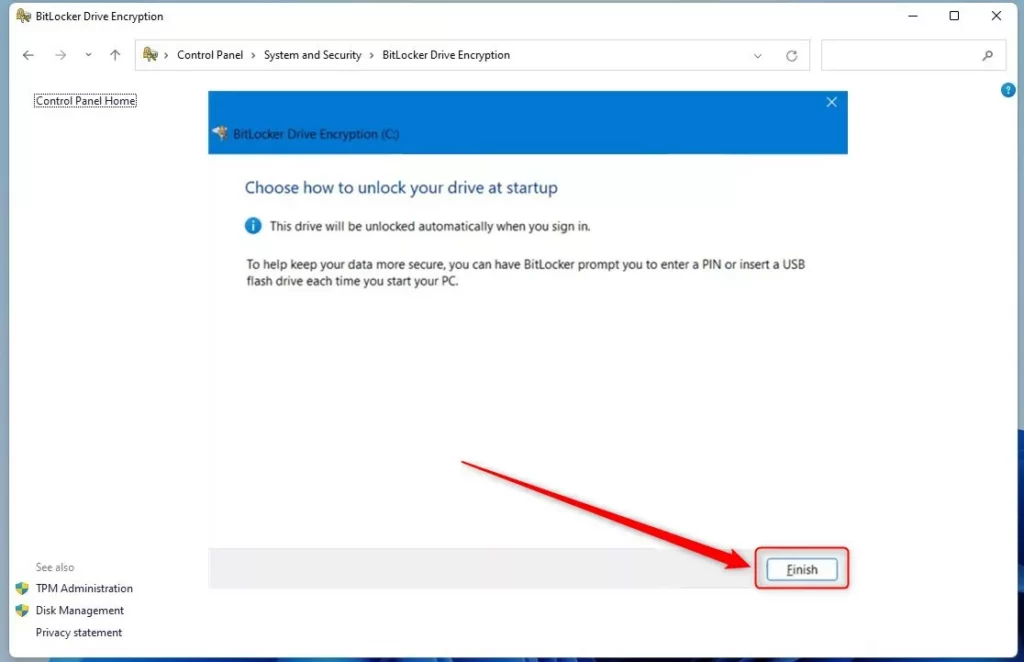
windows 11 let bitlocker automatically unlock my drive finish Click “Finish” to complete setup
BitLocker auto unlock lets your Windows 11 PC start up normally without asking for a password or PIN every time you turn it on. To set this up, open the Control Panel from your Start menu , go to System and Security, and click BitLocker Drive Encryption. From there, use the option that turns off the extra startup keys for your main drive.
If the option is missing or greyed out, check three things. First, confirm you are signed in as an administrator. Second, confirm the PC has a TPM that is turned on. Third, confirm you are not on Windows 11 Home.
If you ever need to turn off this feature, open PowerShell as an administrator and run Manage-bde -protectors -disable C: to require your password or PIN again at startup. Run it from an elevated window, or it will be refused. Keep a copy of your BitLocker recovery key somewhere safe, because you may need it if the TPM ever detects a change to your system.
Using PowerShell
If you prefer the command line, open PowerShell as an administrator and type Manage-bde -protectors -enable C: to turn on automatic unlocking using commands. Press Enter and read the output to confirm the command ran without an error. The result is the same as the Control Panel steps above.
Why Use BitLocker Auto Unlock?
- It keeps your files safe by encrypting your drive, even if the drive is removed from the PC.
- Using TPM means your PC checks that it hasn’t been tampered with before unlocking.
- Auto unlock makes starting your computer fast and easy without extra steps.
- You can still add extra security if you want, like requiring a PIN or USB key. This is a sensible choice for laptops that travel.
BitLocker auto unlock gives you the strong file protection of full drive encryption while saving you from typing a long password every time you boot your computer. Your PC uses a secure chip called a Trusted Platform Module (TPM) to check that your system is safe before unlocking the drive behind the scenes.
The trade-off is that anyone who can start the PC reaches the Windows sign-in screen, so a strong account password still matters.
That’s it! Your Windows 11 PC will now unlock safely and automatically at startup using BitLocker and TPM.

No comments yet — be the first to share your thoughts!