How to Suspend and Resume BitLocker in Windows 11

Suspending BitLocker in Windows 11 temporarily turns off drive encryption.
BitLocker is a Windows feature that scrambles your data to keep it safe. You can encrypt your main drive, other internal drives, or USB drives.
You might want to suspend BitLocker before changing computer parts, like a hard drive. It also helps if you need to let someone access a drive quickly without waiting a long time for it to decrypt. Fully decrypting a large drive can take many hours.
This process allows you to perform maintenance or grant temporary access without long waits. Windows 11 makes it simple to turn this protection back on when you’re done.
Navigate to Control Panel, then BitLocker Drive Encryption, and click “Suspend protection” or “Resume protection” for your desired drive. Alternatively, use PowerShell commands like manage-bde -protectors -disable C: to suspend or manage-bde -protectors -enable C: to resume.
Why Suspend BitLocker?
You can temporarily turn off BitLocker protection when making hardware changes or upgrading Windows. This temporary measure protects your data, so ensure you turn BitLocker back on after finishing these tasks.
What Happens When You Suspend BitLocker?
When you suspend BitLocker drive encryption, your drive stays unprotected until you turn BitLocker protection back on. For your main Windows drive, certain actions automatically turn BitLocker protection back on. For other drives, BitLocker protection remains suspended until you manually resume it, even after restarting your computer.
How to Suspend or Resume BitLocker in Windows
Method 1Using Control Panel
- Open open the Control Panel and go to System and Security → BitLocker Drive Encryption.
- Look for the drive you want to suspend under “Operating system drive.”
- Click the “Suspend protection” link next to that drive.
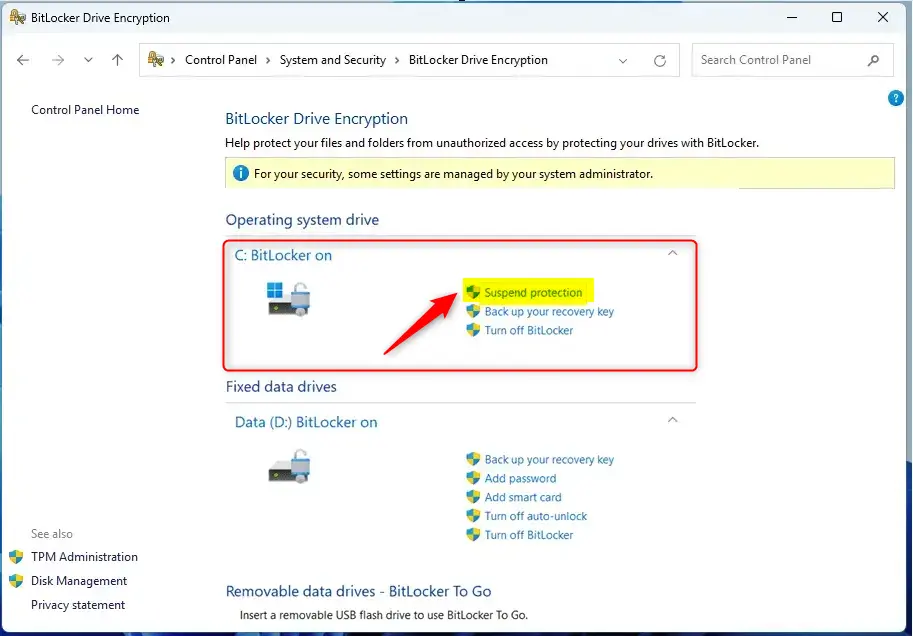
- A pop-up window will appear. Click Yes to confirm.
You can suspend BitLocker protection for your drives using the Control Panel. First, open the Control Panel and navigate to System and Security, then select BitLocker Drive Encryption. Locate the drive you wish to suspend and click the ‘Suspend protection’ link next to it.
BitLocker protection for other drives remains suspended even after a restart. You’ll need to manually turn protection back on to secure your data.
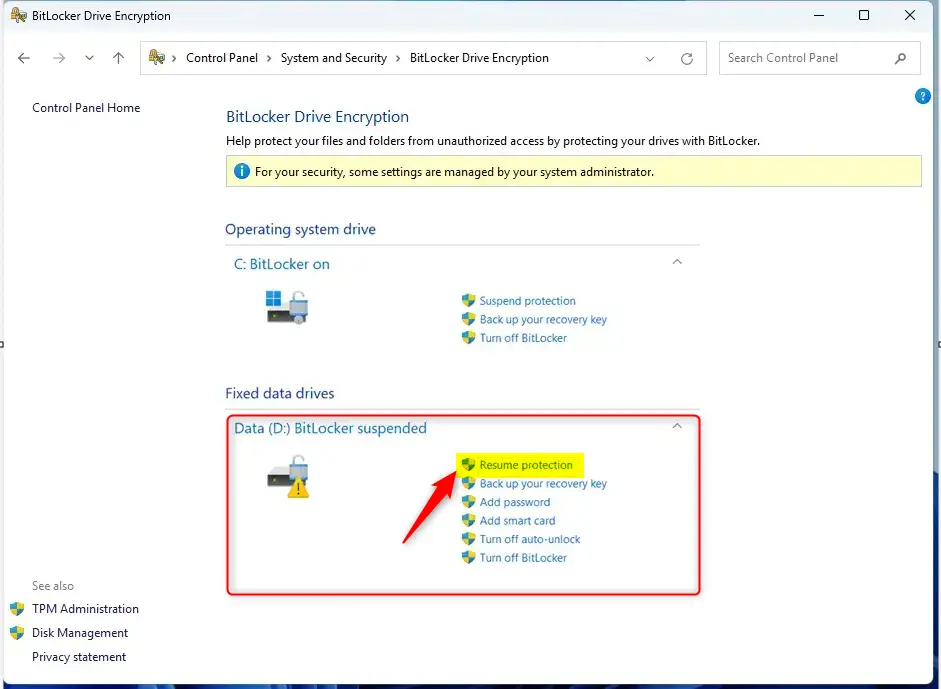
How to Resume BitLocker Using Control Panel
- Follow the same steps: Control Panel → System and Security → BitLocker Drive Encryption.
- Click “Resume protection” for the drive you want to protect again.
Method 2Using File Explorer
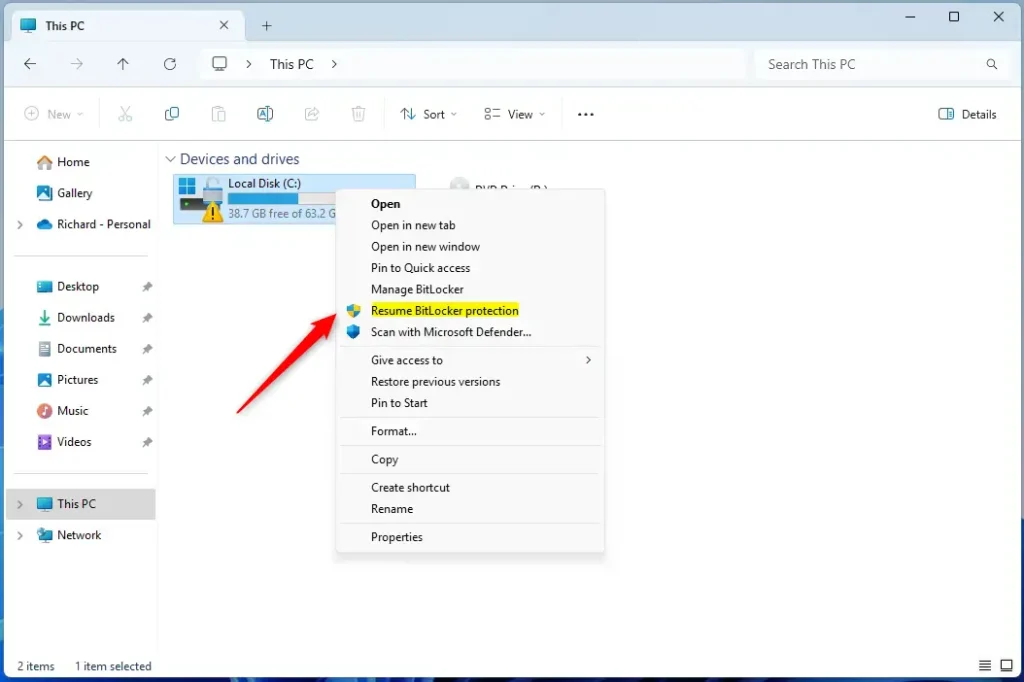
- Open File Explorer.
- Right-click on the drive you want to resume.
- Select “Show more options.”
- Click “Resume BitLocker protection” from the menu.
How to Suspend or Resume BitLocker Using PowerShell
You can also use Windows PowerShell to control BitLocker. Note: You’ll need administrator privileges to use these commands.
- Open Windows Terminal as administrator and select the PowerShell tab.
Suspend BitLocker for One Drive
Enter this command, replacing [drive_letter] with your actual drive letter:
manage-bde -protectors -disable <drive letter>:Example:
manage-bde -protectors -disable C:Resume BitLocker for One Drive
Enter this command:
manage-bde -protectors -enable C:Suspend BitLocker for All Drives
Enter this command:
Get-BitLockerVolume | Suspend-BitLockerResume BitLocker for All Drives
Enter this command:
Get-BitLockerVolume | Resume-BitLockerSuspend BitLocker for Your Main Drive with Restart Limits
If you need to suspend BitLocker on your main drive, such as your C: drive, for more than one restart, you can control when protection turns back on. Use the command ‘Suspend-BitLocker -MountPoint “C:” -RebootCount ‘ in PowerShell, replacing `
Suspend-BitLocker -MountPoint "C:" -RebootCount <restarts #>Replace `
Example:
Suspend-BitLocker -MountPoint "C:" -RebootCount 0Summary
BitLocker is a Windows feature that protects your drive data. You can temporarily suspend BitLocker protection, for instance, when changing hardware or installing Windows updates. Suspending BitLocker removes drive protection until you manually turn BitLocker protection back on or until it automatically re-enables, which happens after a restart.
Suspending BitLocker Drive Encryption is particularly useful when you need to temporarily disable disk protection for hardware changes or Windows upgrades. For example, you might need to suspend BitLocker before installing new RAM or upgrading your operating system to version 23H2.
What happens when suspended? Your drive has no protection until you turn BitLocker back on. For your main drive, some actions turn it back on automatically. For other drives, you must manually resume it.
You can control BitLocker suspension using three methods: the Control Panel, File Explorer, or PowerShell commands. PowerShell commands, which require administrator access, offer a powerful way to manage BitLocker for advanced users.
Important reminder: Always resume BitLocker protection as soon as you’re done with whatever required you to suspend it. This keeps your data secure.
Is suspending BitLocker the same as turning it off?
Decrypt completely removes BitLocker protection and fully decrypts the drive. Suspending keeps your data encrypted, but it uses a ‘clear key’ to encrypt the BitLocker volume master key.
Was this guide helpful?

About the Author
Richard
Tech Writer, IT Professional
Richard, a writer for Geek Rewind, is a tech enthusiast who loves breaking down complex IT topics into simple, easy-to-understand ideas. With years of hands-on experience in system administration and enterprise IT operations, he’s developed a knack for offering practical tips and solutions. Richard aims to make technology more accessible and actionable. He's deeply committed to the Geek Rewind community, always ready to answer questions and engage in discussions.


No comments yet — be the first to share your thoughts!