How to Change BitLocker Encryption in Windows 11

BitLocker encryption in Windows 11 controls how your PC locks your drives so that a thief cannot read your files. BitLocker is the built-in Windows tool that scrambles the data on a drive. Nobody can read that data without your password or recovery key.
You can change the default cipher to a stronger one, such as XTS-AES-256. This works for your main system drive, for other internal drives, and for portable USB drives. One point to know before you start: the cipher is chosen when a drive is encrypted. Changing the setting does not re-encrypt drives that are already protected. The Group Policy and Registry methods below both cover this.
Open the Group Policy Editor, navigate to Computer Configuration Administrative Templates Windows Components BitLocker Drive Encryption, double-click “Choose drive encryption method and cipher strength”, select Enabled, and choose your cipher from the dropdown menu. The setting applies only to drives you encrypt afterward; already-encrypted drives keep their old cipher.
What is BitLocker?
BitLocker is a built-in Windows security tool that scrambles the data on your drives so no one can read it without your password or recovery key. If your computer is lost or stolen, your personal files stay protected. It covers internal system drives and external USB sticks.
BitLocker has two parts you will see in this guide. One is the encryption method, which is the algorithm that scrambles the data. The other is the cipher strength, which is the key size, 128-bit or 256-bit. Both are set when a drive is first encrypted.
Turning on BitLocker for your main drive often means Windows unlocks it automatically at startup. This uses a Trusted Platform Module (TPM), a security chip on the motherboard. Because the TPM holds the key and releases it only when the boot files are unchanged, you do not have to type a password at every boot. Learn more about TPM here.
The TPM does not change which cipher is used. The cipher is a separate setting, which the rest of this guide covers.
Why Change the Encryption Method?
By default, Windows 11 encrypts new drives with XTS-AES 128-bit. Switching to XTS-AES 256-bit gives you a stronger standard. A brute-force attack, which tries every possible key, has far more keys to work through with a 256-bit key.
The 128-bit default is still considered secure, so this change is optional. It makes sense if your organization requires 256-bit, or if you simply want the larger margin. Encryption and decryption may be slightly slower on older hardware.
If a removable drive must be readable on a PC running a version of Windows older than Windows 10 version 1511, pick AES-CBC instead of XTS-AES for that drive type. Those older versions cannot read XTS-AES drives.
How to Change BitLocker Encryption Using Group Policy
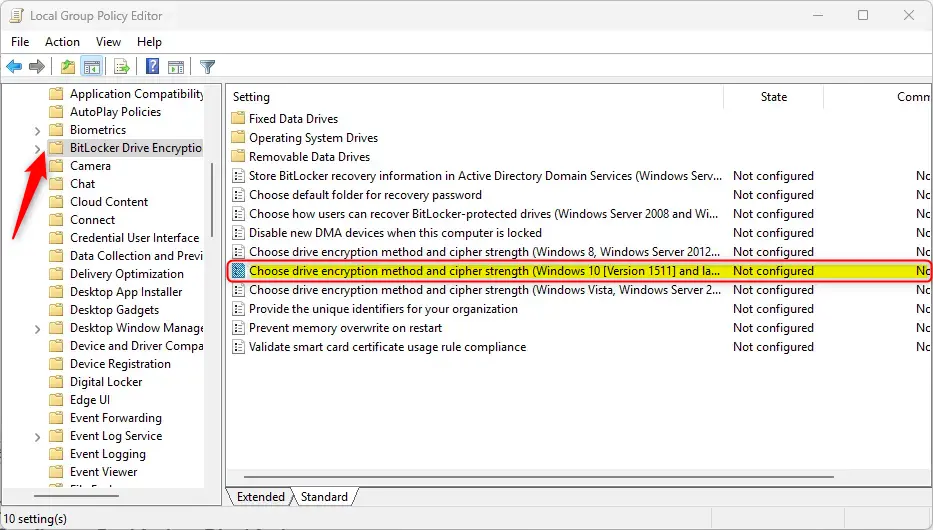
You can change the BitLocker encryption method with the Local Group Policy Editor. It is available in Windows 11 Pro, Enterprise, and Education. It is not included in Windows 11 Home, so Home users should use the Registry Editor method further down. The policy sets the cipher strength and algorithm for each drive type before you turn encryption on. That way your drives meet your security requirements from the start.
A drive that is already encrypted keeps its old cipher. To change such a drive, turn BitLocker off for it, wait for decryption to finish, and turn BitLocker on again. Before you do that, make sure you have a copy of the recovery key and a backup of any important files.
- Open the Group Policy Editor: click the Start button, type
Edit group policy, and press Enter. ⚠️ Admin privileges required If a User Account Control prompt appears, approve it. The Local Group Policy Editor window should open, with a folder tree on the left. - In the left pane, follow this path:
Computer Configuration → Administrative Templates → Windows Components → BitLocker Drive EncryptionExpand each folder by double-clicking it or clicking the arrow beside it. When you select the last folder, a list of BitLocker policies appears on the right. - On the right side, find and double-click "Choose drive encryption method and cipher strength (Windows 10 Version 1511 and later)". A settings window opens. Its state is Not Configured until you change it.
- In the window that opens:
- Select Enabled. The drop-down menus in the Options area become active.
- Now you can choose the encryption method and strength for:
- Operating system drives (the drive Windows is installed on)
- Fixed data drives (other internal drives)
- Removable data drives (USB sticks and external drives)
- Pick the desired encryption type from the drop-down menus. For stronger encryption, pick a 256-bit option, such as XTS-AES 256-bit. For removable drives that older Windows PCs must read, pick an AES-CBC option instead.
- Click OK to save. The window closes, and the policy now shows as Enabled in the list.
- Restart your computer to apply the changes. After the restart, any drive you encrypt will use the method you chose. To undo the change, open the same policy and select Not Configured.
How to Change BitLocker Encryption Using Registry Editor
You will create or edit three registry values that set the cipher strength for each drive type. A wrong edit in the registry can cause problems, so follow the steps carefully. Before you start, export a backup: in Registry Editor, choose File Export and save the file somewhere safe.
As with Group Policy, the values affect only drives you encrypt afterward. A drive that is already encrypted must be decrypted and encrypted again to pick up the new cipher.
- Open the Registry Editor: click Start, type
regedit, and press Enter. ⚠️ Admin privileges required - If prompted, click Yes to allow changes. The Registry Editor window opens.
- Go to this folder path:
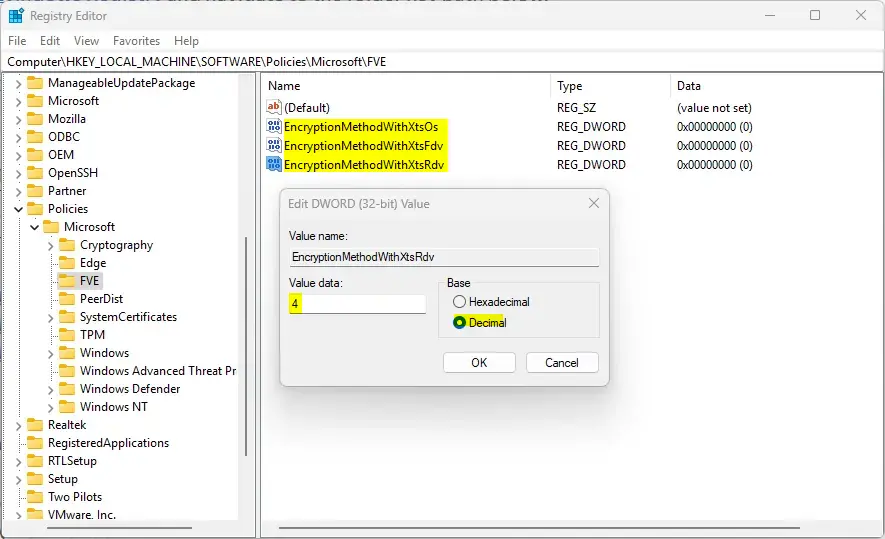
HKEY_LOCAL_MACHINE\SOFTWARE\Policies\Microsoft\FVEYou can paste the path into the address bar at the top of the window, or expand the folders in the left pane one by one. If the last folder in the path does not exist, right-click the folder above it, choose New Key, and give the new key the name that ends the path. - Look for these three entries on the right side:
- EncryptionMethodWithXtsOs (operating system drives)
- EncryptionMethodWithXtsFdv (fixed data drives)
- EncryptionMethodWithXtsRdv (removable data drives)
- If you don't see them, right-click an empty space in the right pane and choose New DWORD (32-bit) Value. Type one of the three names exactly as written above, then press Enter. Repeat until all three exist. Spelling and capitalization matter.
- Double-click each entry. In the box that opens, enter the value that matches the cipher you want:
- 4 for AES-CBC 256-bit encryption
- 7 for XTS-AES 256-bit encryption
- Click OK for each, then close the Registry Editor. Each entry should now show the number you entered in the Data column.
- Restart your PC to apply changes. After the restart, drives you encrypt will use the cipher you set.
Reset to Default Encryption
To go back to the default XTS-AES 128-bit configuration, delete the custom registry values. Open the Registry Editor as an administrator and go to the same key you used earlier. Then right-click each value below, choose Delete, and click Yes to confirm:
- EncryptionMethodWithXtsOs
- EncryptionMethodWithXtsFdv
- EncryptionMethodWithXtsRdv
Restart the computer to apply the deletion. If you used the Group Policy method instead, set the policy back to Not Configured and restart. Reverting affects only drives you encrypt from then on. Drives already encrypted with a 256-bit cipher keep it until you decrypt them and turn BitLocker on again.
Summary
Changing the disk encryption settings with these administrative tools makes your drives harder to break into if your PC is lost or stolen. Keep your recovery keys backed up, and re-encrypt existing drives if you want them to use the new cipher.
Have a question about this guide?
Answered by AI from this guide. Good questions may be added to this page — please don't include personal details.
Did this guide fix your problem?

About the Author
Richard
Tech Writer, IT Professional
Richard is a writer at Geek Rewind who turns complex IT tasks into clear, step-by-step guides. He draws on years of hands-on experience in system administration and enterprise IT operations, focusing on Windows, Linux and WordPress: the problems people actually run into, and the fixes that work. His server and WordPress guides come from systems he runs himself. Richard builds and maintains the platform behind Geek Rewind, from its Ubuntu servers and Nginx configuration to its custom WordPress plugins. Many new tutorials start with readers' questions, and he's always glad to answer them in the comments.
No comments yet — be the first to share your thoughts!