How to Change BitLocker Encryption in Windows 11

Changing BitLocker encryption in Windows 11 can boost your data security, especially when upgrading from the default XTS-AES 128-bit to the stronger XTS-AES 256-bit encryption.
BitLocker is a Windows security tool that locks down entire drives so only you and authorized people can access your files. It protects your information if your computer is lost or stolen.
You can use BitLocker for your main Windows drive, other internal drives, and even USB drives. Windows 11 usually uses XTS-AES 128-bit encryption, but switching to XTS-AES 256-bit offers a much higher level of protection for important data.
Change BitLocker encryption by opening Local Group Policy Editor and navigating to Computer Configuration > Administrative Templates > Windows Components > BitLocker Drive Encryption. Double-click “Choose drive encryption method and cipher strength” to select your desired algorithm and key strength, then restart your computer.
Why Change Your BitLocker Settings?
A stronger encryption code makes your data much harder for others to crack. If you work with very sensitive information, using 256-bit encryption gives you extra protection.
What Happens When You Change These Settings?
When you change these settings, your files remain protected with the new, stronger encryption. Any new files you create will immediately use the updated settings. Keep in mind that your computer might need to restart for these changes to take effect.
Method 1Use Group Policy Editor
You can change your BitLocker encryption in Windows 11 using the Group Policy Editor to manage how your drives are protected. For most people, this tool offers a safer way to adjust drive security settings and keep your data secure.
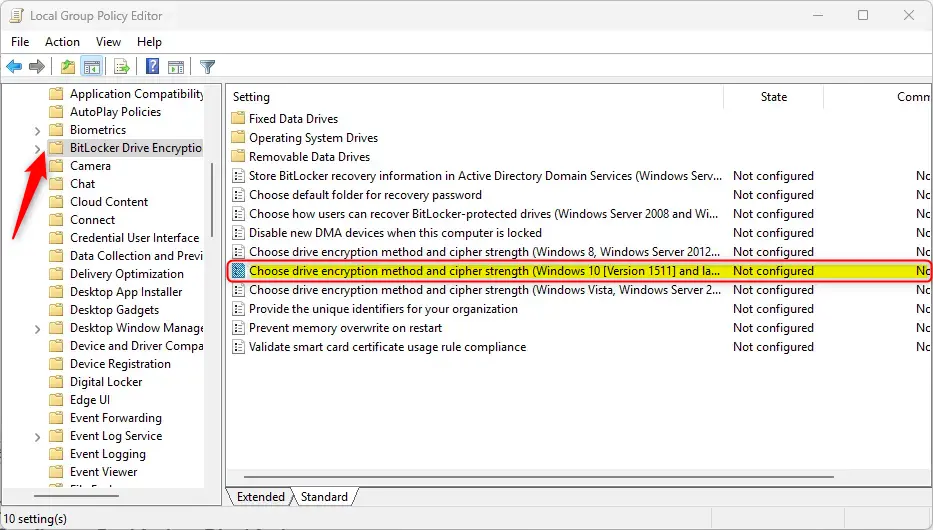
- Open the Local Group Policy Editor. Search for “Edit group policy” on your Start menu.
- Follow these folders in order:
- Computer Configuration
- Administrative Templates
- Windows Components
- BitLocker Drive Encryption
- On the right side, find “Choose drive encryption method and cipher strength (Windows 10 (Version 1511) and later)”. Double-click it.
- A window opens. You have three choices:
- Not Configured (this is the default) – BitLocker uses its standard settings
- Enabled – you pick the encryption type yourself
- Disabled – BitLocker uses AES with 128-bit or 256-bit strength
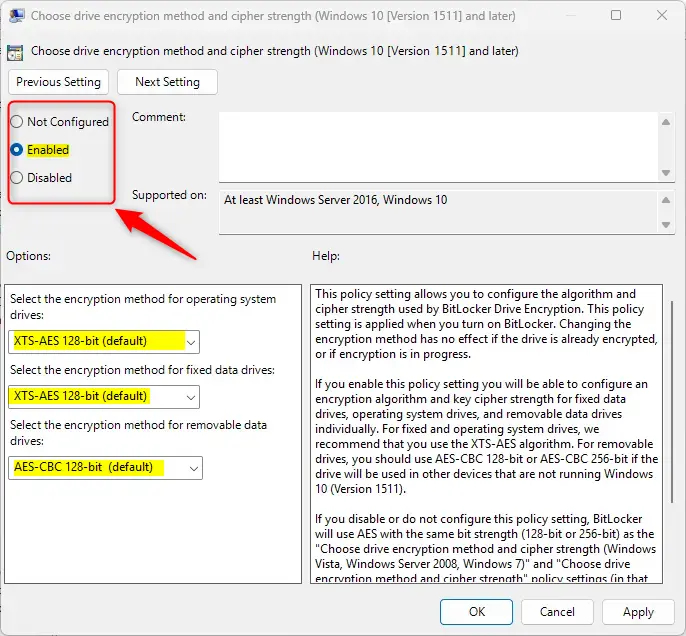
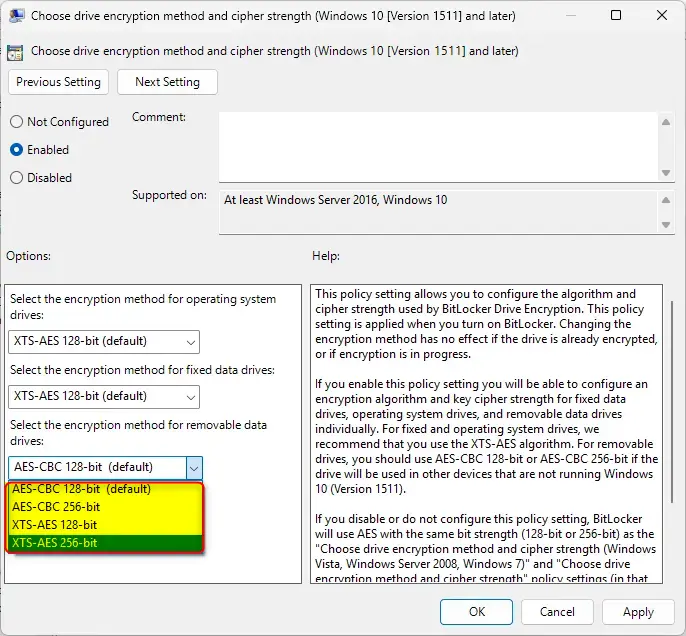
- If you pick Enabled, use the dropdown menu under Options. Choose your encryption method for:
- Operating system drives (your main drive)
- Fixed data drives (regular storage)
- Removable data drives (USB sticks)
- Click OK to save. You may need to restart your computer.
Method 2Use Registry Editor
For those comfortable with advanced computer changes, altering BitLocker encryption in Windows 11 can be done using the Registry Editor. This method involves changing Windows’ core settings. It’s important to be careful and follow instructions precisely to avoid system issues.
- Open the Windows Registry Editor. Search for “regedit” on your Start menu.
- Find this path in the left panel:
HKEY_LOCAL_MACHINE\SOFTWARE\Policies\Microsoft\FVE - Look at the right side. You should see three items with these names:
EncryptionMethodWithXtsOsEncryptionMethodWithXtsFdvEncryptionMethodWithXtsRdv
- Double-click each one and change its value:
- Enter
4to useAES-CBC 256-bitencryption - Enter
7to useXTS-AES 256-bitencryption
- Enter
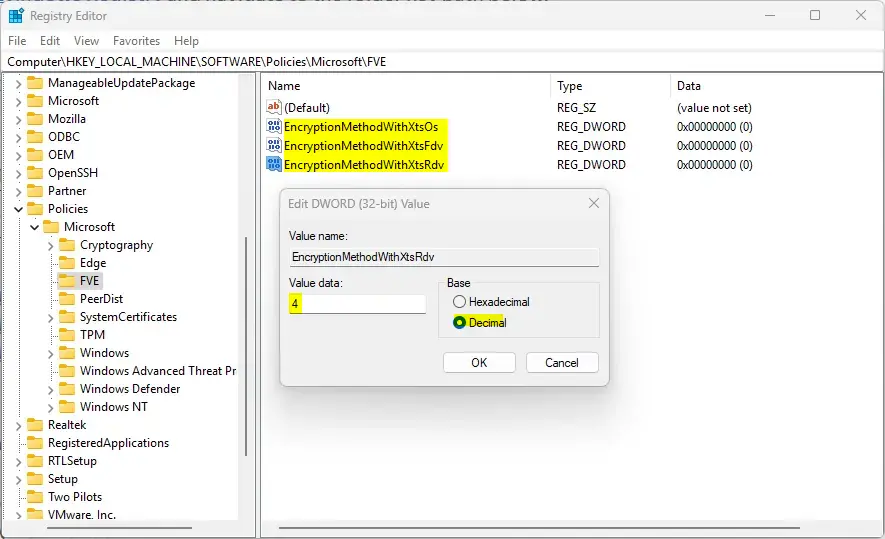
- Don’t see these items? Right-click a blank area on the right side. Pick “New” and then “DWORD (32-bit) Value”. Create all three items if they’re missing, then enter the values above.
- To go back to the default
XTS-AES 128-bitencryption, delete all three items you created or changed. - Save your changes and restart your computer.
Summary
Changing your BitLocker encryption in Windows 11 is an important step to keep your data safe. You have two main ways to do this: the easier Group Policy Editor, which is safer for most people, or the more advanced Registry Editor, which requires more technical comfort and admin access.
There are two ways to change this:
- Group Policy Editor – easier and safer for most people
- Registry Editor – more advanced, requires admin access
Stronger encryption takes a bit more computer power but keeps your data much safer.
Was this guide helpful?

About the Author
Richard
Tech Writer, IT Professional
Richard, a writer for Geek Rewind, is a tech enthusiast who loves breaking down complex IT topics into simple, easy-to-understand ideas. With years of hands-on experience in system administration and enterprise IT operations, he’s developed a knack for offering practical tips and solutions. Richard aims to make technology more accessible and actionable. He's deeply committed to the Geek Rewind community, always ready to answer questions and engage in discussions.


No comments yet — be the first to share your thoughts!