How to Choose BitLocker Encryption Type on Windows 11 Drives
Choosing the right BitLocker encryption type on Windows 11 drives protects your data.
BitLocker is a Windows tool that scrambles your drive’s contents, stopping people without permission from seeing your files if your computer is lost or stolen.
When you set up BitLocker on a Windows 11 drive, you’ll see two main choices: “Used space only” or “Full drive encryption.” “Used space only” encrypts just the files you’re using now. This is faster but could let deleted old files be recovered.
“Full drive encryption” encrypts everything on the drive, offering the strongest security. This method ensures all parts of the drive are scrambled.
You choose between “Used space only” and “Full drive encryption” when setting up BitLocker. “Full drive encryption” encrypts all sectors for maximum security, while “Used space only” encrypts only existing data for faster setup.
What is BitLocker?
BitLocker is a built-in Windows tool that protects your files by scrambling them, making them unreadable to anyone without the correct password or key. You can use BitLocker on your main Windows drive, other internal drives, or external drives like USB sticks to keep your information secure.
- External drives like USB sticks
- Fixed drives inside your computer
- Your main Windows system drive
When you use BitLocker on your main Windows drive, it can unlock automatically when your computer starts. This is made possible by a specialized security chip called the Trusted Platform Module (TPM).
Encryption Types for Fixed Drives
For fixed drives inside your computer, BitLocker offers two main encryption types to protect your data. You can choose full encryption, which scrambles everything on the drive and is the most secure option but takes longer, or you can choose to encrypt only the space on the drive that is currently being used by your files.
- Full Encryption: Encrypts the entire drive — even empty space. This takes longer but is the safest choice.
- Used Space Only Encryption: Encrypts only the space where your files are stored. This is faster but less complete.
How to Make Windows Always Use One Encryption Type
You can set Windows 11 to automatically use your preferred BitLocker encryption type for any new drives you add, so you don’t have to choose it every time. This setting ensures Windows consistently applies full disk encryption from the start, giving you reliable data protection without extra steps.
When you set the BitLocker automatic encryption preference, Windows 11 automatically picks a full disk encryption type for your drive without prompting. This default choice ensures data protection from the start.
If you want Windows to always pick one encryption type, you can set a rule using Windows tools. Here are two ways to do it.
Method 1Using Local Group Policy Editor
- Press the Start button and type
Edit group policy, then open the Local Group Policy Editor. - In the window that opens, go to this folder:
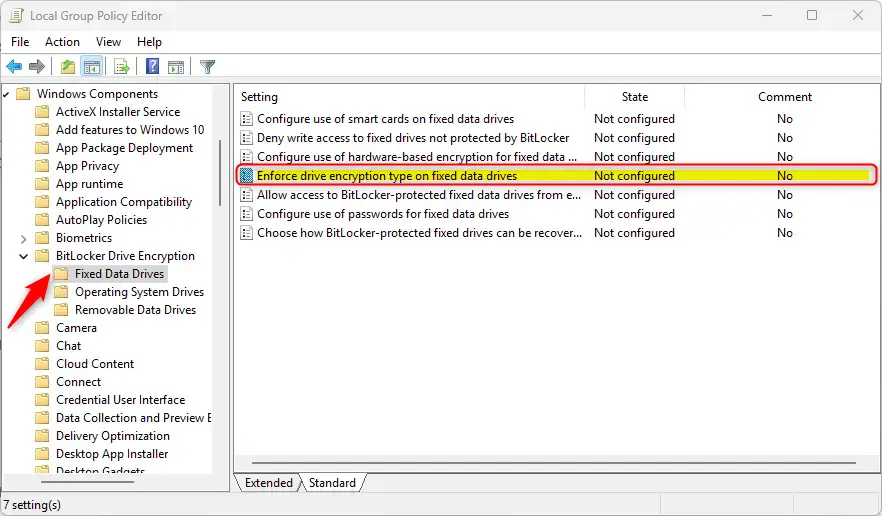
Computer Configuration > Administrative Templates > Windows Components > BitLocker Drive Encryption > Fixed Data Drives - Find
Enforce drive encryption type on fixed data driveson the right and double-click it. - Choose one of these options:
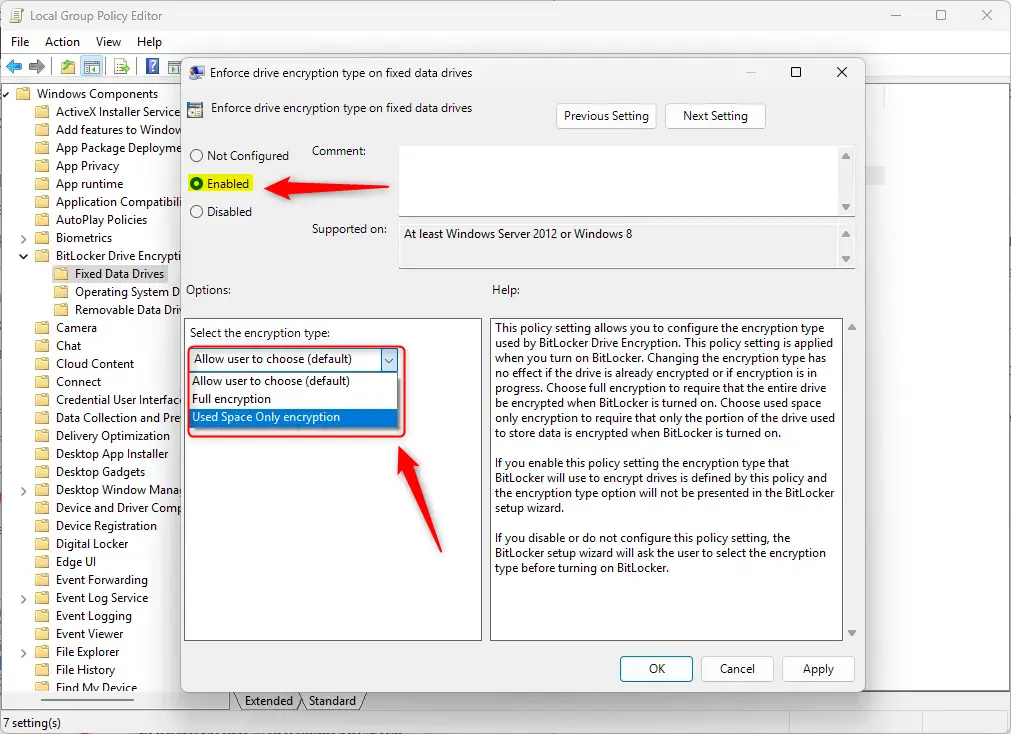
Not Configured(default): Windows will ask you every time which encryption type to use.Enabled: You pick the encryption type below, and Windows will use it automatically without asking.Disabled: Same as Not Configured — Windows asks you each time.
- If you selected
Enabled, choose either:- Full encryption
- Used space only encryption
- Click
OKto save. - Restart your computer to apply the changes.
To set your preferred BitLocker encryption type using the Local Group Policy Editor, first press the Start button and type ‘Edit group policy,’ then open the tool. In the window that appears, navigate to Computer Configuration > Administrative Templates > Windows Components > BitLocker Drive Encryption > Fixed Data Drives.
And here are the options you can pick:
Method 2Using Windows Registry Editor
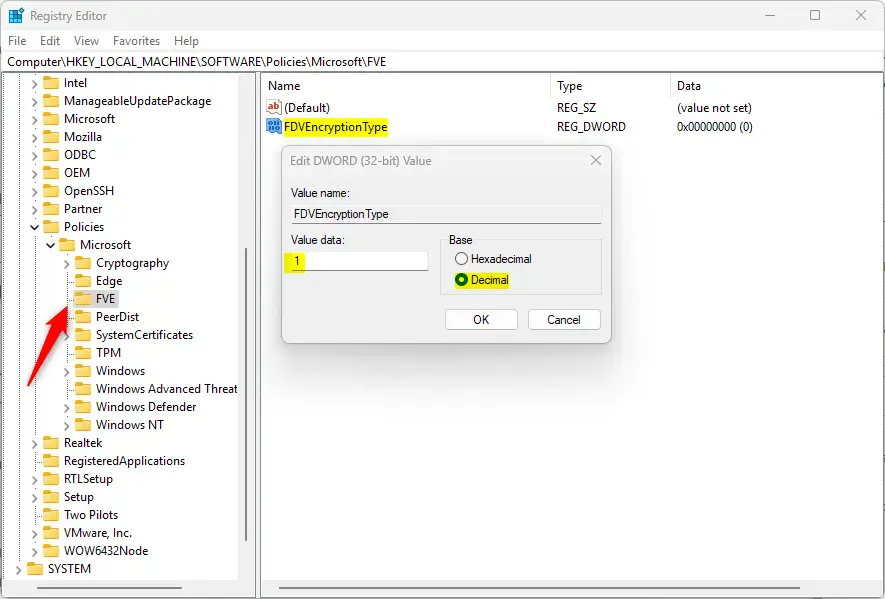
Setting a default BitLocker encryption type can be done by carefully editing the Windows Registry. Open the Registry Editor by searching for ‘regedit’ in the Start menu and choosing ‘Run as administrator.’ Then, go to the 🗝️HKEY_LOCAL_MACHINE\SOFTWARE\Policies\Microsoft\FVE folder. Be cautious, as incorrect changes can damage your system.
- Open the Windows Registry Editor as administrator. Search for
regeditin Start, then right-click and chooseRun as administrator. ⚠️ Requires admin privileges - Go to this folder in the Registry Editor:
HKEY_LOCAL_MACHINE\SOFTWARE\Policies\Microsoft\FVE - Look for a value named
FDVEncryptionTypein the right pane. - If it’s not there, right-click on the right side, pick
New > DWORD (32-bit) Value, and name itFDVEncryptionType. - Double-click
FDVEncryptionTypeand set its value to:1for Full encryption2for Used space only encryption
- Click
OKand close the Registry Editor. - Restart your computer to apply changes.
If you want to go back to letting Windows ask which encryption type to use, delete the FDVEncryptionType value from the registry.
Summary
- BitLocker protects your drives by encrypting them so only authorized users can access your data.
- You can choose how BitLocker encrypts fixed drives: full drive or used space only.
- Using the Group Policy Editor or Registry Editor, you can force Windows to always use one encryption type without asking.
- Remember to restart your computer after making these changes.
BitLocker is a Windows feature that secures your drives by encrypting them, ensuring only authorized people can access your data. You can choose between full drive encryption or encrypting only used space for fixed drives. Using the Group Policy or Registry Editor, you can set Windows to always use your preferred encryption type automatically.
How do I select the encryption type in BitLocker?
Open the Start Menu and search for Edit group policy to open the program. Navigate to Computer Configuration > Administrative Templates > Windows Components > BitLocker Drive Encryption. Double-click Choose drive encryption method and cipher strength (Windows 10 [Version 1511] and later).
Was this guide helpful?

About the Author
Richard
Tech Writer, IT Professional
Richard, a writer for Geek Rewind, is a tech enthusiast who loves breaking down complex IT topics into simple, easy-to-understand ideas. With years of hands-on experience in system administration and enterprise IT operations, he’s developed a knack for offering practical tips and solutions. Richard aims to make technology more accessible and actionable. He's deeply committed to the Geek Rewind community, always ready to answer questions and engage in discussions.


No comments yet — be the first to share your thoughts!