How to Enforce BitLocker Encryption Types on Windows 11 Drives


BitLocker encryption type enforcement on Windows 11 forces every fixed data drive to use one encryption method: Full encryption or Used Space Only. BitLocker is the built-in tool that locks a drive so nobody can read the files without the password or recovery key. When you enforce the type, the setup wizard stops asking the user to choose.
The easiest way to set this is the Local Group Policy Editor, which is in Windows 11 Pro, Enterprise and Education. It stops people from picking a weaker or slower option on secondary drives, and it keeps the setting the same on every PC you manage. Windows 11 Home has no Group Policy Editor, so Home users need the registry method further down.
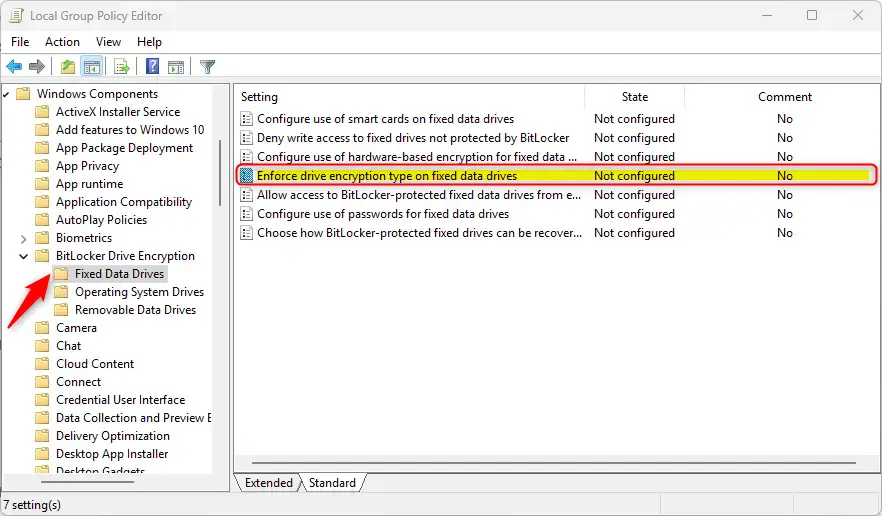
Enforce BitLocker encryption types by opening the Local Group Policy Editor and navigating to Computer Configuration Administrative Templates Windows Components BitLocker Drive Encryption Fixed Data Drives, then double-clicking “Enforce drive encryption type on fixed data drives.” Select “Enabled” and choose your preferred encryption method.
Enforce Drive Encryption Type on Fixed Data Drives
The steps below set the encryption type for fixed data drives, meaning internal secondary drives and other drives that are not removable. They do not cover the operating system drive or USB drives, which have their own policies.
Method 1Using Local Group Policy Editor
The Local Group Policy Editor lets you enforce BitLocker encryption types on Windows 11 drives and control security standards for the whole computer. Press the Win, type edit group policy, and press Enter to open it. Then go to Computer Configuration Administrative Templates Windows Components BitLocker Drive Encryption to find the encryption settings.
The policy only applies when BitLocker is turned on for a drive. A drive that is already encrypted keeps the type it was encrypted with. To change it, you have to decrypt the drive and encrypt it again.
What happens: BitLocker automatically applies your chosen configuration and hides these options from the setup screens.
- Open the Local Group Policy Editor. Search for Edit group policy in the Start menu and select the result. Changing encryption settings for every user on the PC needs administrator rights, so sign in with an admin account first. You should see the Local Group Policy Editor window with a folder tree on the left.
- In the left pane, open these folders in order:
- Computer Configuration
- Administrative Templates
- Windows Components
- BitLocker Drive Encryption
- Fixed Data Drives
- Select Fixed Data Drives. In the right pane, double-click Enforce drive encryption type on fixed data drives. A settings window with the policy name in its title bar opens.
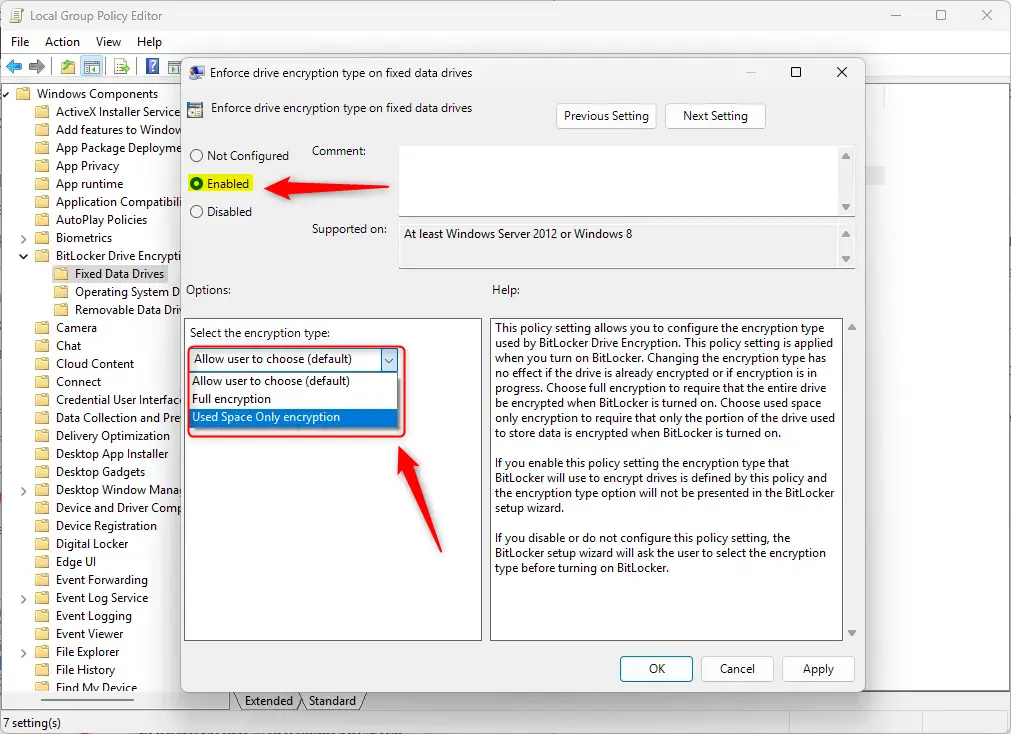
- Choose one of the three settings:
- Not Configured: This is the default. It works the same as Disabled.
- Enabled: BitLocker will use the type you pick. Users won't be asked to choose. In the options box, select Full encryption to encrypt the whole drive, or Used Space Only encryption to encrypt only the part of the drive that holds data. Used Space Only is faster to set up. Full encryption also covers free space, where traces of deleted files may remain, so it is the safer choice for drives that held data before.
- Disabled: The setup wizard will ask users to pick their own type.
- Click OK, then restart your computer so the policy is applied everywhere. ⚠️ Admin privileges required.
To undo the change later, open the same policy, set it back to Not Configured, click OK, and restart.
Method 2Using Windows Registry Editor
The Windows Registry Editor lets you enforce BitLocker encryption types when the Group Policy tool is not available, as on Windows 11 Home. Press the Windows key, type regedit, and press Enter to open it. A wrong edit in the registry can make Windows unstable, so back up first. In Registry Editor, choose File Export, select All under Export range, give the file a name, and save it somewhere safe. To restore it later, double-click the saved file.
BitLocker reads this registry entry every time drive encryption initializes, so the encryption type you set stays in force across the operating system. As with the policy method, it only affects drives you encrypt after the change. Drives that are already encrypted are left alone.
- Open the Start menu, type
regedit, and choose Run as administrator. Click Yes if the User Account Control prompt appears. ⚠️ Admin privileges required.
- Navigate to this registry path:
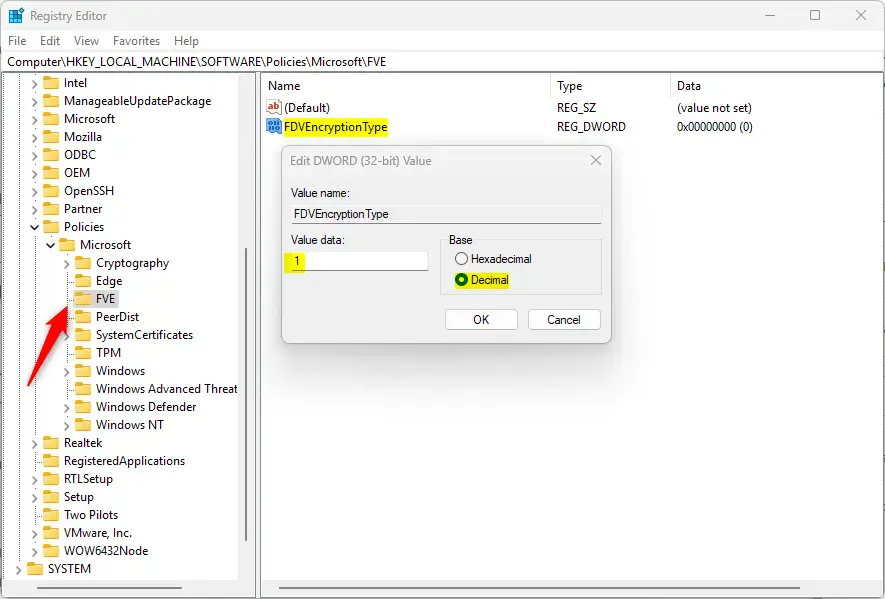
Computer\HKEY_LOCAL_MACHINE\SOFTWARE\Policies\Microsoft\FVE. If a key along the path is missing, right-click its parent key, select New Key, and name it to match the path.
- Look for a value named
FDVEncryptionTypein the right pane. If you don't see it, right-click an empty space, select New DWORD (32-bit) Value, and name itFDVEncryptionType. The new value appears in the list.
- Double-click the value and enter this number in the Value data box:
1for full encryption.2for used space-only encryption.
- Click OK, close Registry Editor, and restart your computer. ⚠️ Admin privileges required.
After the restart, turn on BitLocker for a fixed data drive. The wizard should no longer ask which encryption type to use.
How to Remove the Encryption Type Setting
To give users their choice back after using the registry method, open Registry Editor as an administrator, go to the same path, delete the FDVEncryptionType item you created, and restart the computer. If you used Group Policy instead, set the policy back to Not Configured. Drives that were already encrypted while the rule was active keep their encryption type.
Summary
Enforcing a BitLocker encryption type on Windows 11 drives keeps data protection consistent and removes a choice from the setup wizard. Use the Local Group Policy Editor on Pro, Enterprise or Education. On Home, use the Registry Editor. Either way, the setting applies only to drives you encrypt after the change, so decrypt and re-encrypt any existing drive that needs a different type.
Was this guide helpful?

About the Author
Richard
Tech Writer, IT Professional
Richard is a writer at Geek Rewind who turns complex IT tasks into clear, step-by-step guides. He draws on years of hands-on experience in system administration and enterprise IT operations, focusing on Windows, Linux and WordPress: the problems people actually run into, and the fixes that work. His server and WordPress guides come from systems he runs himself. Richard builds and maintains the platform behind Geek Rewind, from its Ubuntu servers and Nginx configuration to its custom WordPress plugins. Many new tutorials start with readers' questions, and he's always glad to answer them in the comments.



No comments yet — be the first to share your thoughts!