How to Change the Date Format in Windows 11


The date format in Windows 11 controls how days, months and years appear on the taskbar , in File Explorer and in most apps. You can switch between regional layouts, for example from the United States Month/Day/Year to the Day/Month/Year order used in many other countries.
A custom format also helps with sorting. A year-first format like YYYY-MM-DD makes files sort in true date order when you sort by name, and it removes the guesswork about whether 03/04 means March or April.
This guide covers four methods: Settings, Control Panel , Registry Editor and PowerShell. They all change the same underlying values, so use whichever you are comfortable with. The Settings app is the safest choice, and the other three are for layouts it does not offer.
To change the date format in Windows 11, open Settings , go to Time & language Language & region, expand Regional format and click Change formats. Pick a new option from the Short date dropdown and it applies immediately to the taskbar clock and File Explorer . For a custom layout such as yyyy-MM-dd, use Control Panel ’s Region Additional settings Date tab.
Method 1Changing Date Format in Settings (The Simple Way)
The Settings app is the quickest way to change the date format. It only offers a list of presets, but that is enough for most people. The change applies to your user account only, not to other accounts on the PC.
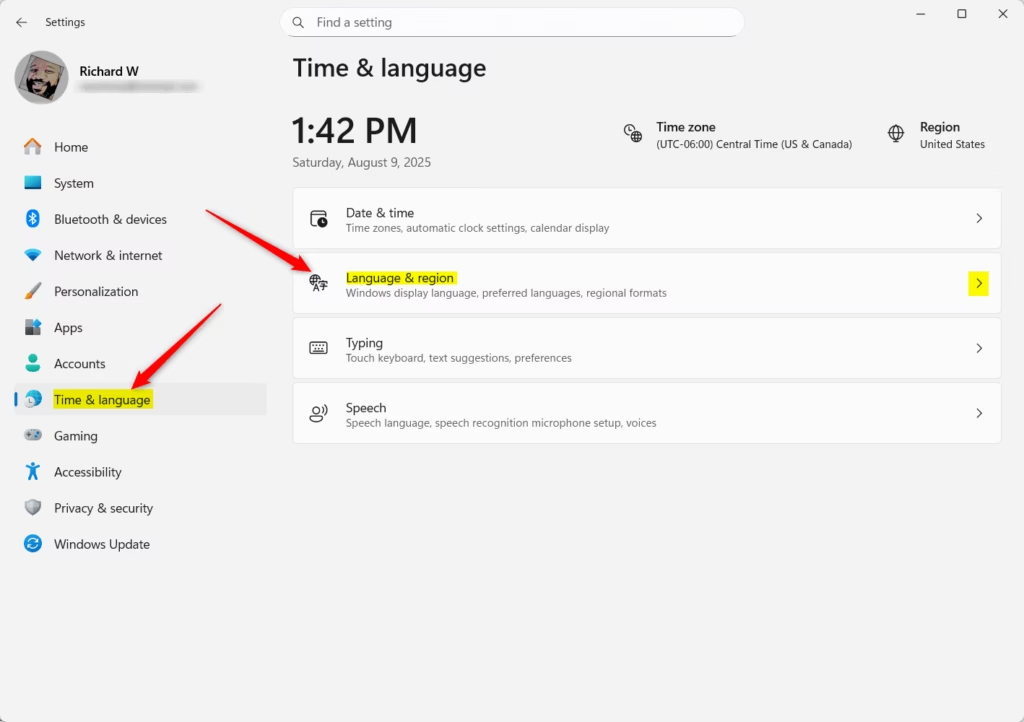
- Press Win+I to open Settings . You can also click Start and then the Settings gear icon. The Settings window opens with a list of categories on the left.
- Click Time & language on the left side.
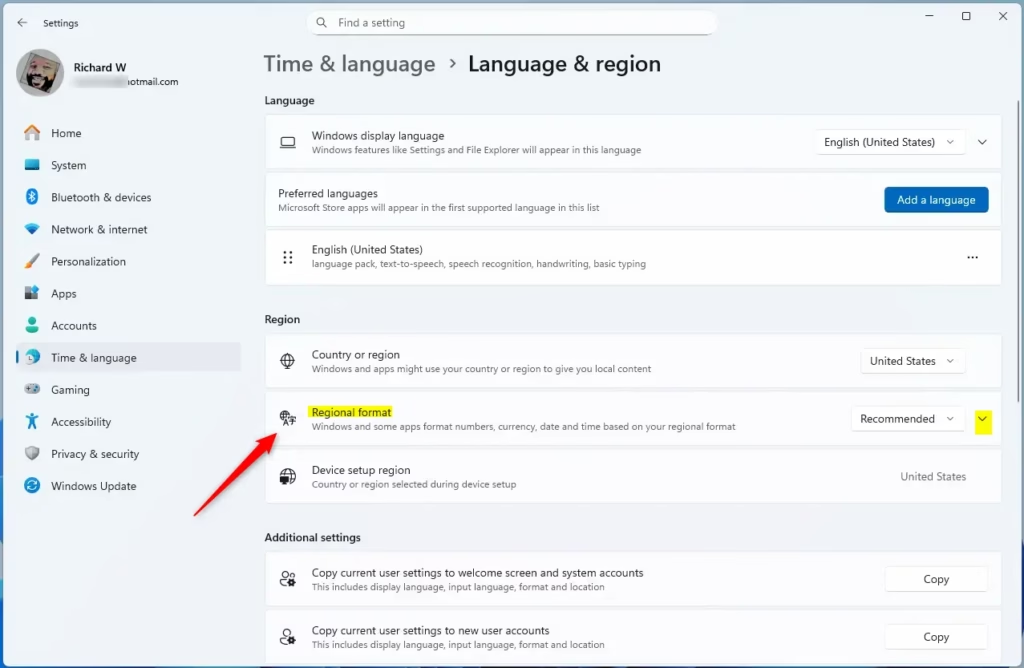
- Click Language & region. Find the Regional format row near the top of the page.
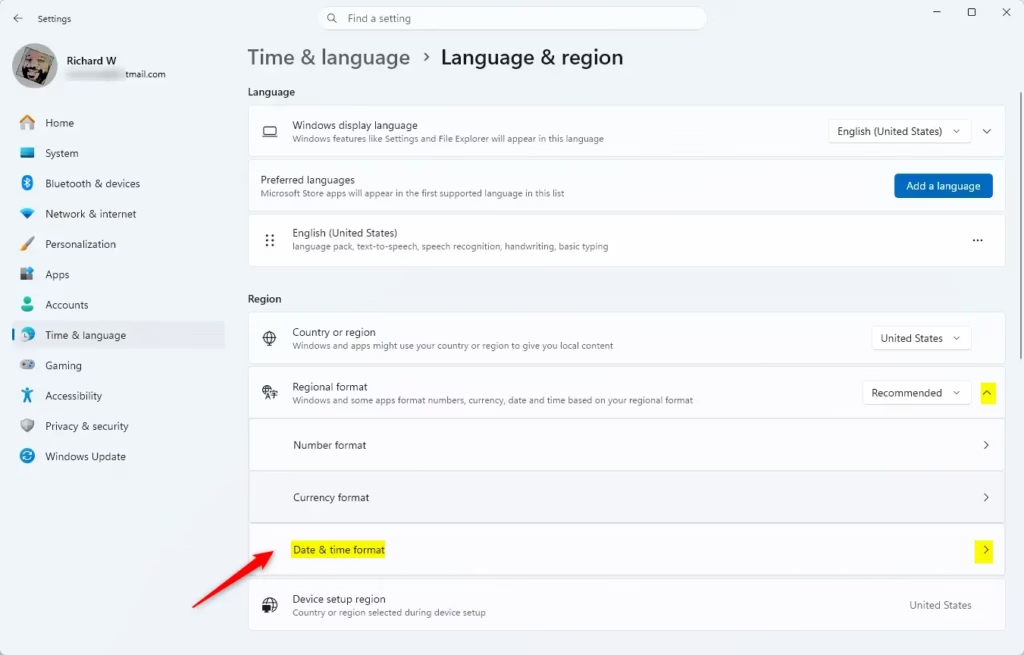
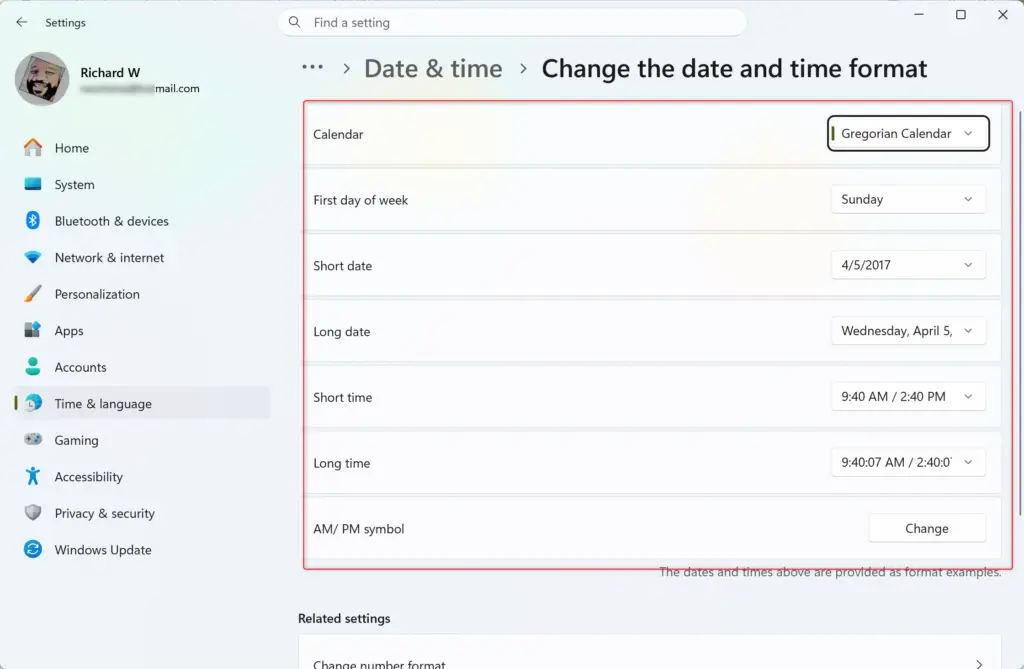
- Click the Regional format row to expand it, then click the Change formats button. On current Windows 11 builds, the button sits inside the expanded row. A page opens listing Calendar, First day of week, Short date, Long date, Short time and Long time.
- Open the Short date dropdown and pick a format. Each entry in the list shows a live example, so you can see the result before you choose it.
- Open the Long date dropdown and pick a format the same way.
The short date is the one you see most often. It appears on the taskbar clock and in the Date modified column in File Explorer . The default for US English is M/D/YYYY. The long date is spelled out, with the weekday and month name, and shows up in places like the taskbar calendar flyout and some apps.
- Check the date on the taskbar . Windows applies the change right away, so the clock should already show the new format. Apps that were open when you made the change may need to be closed and reopened before they pick it up.
To undo the change, go back to the same page and select your old format. If the preset you want is not in the list, use one of the methods below.

Method 2Using Control Panel for More Choices
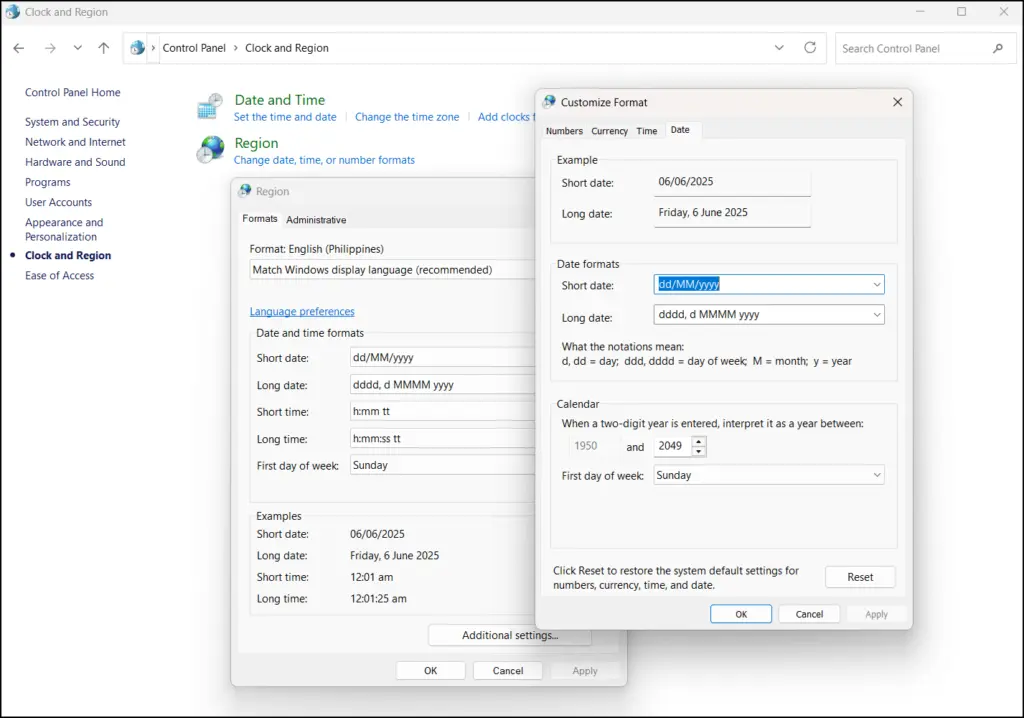
Control Panel is the method to use when the Settings presets do not offer the layout you need. Here you can type your own short and long date patterns using letter codes. This works on both Home and Pro editions.
- Click Start, type Control Panel and select it from the search results.
- Click Clock and Region, then click Region. The Region window opens on the Formats tab.
- Click the Additional settings... button at the bottom of the window. A new window called Customize Format opens.
- Click the Date tab. You will see boxes for Short date and Long date. Each has a dropdown of presets, and you can also type your own pattern into the box.💡TipYou can use these codes:
- d for the day, and dd for a two-digit day
- M for the month, and MM for a two-digit month
- yyyy for the full year
For example, dd/MM/yyyy shows the date as 26/10/2023. Case matters. An uppercase M means month, while a lowercase m means minutes, so a pattern with the wrong case gives odd results. The Customize Format window shows a preview of today's date, so check it before you save.
- Click Apply, then OK. You may need to click OK again in the Region window to close everything. The taskbar clock should update straight away.
To undo your changes, go back to Additional settings... and click the Reset button. This restores the defaults for your current regional format.
Method 3Editing the Registry Editor (For Advanced Users)
Registry Editor lets you change the date format directly by editing text values. It does the same job as the Control Panel method, with more room for mistakes, so use it only if you have a reason to. A typical reason is that you are checking or fixing a value another tool set.
Changing values here without understanding their purpose can make your system unstable. Before you start, you can back up the key. Right-click the key in the left pane, choose Export, and save the .reg file somewhere safe. Double-clicking that file later restores the old values.
- Press Windows key + R to open the Run box. Type
regeditand press Enter or click OK. If a User Account Control prompt appears, click Yes. Registry Editor opens. - Click the address bar at the top of the Registry Editor window, paste this path and press Enter:
HKEY_CURRENT_USER\Control Panel\InternationalThis takes you to the settings for international formats. The values appear in the right pane. - Find the values you want to change in the right pane. They are listed as string values (type REG_SZ). These are the two for dates:
sShortDate: This controls your short date format.sLongDate: This controls your long date format.
To change a value:
- Double-click the value name, such as
sShortDate. An Edit String box opens. - In the Value data box, type your preferred format using the codes from the Control Panel method (d, dd, M, MM, yyyy). For example, to set the short date to Year-Month-Day, type
yyyy-MM-dd. - Click OK. The new text appears in the Data column.
Tip: The same location also holds the time formats (
sTimeFormat,sTimeFormat), the AM/PM symbols (sAMDesignator,sPMDesignator) and the first day of the week (iFirstDayOfWeek). Take the same care if you edit those. - Close the Registry Editor window when you are done.
- Restart your computer. Windows reads these values at sign-in, so some apps will keep the old format until you restart. In some cases, signing out and back in is enough, but a restart is the safest option.
To undo the change, double-click the same value again and enter the old data, or import the .reg file you exported.
Method 4Using PowerShell for Command-Line Control
PowerShell lets you change the date format from the command line. That is useful if you want to script the change or apply it the same way on several computers. For a single PC, the earlier methods are usually faster.
- Click Start, type PowerShell, right-click Windows PowerShell and choose Run as administrator. Click Yes on the User Account Control prompt. A blue PowerShell window opens.
- Check your current formats. Type this command and press Enter:
Get-Culture | Select-Object -ExpandProperty DateTimeFormatThe output shows the current settings for the short and long dates. Make a note of them in case you want to go back. - Set a custom short date format. You can do this with the
Set-Culturecommand. For example, to set the short date to the ISO 8601 standard (yyyy-MM-dd), run this:Set-Culture -CultureInfo en-GBReplaceyyyy-MM-ddwith your preferred format codes. The codes are the same ones used in Control Panel, including the case rules.Tip: You can change the
sLongDatevalue in a similar way. - Log off or restart. Some changes made with PowerShell will not show up in every program until you sign out and back in, or restart the computer. If the taskbar clock still shows the old format afterwards, restart Windows.
To undo the change, run the same command again with your old pattern, using the values you noted in step 2.
Summary
Windows 11 gives you several ways to change the date display, from the Settings app and Control Panel to the Registry Editor and PowerShell. Start with Settings. Move to Control Panel if you need a custom pattern. Keep the Registry Editor and PowerShell for repair work and scripted changes.
Did this guide fix your problem?

About the Author
Richard
Tech Writer, IT Professional
Richard is a writer at Geek Rewind who turns complex IT tasks into clear, step-by-step guides. He draws on years of hands-on experience in system administration and enterprise IT operations, focusing on Windows, Linux and WordPress: the problems people actually run into, and the fixes that work. His server and WordPress guides come from systems he runs himself. Richard builds and maintains the platform behind Geek Rewind, from its Ubuntu servers and Nginx configuration to its custom WordPress plugins. Many new tutorials start with readers' questions, and he's always glad to answer them in the comments.
No comments yet — be the first to share your thoughts!