Why Does Windows 11 Keep Resetting My Default Date and Time Format

Windows 11 resets your date and time format because several tools control the same settings: the Settings app, the classic Control Panel , and your regional language settings. System updates, sleep and wake cycles, time server syncs and cloud settings sync can each push the regional default back over your custom choice. When two of these disagree, your custom 12-hour or 24-hour clock is usually the one that loses.
Work through the fixes below in order. Start with the ones that are quickest to try and easiest to undo.
Windows 11 resets your date and time format because multiple tools control these settings: Settings, Control Panel , and regional language preferences. System updates, cloud sync, and time server syncs can push the regional default back over your custom choice. Turn off Remember my preferences in Settings Accounts Windows backup, then reapply your format through Control Panel Region Formats tab to make it stick.
Fix 1: Turn Off Cloud App Syncing to Stop Settings From Reverting
If you sign in with a Microsoft account, Windows can store your preferences online and restore them on every sign-in. That includes language and regional settings, so an old format can come back after a restart. Turning off this sync stops the cloud copy from overwriting your local choice.
On a local account the Windows backup page has fewer options. You may not see these toggles at all, and in that case you can skip this section.
- Click the Start button on your taskbar and select Settings (the gear icon). The Settings window opens.

Taskbar - In the left-hand menu, click Accounts.
- Scroll down the right side and click Windows backup. You should see a list of backup and sync options.
- Find Remember my preferences. On some builds the related option is Remember my apps. Language and regional settings fall under preferences.
- Click the toggle next to Remember my preferences to turn it Off. If the toggle expands into a list of checkboxes instead, clear the ones for language preferences and other Windows settings .
Once this is off, Windows stops pulling old preferences from the cloud. No restart is needed. Re-apply your date and time format afterwards, because the setting only prevents future overwrites. It does not bring back a format that was already overwritten. To undo the change, turn the toggle back on.
Fix 2: Apply Date and Time Changes Through the Classic Control Panel
The Settings app sometimes fails to apply regional changes properly. The classic Control Panel writes the same values directly, and setting your format there often makes it stick. This works on both Home and Pro.
- Click the Start button, type Control Panel into the search bar, and press Enter. The Control Panel window opens.

Control Panel - In the top right corner, find the View by menu and change it from Category to Large icons or Small icons. The window now shows every Control Panel item in one list.
- Click Region. A small Region window pops up.
- On the Formats tab, look at the dropdown menus for Short date, Long date, Short time and Long time.
- Select your preferred format from each list. For a 24-hour clock, choose a time format that uses a capital HH (for example, HH:mm). For a 12-hour clock, use a lowercase h with tt for AM/PM.
- Click Apply at the bottom right of the window, then click OK.
If you want formats that are not in the lists, click Additional settings on the Formats tab and edit them on the Time and Date tabs.
You can also reach the same dialog from the main Control Panel page. Click Clock and Region, then Change date, time, or number formats, and check that your regional profile matches your choices. To undo your changes, open the Formats tab again and click Reset under Additional settings.
Fix 3: Adjust Time Zone and Regional Format Settings
If your PC thinks you are in a different region, it can reapply that region's formats when it connects to the internet or after an update. Check that your country, regional format and time zone all point to the same place.
- Press the Windows key + I on your keyboard to open the Settings app.
- Click Time & language in the left sidebar.

Settings › Time & language - Click Language & region.
- Find the Country or region setting and confirm it matches where you actually are.
- Find Regional format and make sure the dropdown is set to the country or region whose date and time layout you want. If you see Recommended next to a choice, that one follows your display language, which may not be what you want.
- Click Date & time in the left sidebar (you may need to go back to Time & language first).
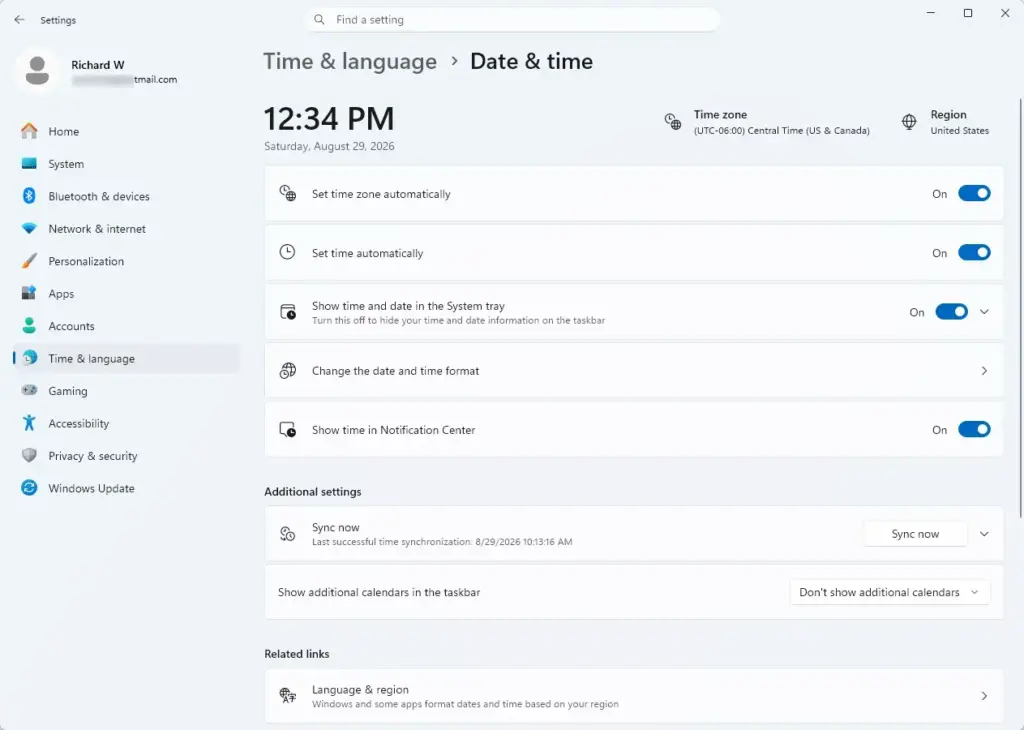
Settings › Time & language › Date & time - Check Set time zone automatically. Leave it on if Windows detects your zone correctly. If it picks the wrong one, turn it off and choose the right zone from the Time zone dropdown.
If Set time zone automatically is greyed out, turn on location services under Settings Privacy & security Location. Automatic time zone detection depends on it.
Fix 4: Check and Restart the Windows Time Service
The Windows Time service keeps your clock synced with a time server. When it is stuck or stopped, the clock drifts, and settings can revert after a reboot. Restarting it and setting it to start automatically rules this out.
The service settings will be greyed out or refuse changes on a standard account.
- Click the Start button, type Services in the search bar, and press Enter. The Services window opens with an alphabetical list.
Settings › Privacy & security › Search - Scroll down the list until you find Windows Time.
- Right-click Windows Time and select Properties. The properties window opens on the General tab.
- Find the Startup type dropdown and change it to Automatic.
- Under Service status, if the service is running, click Stop, then click Start to restart it. If it was already stopped, just click Start.
- Click Apply, then click OK.
You can also right-click Windows Time in the list and choose Restart for a quick restart. If the service will not start and shows an error, move on to the system file check below.
Fix 5: Scan for Corrupted System Files and Malware
Damaged system files, often left by sudden shutdowns or failed updates, can stop Windows from saving user preferences. The System File Checker scans protected system files and replaces any that are corrupted. Typing sfc /scannow is the core of it, and the steps below show the full routine.
A standard Command Prompt window will show an error saying you need elevated privileges.
- Click the Start button and type Command Prompt into the search bar.

Command Prompt - Right-click Command Prompt in the results and select Run as administrator. If a User Account Control window asks whether to allow this app to make changes to your device, click Yes. The title bar of the black window should now say Administrator.
- Type the following command exactly and press Enter:
DISM.exe /Online /Cleanup-image /Restorehealth. Let it finish completely before you do anything else. - Next, type this command and press Enter:
sfc /scannow. - Wait while Windows scans your system files. This can take several minutes, and the progress percentage may sit still for a while. If it finds damaged files, it repairs them automatically.
When the scan finishes, read the result message, close the command window and restart your computer. Then check whether your date and time format is still set the way you left it.
Unique Expert Tips: Preventing Unwanted Resets After Sleep Mode
Many laptops lose custom regional formats right after sleep or hibernation because the system does not sync cleanly on wake. Two things are worth checking: fast startup and the drivers.
- Update your chipset drivers from your PC or motherboard manufacturer's website, not from a third-party driver site. Restart if the installer asks.
- Open the Control Panel and go to Hardware and Sound Power Options
- Click Choose what the power buttons do in the left pane.
- Click Change settings that are currently unavailable. You need administrator rights for this. The options at the bottom become editable.
- Clear the Turn on fast startup (recommended) checkbox, then click Save changes.
If you do not see the fast startup checkbox, hibernation is probably turned off on your PC, so there is nothing to change here. To undo this, tick the box again.
Also keep the Windows Time service syncing with a network time server, as covered above, so the clock corrects itself after waking. Then check any third-party antivirus or PC cleanup tools. Some aggressive ones clear user profile caches or registry entries when the PC wakes, which wipes customized regional and time formats. Look in the tool's settings for options that clean registry entries or user preference files, and turn those off or exclude them.
If the time itself, not just the format, is wrong after every shutdown, the motherboard's CMOS battery may be dying. That is a hardware fault and worth checking on older PCs.
A good order to follow: turn off cloud settings backup, then apply your preferred format through the classic Control Panel. If the problem comes back, check your region and time zone, the Windows Time service, and the system file check. Last, look at power settings and any utility software.
Summary
Date and time formats that keep resetting in Windows 11 are usually fixable with a few checks. Turn off cloud sync, set your format in the classic Control Panel, correct your region and time zone, restart the Windows Time service, and repair damaged system files with a scan. If it still resets after all that, look at fast startup and your cleanup or antivirus software. Change one thing at a time so you can tell which fix worked.
Did this guide fix your problem?

About the Author
Richard
Tech Writer, IT Professional
Richard is a writer at Geek Rewind who turns complex IT tasks into clear, step-by-step guides. He draws on years of hands-on experience in system administration and enterprise IT operations, focusing on Windows, Linux and WordPress: the problems people actually run into, and the fixes that work. His server and WordPress guides come from systems he runs himself. Richard builds and maintains the platform behind Geek Rewind, from its Ubuntu servers and Nginx configuration to its custom WordPress plugins. Many new tutorials start with readers' questions, and he's always glad to answer them in the comments.
No comments yet — be the first to share your thoughts!