How to Change Date and Time Formats in Windows 11 Regional Settings

Windows 11 regional settings control how your PC displays dates and times on the taskbar and across your apps. You can switch between a 12-hour and 24-hour clock, change the date order from day-month-year to month-day-year, or add day names to your clock.
You can make these changes in either the modern Settings app or the classic Control Panel . Both write to the same regional settings, so a change in one shows up in the other. Neither one changes the time itself, only how it is displayed.
Open Settings , press Win+I, go to Time & language Language & region, scroll to Regional format and click it, then select from the Short time and Long time drop-downs to switch between 12-hour and 24-hour formats or click Change formats to customize date and time layouts individually.
How to Change Date and Time Formats in 🪟 Windows 10 and 11
Windows has built-in options for how it shows hours, minutes, short dates and long dates. The short date and short time are what you see on the taskbar clock. The long date and long time appear in places that have room for more detail. Changing these formats affects the taskbar, File Explorer and most desktop applications that follow the system settings.
These settings are saved per user account. If several people share the PC, each one can have a different format.
Method 1Using Windows Settings
You can change the time format in the Settings app without administrator rights. This is the quickest method, and it works the same on Windows 11 Home and Pro.
- Press Win+I to open Settings.

Windows 11 Start menu with Settings gear icon highlighted. - Select Time & language from the left-hand menu.

Settings › Time & language - Click Language & region. You should see your display language, preferred languages and a Region section further down. (Some Windows 10 builds call this page Region.)
- Scroll to the Region section and click Regional format to expand it. The row shows the current format, and the expanded area lists the options below it.
- Open the Regional format drop-down menu if you want a preset combination, such as a different country or region. Or click the Change formats button to set the individual fields yourself.
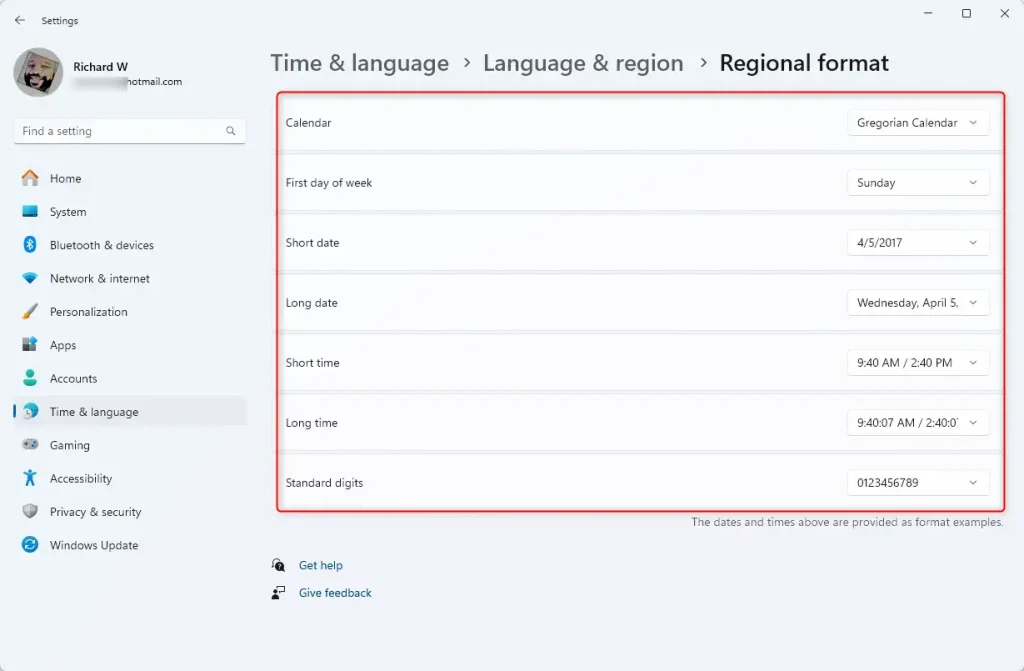
- On the formats page, choose your preferred values from the drop-down menus for Short date, Long date, Short time and Long time. Each change applies as soon as you pick it, and there is no Save button.
If it still looks the same, sign out and back in (see the question about apps not updating below). To undo, return to the same page and pick your old values. It helps to note the originals before you start.
Method 2Using Control Panel
Use Control Panel when you want more control over the regional settings. It also has the custom format boxes and the option to copy settings to other accounts. The Region window lets you choose from standard layouts for short time, long time, short date and long date.
- Open the Start menu, type Control Panel and press Enter.

Control Panel - Set the View by option in the top right corner to Large icons or Small icons. The full list of tools now appears.
- Click Region. The Region properties window opens.

Control Panel › Clock and Region - Make sure you are on the Formats tab. The drop-down menus show a sample of each format below them.
- Open the Short time or Long time drop-down menu to switch between 12-hour and 24-hour layouts. Open Short date and Long date to choose a different date layout. The Examples area updates so you can check the result before saving.
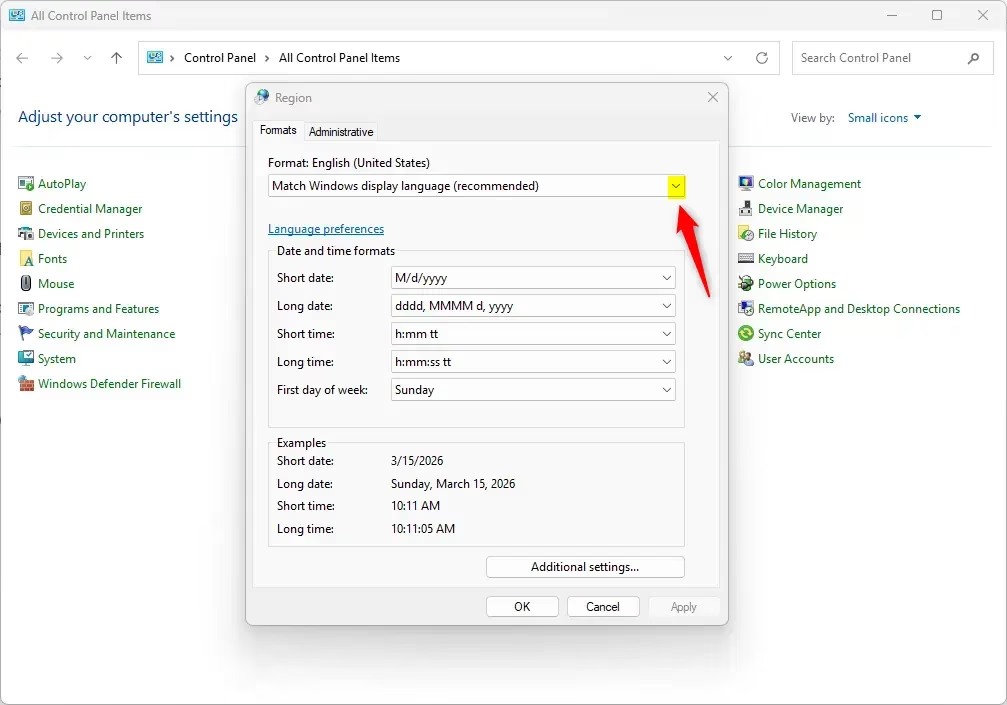
- Click Apply to save your changes, then click OK to close the window.
If you are not happy with the result, return to the same tab and select your previous values. You can also pick a different language in the Format drop-down at the top of the tab to get that region's defaults.
Method 3Creating Custom Date and Time Formats
This lets you build a layout from day, month and year characters. Letter case matters, because M means month while a lowercase m means minutes.
- Open the Start menu, type Control Panel and press Enter.
- Select Region and make sure you are on the Formats tab.
- Click Additional settings if you want to see the full customization window, which has separate Time and Date tabs. Find the Short date field and type your own combination. Use d for day, M for month and y for year. For example, typing
dd-MMM-yyyydisplays the date as 22-Oct-2024. - Find the Short time field and type your tokens. Use
horhhfor 12-hour time with an AM/PM designator. UseHorHHfor a 24-hour clock. - Click Apply, then OK. The new layout applies across your user account.
If you mistype a code and the sample looks wrong, you can click Reset in the customization window to return to the defaults for your region.
A Closer Look at Date and Time Formats in Windows
Regional formats control how applications display text-based dates and which separator characters sit between days, months and years. Changing them updates how you see the time and date on screen. It does not change your hardware clock, and it does not change your time zone. If the time itself is wrong, that is a separate setting under Time & language.
Troubleshooting Common Issues with Date and Time Formats
Sometimes a format change does not stick or behaves oddly. The usual causes are a mismatch between regional profiles (for example, your account and the system accounts) or a policy overriding your choice. The sections below cover the most common cases.
The Date or Time Format Reverts After a Restart
Format settings can revert after a restart when a third-party utility or a network policy overrides your local user preferences. On a work PC, a policy managed by your IT team may be the cause, and you will need to ask them. On a personal PC, copying your choices to the system accounts often helps.
- Open Control Panel and go to Region.
- Click the Administrative tab, then click Copy settings. Approve the administrator prompt if one appears.
- Tick Welcome screen and system accounts to copy your current formats to the sign-in screen and system accounts. Tick New user accounts only if you want future accounts to start with the same formats.
- Click OK, then restart the PC to check that the settings hold.
If they still revert, check whether any clock or customization tool is installed and turn off its regional options.
24-Hour Format Not Applying Correctly
The 24-hour clock does not appear on the taskbar when the Short time setting is still a 12-hour format. The taskbar clock uses the short time value. Update the Short time field in Control Panel (Region Formats) or in the Settings app (Change formats), not just the long time.
After changing it, give the taskbar a moment to refresh. If it does not, sign out and back in.
Can I change the time format without changing the date format?
Yes, time and date are separate settings. Open the Region settings in Control Panel, find the time fields and choose your 12-hour or 24-hour layout. Your existing short and long date settings stay as they are. The same is true in the Settings app, where each field has its own drop-down menu.
Why do my date and time format changes not apply immediately?
Some desktop applications read the regional settings only when they start, so they keep showing the old format. If your taskbar or open programs do not update, close the apps and reopen them first. If that does not work, sign out of your Windows account and sign back in so every running process reloads the settings. A full restart also works, but it is rarely needed.
How do I switch between 12-hour and 24-hour formats?
To remove the AM/PM designator, you switch to a 24-hour time format. In the Settings app, go to Time & language, select Language & region and expand Regional format. Choose a different regional preset, or click Change formats and pick short and long time values that omit AM/PM. If you want to bring AM/PM back, choose a 12-hour format in the same place.
What to do next
After you save your settings, check the new layouts on the taskbar clock and in File Explorer. If anything looks wrong, use the steps above to correct it. The next step is to set your time zone and automatic time synchronization, which you need if you want your system clock to match internet time servers.
Frequently asked questions
How to change from 24 hour to 12-hour format?
Open Settings, go to Time & language, then Language & region. Select Regional format, click Change formats, and open the Short time list. Choose a 12-hour option that ends in tt, such as h:mm tt. The taskbar clock changes right away.
How do I change my 🪟 Windows 10 clock to 12-hour format?
Open Settings and go to Time & Language, then Region. Click Additional date, time, & regional settings, then select Change date, time, or number formats. On the Time tab, open the Short time list, choose h:mm tt, and click OK. The taskbar clock switches to a 12-hour display.
How to change time format in 🪟 Windows 11 to dd mm yyyy?
Open Settings, go to Time & language, select Language & region, then Regional format. Click Change formats, open the Short date list, and choose dd/MM/yyyy. The taskbar then shows the day first, followed by the month and the year.
How do I change the clock to 24-hour format in 🪟 Windows 10?
Open Settings, go to Time & Language, then Region, and click Additional date, time, & regional settings. Select Change date, time, or number formats, go to the Time tab, and open the Short time list. Choose HH:mm, then click OK. The clock shows 24-hour time.
Still have a question?
Answered by AI from this guide. Good questions may be added to this page — please don't include personal details.
Did this guide fix your problem?

About the Author
Richard
Tech Writer, IT Professional
Richard is a writer at Geek Rewind who turns complex IT tasks into clear, step-by-step guides. He draws on years of hands-on experience in system administration and enterprise IT operations, focusing on Windows, Linux and WordPress: the problems people actually run into, and the fixes that work. His server and WordPress guides come from systems he runs himself. Richard builds and maintains the platform behind Geek Rewind, from its Ubuntu servers and Nginx configuration to its custom WordPress plugins. Many new tutorials start with readers' questions, and he's always glad to answer them in the comments.
No comments yet — be the first to share your thoughts!