How to Display Time in 12-Hour or 24-Hour Format in Windows 11

Windows 11 displays time in two formats: 12-hour (1:45 PM) or 24-hour (13:45). You can switch between them in Settings without restarting your computer—the taskbar clock updates right away.
The setting lives in Time & language Language & region under Regional format, not on the Date & time page where many people look first. This catches a lot of users off guard because the clock itself is on the Date & time page, but the format control is elsewhere.
Settings gives you a list of standard formats, but the Control Panel method lets you create a custom time format if none fits what you need. Some apps may ignore the Windows setting and show their own format instead—this article explains why and what you can do about it.
Open Settings , go to Time & language Language & region, expand Regional format, click Change formats, then change Short time and Long time to entries without AM or PM for 24-hour format or with AM or PM for 12-hour format. The taskbar clock updates immediately.
What the time format setting changes
Windows stores two separate time formats. Knowing which does what saves you from changing the wrong one.
- Short time controls the clock on the taskbar . It shows hours and minutes only.
- Long time controls places where Windows shows seconds, such as the clock at the top of the calendar flyout (the panel that opens when you click the date and time on the taskbar ).
If you change only Short time, the taskbar shows 24-hour time, but other places may still show 12-hour time with AM or PM.
Three other points apply to every method below:
- The setting applies to your user account only. Other accounts on the same PC keep their own format.
- You do not need administrator rights to change it for your own account.
- You do not need to restart. Windows applies the change as soon as you pick it. Some open apps need to be closed and reopened (see the troubleshooting section).
This works the same on Windows 11 Home and Pro. The steps below match current Windows 11 releases. Menu wording can differ slightly on very early builds.
Change the time format in Settings
This is the quickest route. It offers a fixed list of formats, which covers the standard 12-hour and 24-hour choices.
Switch to 24-hour time
- Press Win+I to open Settings.

Windows 11 Start menu with Settings gear icon highlighted. - Click Time & language in the left sidebar.

Settings › Time & language - Click Language & region. The page lists your display language, preferred languages and region settings.
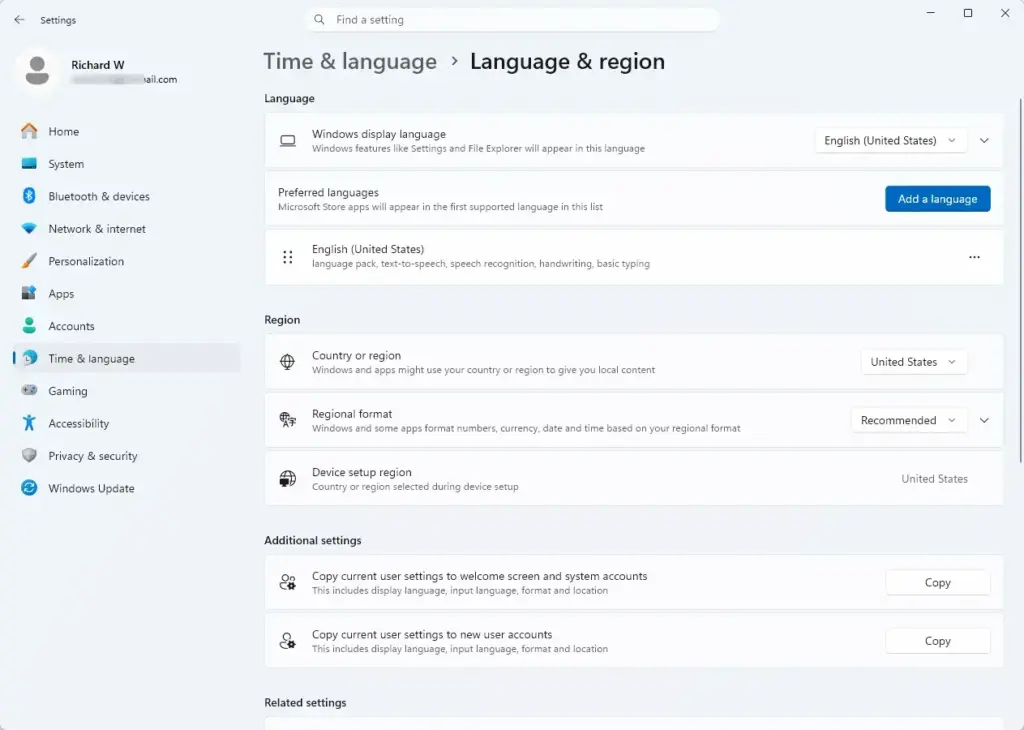
Settings › Time & language › Language & region - Scroll down to Regional format and click the row to expand it. You now see a Change formats button.
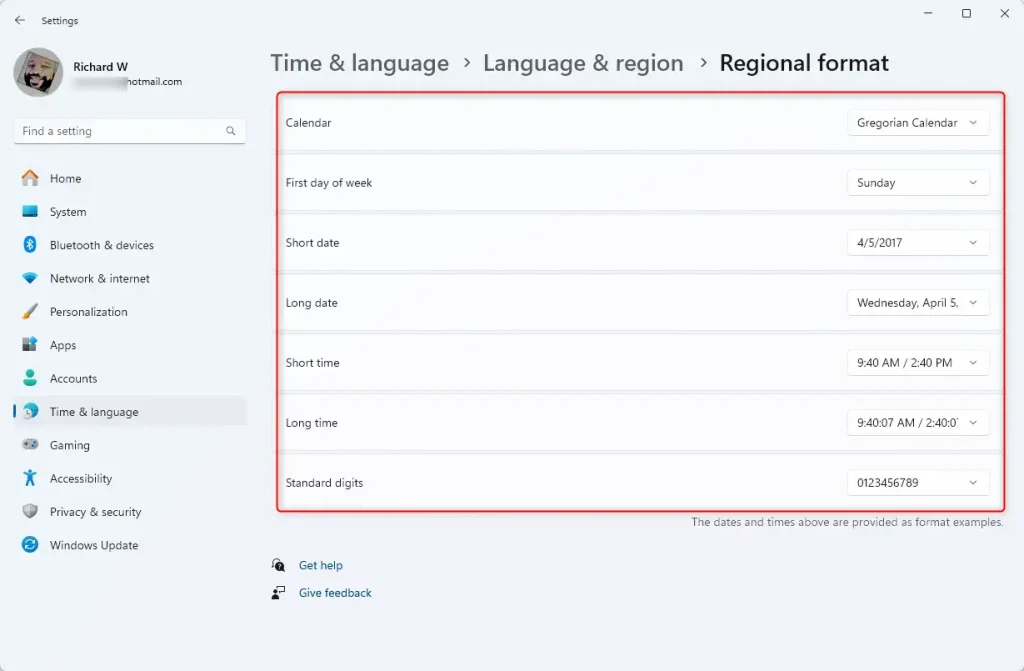
- Click Change formats. A list of dropdown menus appears, including Calendar, First day of week, Short date, Long date, Short time and Long time.
- Open the Short time dropdown. Each entry shows a sample of the current time. Choose an entry that has no AM or PM, such as 13:45. If you see two such entries, the one with a leading zero (for example 09:45) pads single-digit hours, and the other does not.
- Open the Long time dropdown and choose the entry without AM or PM, such as 13:45:30.
Look at the taskbar clock. It now shows the time in 24-hour format, for example 13:45 instead of 1:45 PM.
If the clock does not change, check that you changed Short time and not only Long time. If both are correct and nothing changes, go to the troubleshooting section.
Switch back to 12-hour time
To undo the change, repeat the same route and pick the 12-hour entries instead.
- Open Settings Time & language Language & region.
- Expand Regional format and click Change formats.
- Open Short time and choose an entry that ends in AM or PM, such as 1:45 PM.
- Open Long time and choose the matching entry with seconds, such as 1:45:30 PM.
The taskbar clock returns to 12-hour display with AM or PM.
Nothing is lost by switching back and forth. These two dropdowns change only how the time is shown. They do not change the actual time, your time zone or your date format.
Change the time format in Control Panel
Use Control Panel if you want a format that is not in the Settings list. You can hide the leading zero, change the AM and PM labels, or choose a different pattern. The Settings app does not offer these options, so this dialog is the usual place to do it.
- Press Win+R to open the Run dialog.
- Type
intl.cpland press Enter. The Region window opens on the Formats tab.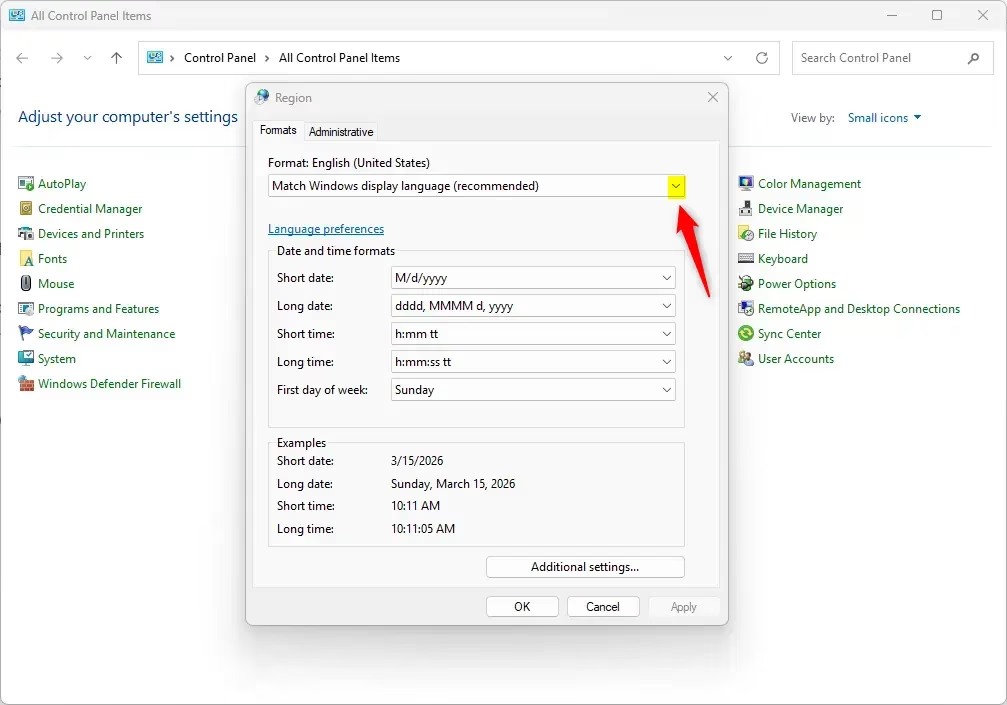
- Click Additional settings… near the bottom. The Customize Format window opens.
- Click the Time tab.
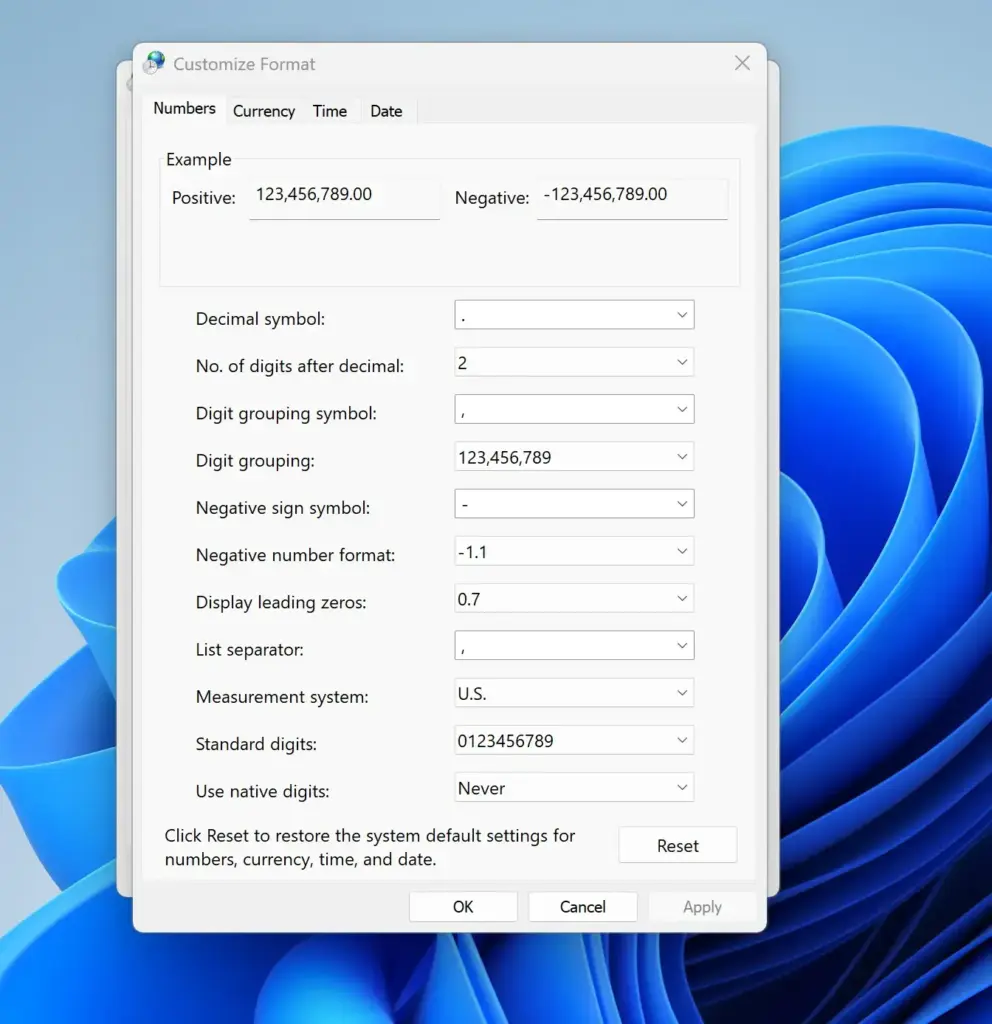
- Open the Short time dropdown and choose a 24-hour entry, or a 12-hour entry if you are switching back.
- Open the Long time dropdown and choose the matching entry.
- Click Apply, then click OK. Click OK again in the Region window if it is still open.
The Customize Format window shows a preview of the time under Time as you pick a format. The taskbar clock changes when you click Apply.
Read the format codes
The entries in the dropdowns are made of letter codes. Once you know them, you can read any format and type your own. These codes are the standard Windows time-format letters:
his the hour on a 12-hour clock.hhadds a leading zero, so 9 becomes 09.His the hour on a 24-hour clock.HHadds a leading zero.mmis minutes andssis seconds.ttis the AM or PM label.
The letter case matters. Lowercase h gives a 12-hour clock. Uppercase H gives a 24-hour clock. That is the whole difference between h:mm tt (1:45 PM) and H:mm (13:45). In practice, the 24-hour formats you will see are H:mm and HH:mm for Short time, and H:mm:ss and HH:mm:ss for Long time.
If you type your own pattern into the Short time or Long time box and Windows rejects it, you may see an error that the format is invalid. Check that you used the correct letter case and no unsupported characters. If you are not sure, pick a format from the dropdown instead.
Reset to the defaults
If you change several things in Customize Format and want to go back, click Reset at the bottom of that window. This restores all the formats on every tab, including date and number formats, to the defaults for your selected region. Use it only when you want everything reset. To undo a time-only change, switch the two time dropdowns back by hand.
If the setting is missing, greyed out or doesn’t stick
Most of the problems below come from a managed PC, a mismatch between region and format, or an app that keeps its own time format.
The time format dropdowns are greyed out
On a work or school PC, an administrator can lock regional settings with a policy. If you see a message such as “Some settings are managed by your organization”, you cannot change the format yourself. Ask your IT team. On a personal PC that shows this message, check whether the PC was ever joined to a work or school account under Settings Accounts Access work or school.
The 24-hour options are not in the list
The Settings list contains only formats that match your selected Regional format. Some regions offer a smaller set of choices. If you do not see a 24-hour entry, use the Control Panel route above and open Additional settings…. There you can choose an entry or type a pattern with the uppercase H code.
The clock changed but an app still shows the old format
Close the app completely and open it again. Most apps read the Windows time format only when they first open. If it still shows the old format, the app probably has its own time setting. Email, calendar and chat apps often do, so check the app's own settings. Websites follow your browser's language and region settings, not the Windows time format, so a website can show 12-hour time even after you switch Windows to 24-hour.
The sign-in screen still shows the old format
Your change applies to your account. The sign-in screen and new accounts use the system default format. To copy your format to those places, you need administrator rights. This is the one step in this article that does.
- Press Windows key + R, type
intl.cpland press Enter. - Click the Administrative tab.
- Click Copy settings…. A Welcome screen and new user accounts settings window opens. Windows may ask you to approve the action in a User Account Control prompt.
- Under Copy your current settings to:, tick Welcome screen and system accounts. Tick New user accounts as well if you want future accounts to use the same format.
- Click OK.
The next time you reach the sign-in screen, it uses your chosen format. If the Copy settings… button is greyed out, you are not signed in as an administrator.
Check the other formats on the Formats tab before you copy them.
The format reverts after a while
Changing your Regional format to a different region can reset the time format to that region's default. If you switch to 24-hour time and then change the region, the format may go back to 12-hour. After changing the region, check Short time and Long time again. A work or school policy can also reapply its own format at sign-in or at a refresh interval. If that happens on a managed PC, the setting is controlled by your organization.
The time is wrong, not just the format
The format setting changes how the time looks, not what it is. If the clock shows the wrong hour, the cause is the time zone or the clock sync, not the format. See the next section.
What to do next
To return to the default at any point, open Change formats again and pick the original entries, or click Reset in the Control Panel Customize Format window. If the clock shows the wrong time rather than the wrong format, open Settings Time & language Date & time. Check that Set time automatically and Set time zone automatically are on, or select the correct time zone from the Time zone list. The same Language & region page has the date format dropdowns, so you can switch Short date and Long date there if you want the date to match your new time style.
Frequently asked questions
Where do display ads appear?
Display ads appear across Google's network of websites, apps, and videos. They show as banner ads, text ads, or image ads on publisher sites, in Gmail, on YouTube, and in mobile apps. Google targets them to people based on their interests and browsing history.
What does "display" mean?
Display means to show or present something visibly. In computing, it refers to a screen or monitor, or the act of showing information on a screen. In advertising, a display ad is a visual advertisement shown on websites and apps.
Is "display" a verb?
Yes, display is a verb meaning to show or present something. Examples: "display the image on screen" or "display your portfolio online." It can also be a noun referring to a screen or an advertisement shown publicly.
How do I create a display campaign in Google Ads?
Go to Google Ads, click Campaigns, then New Campaign. Choose Display as your campaign type. Select your marketing goal, set your budget and bidding strategy, define your target audience, and upload your ads—images, videos, or responsive ads. Then review and launch.
Still have a question?
Answered by AI from this guide. Good questions may be added to this page — please don't include personal details.
Did this guide fix your problem?

About the Author
Richard
Tech Writer, IT Professional
Richard is a writer at Geek Rewind who turns complex IT tasks into clear, step-by-step guides. He draws on years of hands-on experience in system administration and enterprise IT operations, focusing on Windows, Linux and WordPress: the problems people actually run into, and the fixes that work. His server and WordPress guides come from systems he runs himself. Richard builds and maintains the platform behind Geek Rewind, from its Ubuntu servers and Nginx configuration to its custom WordPress plugins. Many new tutorials start with readers' questions, and he's always glad to answer them in the comments.
No comments yet — be the first to share your thoughts!