How to Reset Network Time Synchronization in Windows 11 Date and Time Settings

Network time synchronization in Windows 11 is a built-in feature that connects your PC to an online time server to keep your clock exact. By default, Windows contacts time.windows.com every 7 days to correct clock drift and match the official time.
When this background service breaks, the clock starts running fast or slow. That can stop websites from loading and break app logins. A reset fixes it by restarting the time service and forcing your PC to fetch the correct time right now. The sections below go from the quickest fix to the more involved ones, so work through them in order and stop when the clock is right.
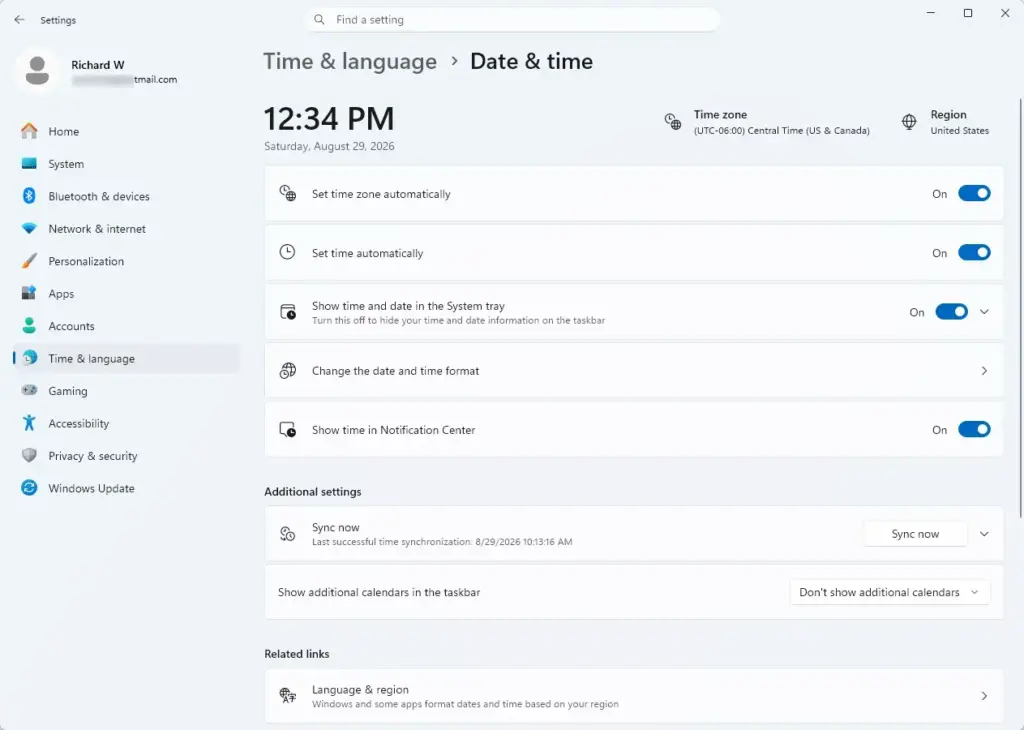
Open Settings , click Time & language, then Date & time, scroll to Additional settings, and click Sync now. Windows contacts the time server and updates your clock immediately. Check your taskbar to confirm the time changed.
Common Signs That Your Time Synchronization Is Broken
The most obvious sign of a sync problem is a taskbar clock that does not match your phone or a wall clock. Even a few minutes of difference is enough to cause trouble.
The other common sign is a sudden security certificate error when you open a popular website. Secure sites depend on exact time matching. If your PC thinks it is in the past or the future, the browser treats the site’s certificate as expired or not yet valid and blocks the page. In Edge and Chrome you will often see a message such as “Your clock is ahead” or “Your clock is behind.”

Online games, chat apps and file-sharing tools can also misbehave. If your messages appear out of order, or a game disconnects with a server error, an inaccurate clock is often the hidden cause. Check the time before you spend hours reinstalling the app.
How to Check Your Current Date and Time Settings
Before you change anything, check how your PC is currently set up. The Time & language page shows whether Windows updates the clock automatically or is stuck on manual mode.
- Click the Start button and select the Settings gear icon. You can also press the Windows key and I together. The Settings app opens.
- Click Time & language in the left-hand menu.

Settings › Time & language - On the right side of the screen, click Date & time. The current time, the time zone and the sync options now appear.
- Find the switch labeled Set time automatically.
If the switch is off, your PC is not asking the internet for the time, so turn it on and check the clock again. If the switch is on but the clock is still wrong, the connection to the time server is stuck or failing, and the fixes below apply.
How to Reset Network Time Synchronization in 🪟 Windows 11 Date And Time Settings
It forces your PC to contact the internet time server and correct a drifting clock immediately. The steps are the same on Windows 11 Home and Pro.
Follow these steps to sync your clock manually:
- Open Settings by clicking Start and choosing the gear icon, or by pressing the Windows key and I.

Settings - Click Time & language in the left sidebar.
- Click Date & time on the main settings panel.
- Scroll down to the Additional settings section. You may need to expand it if it is collapsed.
- Click the Sync now button.
Windows now contacts the time server and checks the correct time. When it finishes, the line under the button updates to show the last successful synchronization and the time server used. Look at your taskbar clock to confirm it changed to the right time.
If the button is greyed out or the sync does not complete, make sure Set time automatically is on. On a work PC joined to a domain, the clock is managed by your organization's servers, so ask your IT team before changing anything.
What to Do If the Sync Now Button Fails
If Sync now fails, the usual causes are a missing internet connection or a time server that is not responding. If web browsing works normally but the clock still refuses to update, a temporary server glitch is the likely cause.
- Open a web page in your browser to confirm you are online. Pages that load fine rule out a network problem.
- If you use a VPN or a strict firewall, turn it off briefly and try Sync now again. Some of them block the traffic that time sync uses.
- If the sync still fails, switch to a different time server using the Control Panel, as described next.
Changing Your Time Server Using the Control Panel
The Control Panel lets you pick a different time server, which helps when the Settings app cannot sync. You reach it by opening Control Panel, switching to icon view, and opening the Date and Time window.
- Open the Start menu, type Control Panel, and select the app from the search results.

Control Panel - In the top right corner, change the View by option to Large icons or Small icons so every item is visible.
- Click Date and Time. A small properties window opens.
- Click the Internet Time tab at the top. If this tab is missing or says your PC syncs with a domain, the PC is managed by a domain and you cannot change the server here.
- Click Change settings.... This step needs administrator rights. If a security prompt asks whether to allow changes, click Yes.
- Make sure the box next to Synchronize with an Internet time server is checked.
- Open the Server drop-down menu. You will see the default server name. Choose a different server from the list, such as an alternative time server provided with Windows.
- Click Update now. You should see a message saying the clock was successfully synchronized.
- Click OK on each open window to save your changes.
To undo the change, repeat these steps and select the original server (time.windows.com) again.
Restarting the Windows Time Service (Unique Expert Tip)
The Windows Time service is the background program that handles clock updates. If it freezes, automatic synchronization stops. Restarting it from the Services app clears temporary glitches. No full PC restart is needed.
- Click Start, type Services in the search box, and click the Services app. This step may require administrator privileges. If a window asks for permission, allow it to continue.
- In the long list of services, scroll down until you find Windows Time.
- Click Windows Time once to select it.
- Right-click the service name and click Restart. You can also use the Restart link on the left side of the window. Alternatively, click Stop and then click Start. If Restart is greyed out, the service is already stopped, so use Start.
- Close the Services window and return to Date & time in Settings. Click Sync now again.
Restarting the service makes Windows drop its temporary timekeeping state and start fresh, which clears many stubborn synchronization errors.
Checking Your Time Zone Settings
A correct sync can still show the wrong local time if your time zone is wrong. Windows keeps the time itself accurate, but the time zone decides what hour you see. The fix takes a minute in Settings.
To check and fix your time zone:
- Press the Windows key and I to open Settings.
- Click Time & language on the left.
- Click Date & time.
- Find the Time zone option.
- Open the drop-down menu and check that it matches your actual local area. If it is wrong, pick the correct one.
- If you travel often, turn on the Set time zone automatically switch. Windows then works out your location and adjusts the time zone for you.
If the Time zone drop-down is greyed out, Set time zone automatically is probably on. Turn it off to choose a zone by hand. Automatic time zones also need location services enabled in Windows.
Handling Hardware Battery Issues
It points to a dead CMOS battery, the small coin-shaped battery on the motherboard that stores system settings and keeps the internal clock running while the PC is off.
Once that battery runs out, the clock resets each time power is removed. On a desktop, replacing it is usually simple. Power off, unplug the PC, open the case, and swap in a battery of the same type. A common size is the coin cell labeled CR2032. Laptop batteries can be harder to reach and may sit under the keyboard or the bottom panel. If your computer is very old and keeps losing its time at startup, have a local computer repair technician check the motherboard battery.
Summary
Keeping your clock accurate comes down to a few quick checks. Use the manual Sync now button first. If that fails, change your time server, restart the Windows Time service, and confirm your time zone. If the time still resets after a shutdown, replace the CMOS battery.
Have a question about this guide?
Answered by AI from this guide. Good questions may be added to this page — please don't include personal details.
Did this guide fix your problem?

About the Author
Richard
Tech Writer, IT Professional
Richard is a writer at Geek Rewind who turns complex IT tasks into clear, step-by-step guides. He draws on years of hands-on experience in system administration and enterprise IT operations, focusing on Windows, Linux and WordPress: the problems people actually run into, and the fixes that work. His server and WordPress guides come from systems he runs himself. Richard builds and maintains the platform behind Geek Rewind, from its Ubuntu servers and Nginx configuration to its custom WordPress plugins. Many new tutorials start with readers' questions, and he's always glad to answer them in the comments.
No comments yet — be the first to share your thoughts!