How to Configure Manual Date and Time Synchronization Servers in Windows 11 Date and Time Settings


Manual date and time synchronization servers in Windows 11 let you point your PC at a specific internet time source so your clock stays accurate. Windows uses the Windows Time service to check an external time server over the internet and update your computer clock automatically.
The hardware clock on a motherboard drifts by a few seconds or even minutes over time. Normally Windows corrects this in the background. If the default server stops responding because of a network block or an outage, the clock keeps drifting. That is when you need to pick a different server yourself.
This tutorial covers Windows 11 Home and Pro. Where they differ, I say so.
Open Settings Time & language Date & time, scroll to Additional settings, and click Sync now to force an immediate update. To use a custom time server, open Control Panel Date and Time Internet Time tab, click Change settings, enter the server address such as time.google.com, then click Update now.
Checking Your Current Time Settings in 🪟 Windows 11
Check your current time settings first. That tells you whether the clock is already wrong and what Windows is currently set to do about it. You do this in the Settings app, under Time & language and then Date & time.
To open your date and time settings:
- Click the Start button and select the Settings gear icon. You can also press the Win and the letter I together.

Windows 11 Start menu with Settings gear icon highlighted.
The Settings window opens. - Click Time & language on the left side of the window.

Settings › Time & language - On the right side, click Date & time.
You should now see the Date & time page.
On this page you will see your current time and time zone, the switches that set them automatically, and a button to sync your clock manually. Compare the time shown with a trusted source, such as your phone. If it is off by more than a few seconds, carry on with the steps below.
How to Set Your Time and Time Zone Automatically
Setting the time and time zone automatically is the simplest way to keep your clock accurate. Windows then updates it for you and you do not have to touch it again. Both switches are on the same Date & time page.
To turn on automatic time updates:
- Open the Settings app, go to Time & language, then select Date & time.
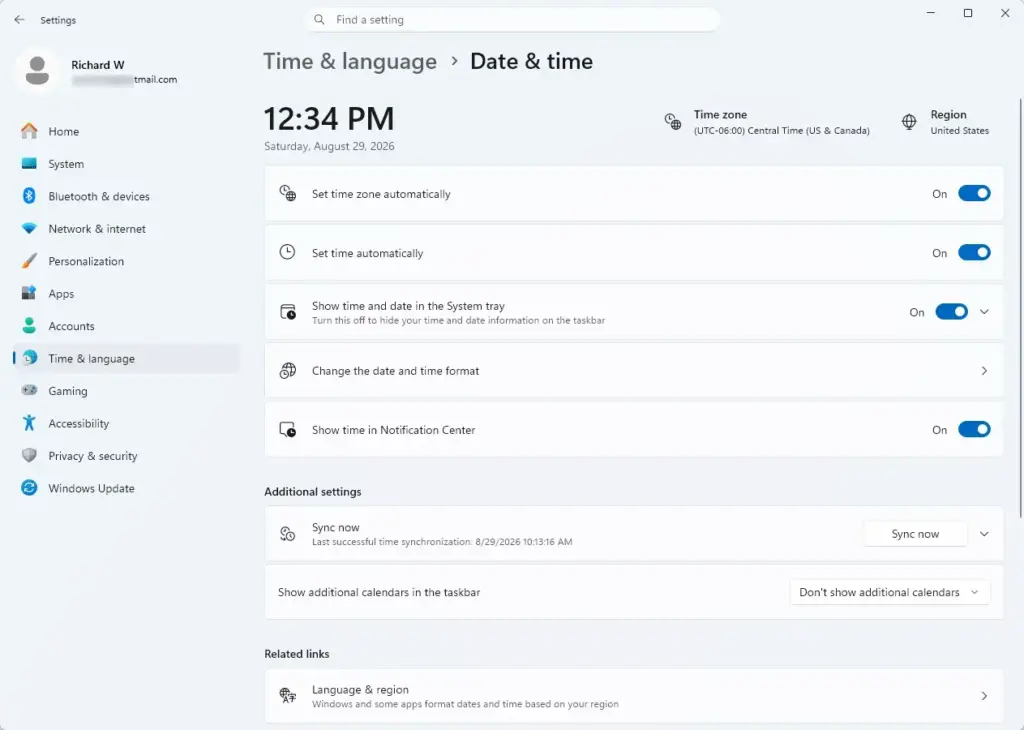
Settings › Time & language › Date & time - Find the switch labeled Set time automatically and turn it on.
- Find the switch labeled Set time zone automatically and turn it on as well.
Both switches should now show On.
If a switch is greyed out or will not stay on, you may be signed in with a standard account, or your organization may control the setting through policy. Try an administrator account.
Automatic time zone detection relies on your location, and it does not always work well. If it picks the wrong zone, turn off Set time zone automatically and choose your zone from the Time zone drop-down menu. To undo any of this, just switch the option back.
How to Manually Force a Time Synchronization
A manual sync updates your clock right away, so you do not have to wait for the scheduled background update. The Sync now button is in the Settings app, under Additional settings.
To force a manual sync:
- Open the Settings app, go to Time & language, then select Date & time.
- Scroll down until you find the section named Additional settings.
Settings › Time & language › Date & time - Find the button labeled Sync now.
- Click Sync now.
Wait a few seconds while Windows contacts the time server.
When the sync works, you should see a small checkmark next to the button, and the clock updates. If you get an error saying the time synchronization failed, your computer could not reach the server. Check that your internet connection is working, then try once more. If it still fails, change your time server.
Using Alternative Time Servers for Better Reliability
An alternative time server helps when the default Microsoft server is busy or down. You can switch to a trusted public server run by an organization such as Google or Cloudflare, which avoids sync failures and keeps your clock accurate.
Popular and reliable time servers include:
- time.google.com
- time.cloudflare.com
- pool.ntp.org
You have to use the classic Control Panel to enter it. The Settings app in Windows 11 does not let you type in a custom server address.
How to Configure Manual Time Servers Using Control Panel
The classic Control Panel lets you enter a custom time server address. You open Control Panel, switch the view to icons, open Date and Time, and add the server you want. This works the same on Home and Pro.
Follow these steps to add a manual time server:
- Click the Windows Start button, type Control Panel in the search box, and click the Control Panel app.
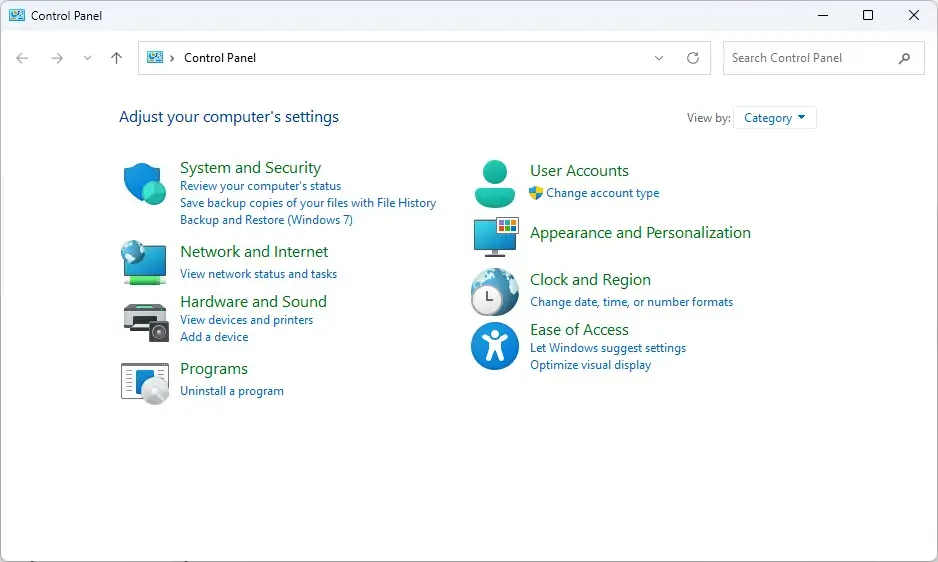
Windows 11 Control Panel dashboard showing power options. - In the top right corner of the Control Panel window, change the View by option to Large icons or Small icons.
The window now lists every Control Panel item. - Click Date and Time.

Control Panel › Clock and Region
A small window opens. - Click the Internet Time tab at the top.
- Click the Change settings... button. If Windows asks for administrator approval, accept the prompt or enter an administrator password.
- Check the box labeled Synchronize with an Internet time server.

- In the Server box, delete the default text and type your chosen time server address, for example time.google.com.
- Click the Update now button to test the connection.
If it works, the window reports that the clock was successfully synchronized, with the date and time. - Click OK to save your changes, then click OK on the main Date and Time window.
If you do not see the Internet Time tab, the PC is probably joined to a work or school domain. In that case the domain sets the time source, and you need to ask your administrator. To go back to the default, repeat these steps and choose the Microsoft server from the drop-down list next to the Server box.
Checking Time Synchronization Using the Command Prompt
The Command Prompt shows the exact status of your time service, including the server in use and the time of the last sync. You run the query from a Command Prompt window opened as an administrator.
To check your time configuration:
- Click the Start button and type cmd in the search box.
- Right-click Command Prompt in the search results and choose Run as administrator. This requires administrator privileges. Click Yes if Windows asks for permission.
- Type w32tm /query /status and press Enter:Code
w32tm /query /status
Look at the output on the screen. It shows the name of the time server, the leap indicator, and the last successful sync time. If the source line shows the local CMOS clock instead of a server name, Windows is not getting time from the network at all.
You can also force an update from the command line. Type w32tm /resync in the same window and press Enter:
w32tm /resyncTroubleshooting Common Time Synchronization Failures
Most sync failures come down to one of three things: no connection, a stuck service, or blocked traffic. Check them in this order, starting with the easiest.
- Check your internet connection: Time synchronization needs an active connection to the internet. Make sure you can open web pages in your browser.
- Restart the Windows Time service: Sometimes the background service gets stuck. Open the Start menu, type Services, and open the Services app. Find Windows Time in the list, right-click it, and choose Restart. Then try Sync now again. No reboot is needed.
- Check your firewall settings: Make sure your security software or router is not blocking Network Time Protocol traffic, which usually uses port 123.
If all three check out and the sync still fails, switch to a different time server from the list earlier in this tutorial. Some corporate and public networks block specific servers.
Advanced Tips: Setting Up Multiple Time Servers
You can give Windows several time servers so it moves on to the next one if the first stops answering. This is the most reliable setup, and it keeps your clock accurate through an outage on a single server. You configure it from an administrator Command Prompt.
To set up multiple servers:
- Open Command Prompt with administrator privileges, as described in the section on checking time synchronization.
- Run the command below, which configures a list of servers separated by commas. Replace the example servers with the ones you want to use.
w32tm /config /manualpeerlist:"time.google.com, time.cloudflare.com, pool.ntp.org" /syncfromflags:manual /updateAfter running this command, restart the Windows Time service to apply the new settings. Open the Services app, right-click Windows Time, and choose Restart. Then run w32tm /query /status to confirm that Windows is using one of your servers.
Summary
Keeping your date and time settings in order matters for more than convenience. An accurate clock is part of keeping your PC secure, because wrong system time can break sign-ins, certificates, and updates. Use automatic updates where you can, set a manual time server through the Control Panel when the default fails, and use the commands above to check status and fix sync errors. With those in place, your system time stays reliable.
Was this guide helpful?

About the Author
Richard
Tech Writer, IT Professional
Richard is a writer at Geek Rewind who turns complex IT tasks into clear, step-by-step guides. He draws on years of hands-on experience in system administration and enterprise IT operations, focusing on Windows, Linux and WordPress: the problems people actually run into, and the fixes that work. His server and WordPress guides come from systems he runs himself. Richard builds and maintains the platform behind Geek Rewind, from its Ubuntu servers and Nginx configuration to its custom WordPress plugins. Many new tutorials start with readers' questions, and he's always glad to answer them in the comments.

No comments yet — be the first to share your thoughts!