How to Set Date &Amp; Time in Windows 11

Setting the date and time in Windows 11 keeps your system clock accurate, so file timestamps, email and messages, calendar entries and app sign-ins all agree. Windows normally updates the time automatically from an internet time server. You can still change the time zone, force a sync, or enter the time by hand if something is wrong.
The short version: press the Win and I to open Settings, then go to Time & language and then Date & time. That page holds the clock, the time zone and the daylight saving switch. With the daylight saving switch on, the PC updates itself when the clocks change.
Open Settings by pressing Win+I, then go to Time & language and click Date & time. Pick your time zone from the drop-down menu, and the clock updates immediately. Toggle Adjust for daylight saving time automatically to On if needed.
Why Does This Matter?
A correct date and time matters more than it looks. Appointments and reminders fire when they should, and Windows Update and Microsoft Store downloads work properly. Secure websites also load without certificate errors, because a clock that is badly off makes the browser think a valid certificate has expired. Windows can also adjust for daylight saving time by itself, as long as the time zone is right.
How to Change Your Time Zone in 🪟 Windows 11
Changing the time zone is the most common fix. It helps when you travel, or when the region was set wrong during setup. You do this in Settings under Time & language, then Date & time. You can pick the zone from a drop-down list, or let Windows detect it if Location services are turned on.
To open Settings , use any one of these:
- Press
Windows key + Ion your keyboard. This is the fastest way. - Click the Start button, then click Settings. If it is not in the pinned apps, click All apps and look for it there.
- Type
Settingsinto the taskbar search box and click the app in the results.
The Settings window should now be open, with a list of categories down the left side.

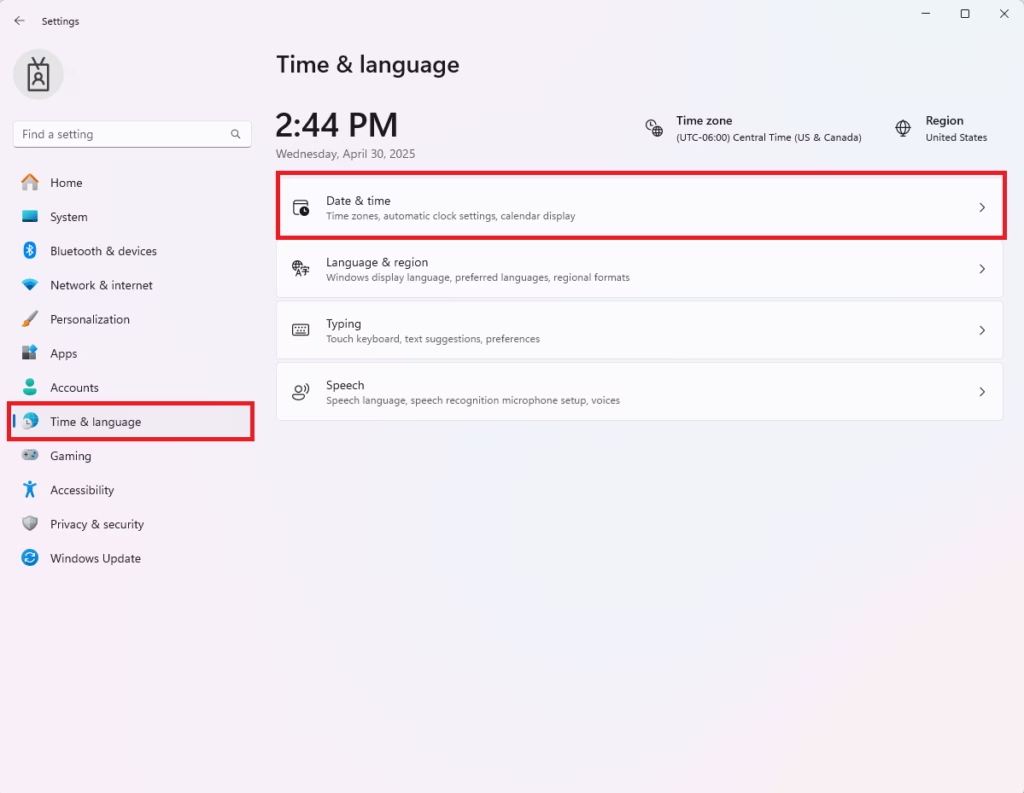
- Click Time & language in the list on the left. The right side now shows the language and time options.
- Click Date & time. You should see the current time at the top, followed by several toggles and the Time zone box.
- Find the Time zone drop-down menu.
- Click it and pick the zone where you live. The clock changes straight away to match.
If the Time zone box is greyed out, the Set time zone automatically toggle above it is on. Turn that toggle off if you want to choose the zone yourself.
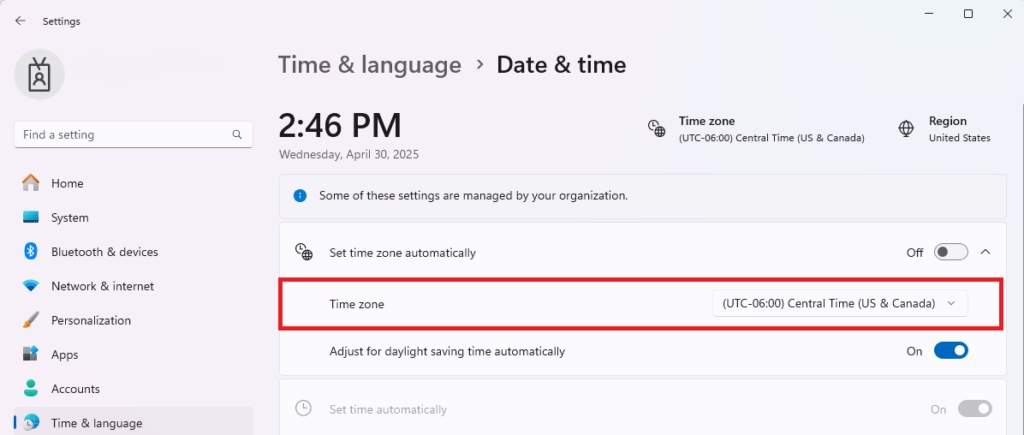
Windows then turns on the setting that adjusts the clock for daylight saving time. You can check that Adjust for daylight saving time automatically is switched On in the same list. It only appears for time zones that use daylight saving time.
This depends on Location services being on, so if the option does not work, check Privacy & security, then Location. The feature can also get it wrong when you use a VPN that connects to another country, because your location appears to be somewhere else. In that case, turn the automatic option off and pick the zone by hand.
If the clock does not update right after a time zone change, force a sync:
- Scroll down the Date & time page to the Additional settings section.
- Click the Sync now button. A short message should confirm that the time was synchronized.
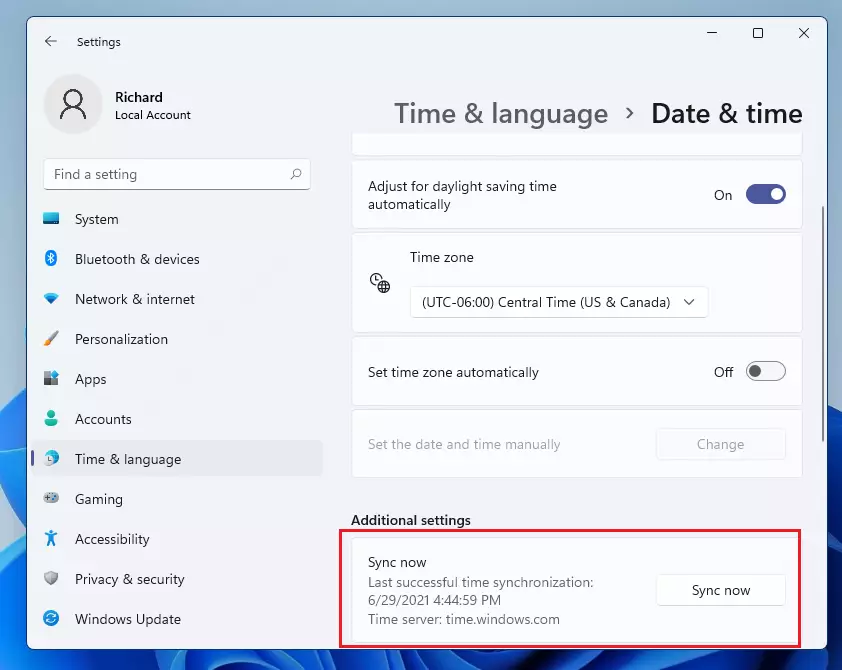
This contacts an internet time server, which acts as a master clock, and pulls accurate time data. Your own clock then corrects itself. The sync needs a working internet connection. If it fails, check that you are online and try again.
If syncing still does not work, restart the computer. Windows applies the new settings after you sign back in.
How to Set Date & Time Manually
This is useful if the PC has no internet connection, or if the automatic time server gives a wrong answer. You have to turn off the automatic clock first, because the manual option stays greyed out while it is on. Changing the system time normally needs an administrator account. If the Change button does nothing or asks for credentials, sign in as an administrator.
- Open Settings, go to Time & language, then Date & time.
- Switch the Set time automatically toggle to Off.
- Switch the Adjust for daylight saving time automatically toggle to Off as well, if you want full manual control.
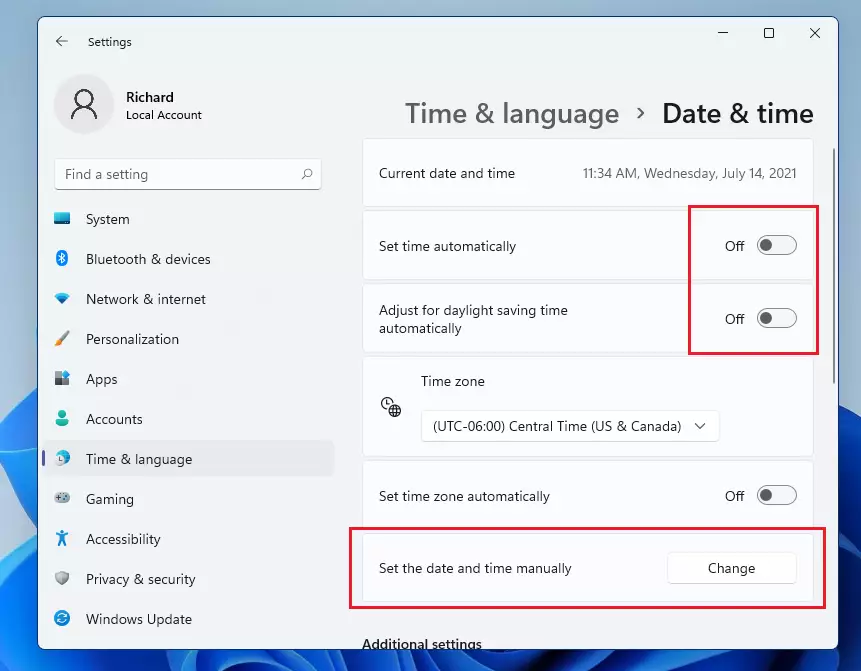
- Find the Set the date and time manually section and click Change next to it. A small Change date and time window opens.
- Use the date drop-downs and the time fields in that window to pick the correct date and time.
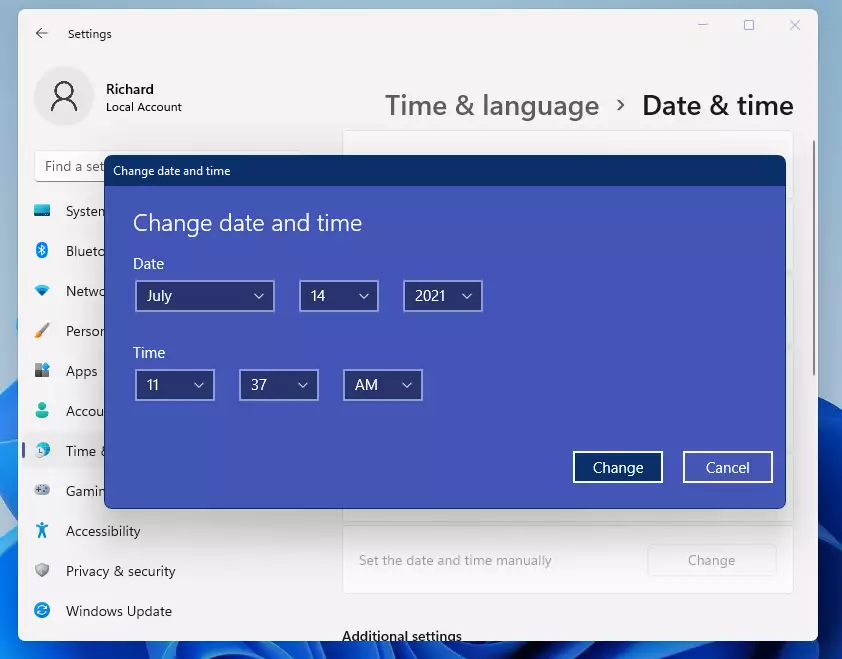
- Click Change in the small window to save the new date and time.
- Look at the clock in the bottom right corner of the screen. It should now show the correct date and time.
To undo this, switch Set time automatically back to On. Windows will go back to the internet time and replace your manual entry.

Summary
The right time on your Windows 11 PC keeps appointments, reminders and software updates running without errors. It also stops problems connecting to secure websites. If automatic updates fail or you lose internet access, you can always switch to manual time.
- Your computer's clock shows the right time for appointments, reminders, and updates.
- It adjusts for daylight saving time on its own, so you do not have to change it yourself.
- You can set the time manually if you have no internet or if automatic updates do not work.
- A correct clock helps your PC avoid errors, including certificate warnings in your browser.
If the computer still loses the correct time, for example after every shutdown, there are two usual causes. The first is a weak CMOS battery on the motherboard. It keeps the clock running while the PC is off, and a dead one makes the time reset. The second is the Windows Time service not running. You can check it in the Services app, where the service is listed as Windows Time.
Check out the official Microsoft support website for more Windows 11 tips.
Was this guide helpful?

About the Author
Richard
Tech Writer, IT Professional
Richard is a writer at Geek Rewind who turns complex IT tasks into clear, step-by-step guides. He draws on years of hands-on experience in system administration and enterprise IT operations, focusing on Windows, Linux and WordPress: the problems people actually run into, and the fixes that work. His server and WordPress guides come from systems he runs himself. Richard builds and maintains the platform behind Geek Rewind, from its Ubuntu servers and Nginx configuration to its custom WordPress plugins. Many new tutorials start with readers' questions, and he's always glad to answer them in the comments.




No comments yet — be the first to share your thoughts!