How to Change System Date and Time Synchronization Servers in Windows 11


Windows 11 keeps its clock accurate by checking an online time server. A background program called the Windows Time service does this. It compares your PC clock with an official internet time server and corrects the difference automatically.
Motherboard clocks drift by a few seconds every month, and those small errors add up. They can cause certificate warnings, failed sign-ins and sync problems with cloud services. If the default server is slow or unreachable, changing your time server fixes the sync errors and keeps the clock right.
Open Settings Time & language Date & time and verify Set time automatically is on. To change the server, open Control Panel Date and Time Internet Time tab > Change settings, then type a new server address in the Server box and click Update now.
Checking Your Current Time Settings in 🪟 Windows 11
The Settings app shows your time zone and sync status. This quick check often shows the real problem, such as automatic time being switched off, before you touch any server settings.
Check your current configuration with these steps:
- Click the Start button on your taskbar .
- Select the Settings gear icon. You can also press the Win and I together to open Settings directly. The Settings window should now be open.
- In the Settings window, click Time & language in the left-hand menu.

- Click Date & time on the right side of the screen. You should see your current time, time zone and the automatic time switches.
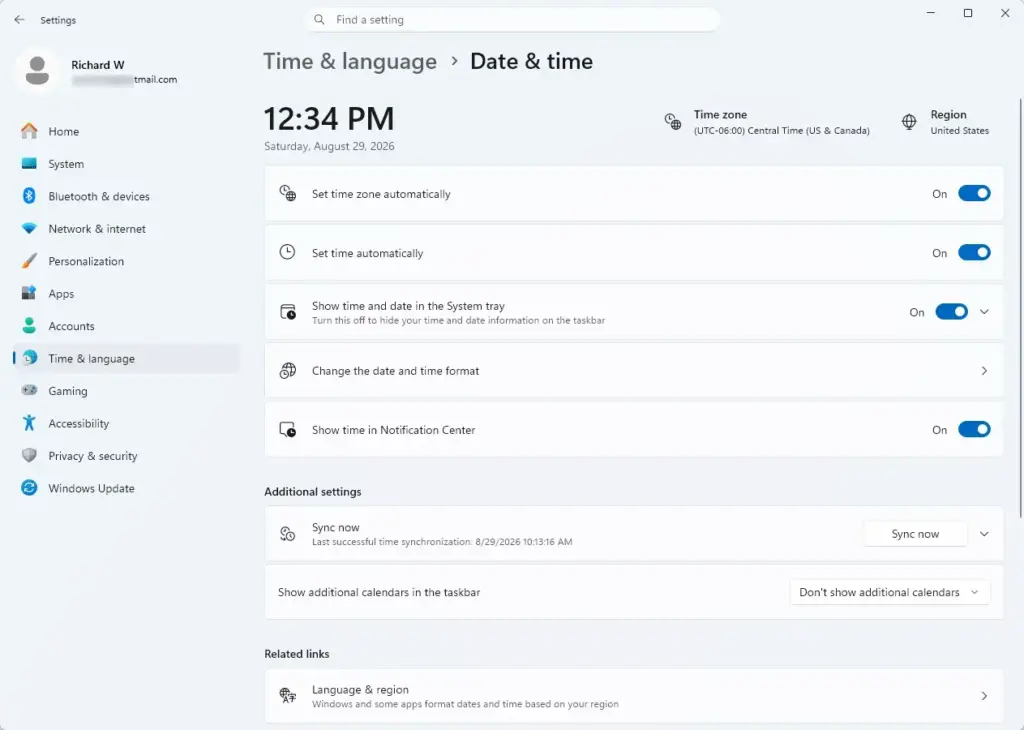
- Find the Set time automatically switch and make sure it is turned on.
- Find the Set time zone automatically switch and turn it on as well, so your computer adjusts when you travel. If this switch is greyed out or keeps turning itself off, location services are probably disabled. Turn them on under Privacy & security and then Location, or set your time zone by hand.
If Set time automatically was off, your computer was relying on you to set the clock by hand. Turn it on now. Then scroll down to the Additional settings area and click Sync now. Windows immediately contacts its current time server and corrects any error. If the sync works, the clock updates right away and the last sync time shown below the button changes. If it fails, carry on to the sections below.
How to Change System Date and Time Synchronization Servers in 🪟 Windows 11
To change the time server, use the classic Control Panel . The Settings app has no box for typing a server address, but the Control Panel Date and Time window does. You open it, enter the address you want and test it.
Switch your time synchronization server using these steps:
- Click the Start button and type Control Panel into the search box.
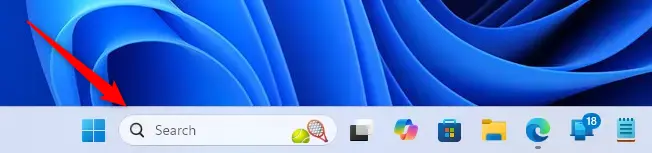
- Click the Control Panel app in the search results.
- In the top right corner of the Control Panel window, find the View by setting. Change it from Category to Large icons or Small icons. This makes every item visible.
- Click Date and Time. A small window opens.
- In this window, click the Internet Time tab at the top.
- Click the Change settings… button. You need administrator rights for this, so Windows may show a prompt. If the button is greyed out, you are probably signed in with a standard account. If the PC is joined to a work or school domain, the domain controller usually controls time and you may not be able to change the server.
- A small box appears. Make sure Synchronize with an Internet time server is ticked. Look at the drop-down menu labeled Server. By default it usually shows the Microsoft time server, time.windows.com.
- Click inside the Server box and type the address of the new time server, or pick one from the drop-down list. For example, you can type a public time server address from the list in the next section.
- Click Update now.
- Watch for the message under the button. If it says “The clock was successfully synchronized,” you are all set. If you get an error instead, check the address for typos, then see the troubleshooting section below.
- Click OK to close the settings box, then click OK again to close the main Date and Time window. If you skip the OK buttons, the new server may not be saved.
It keeps using that server in the background without any more input from you. To undo the change, repeat these steps and enter time.windows.com again.
Alternative Public Time Servers You Can Use
There are several free public time servers you can use. Large companies maintain some of them, such as Google at time.google.com and Cloudflare at time.cloudflare.com. A trusted public server helps your clock stay accurate and avoids the connection errors Windows sometimes gets with an overloaded default.
Here are some of the most popular and trusted public time servers:
- time.google.com – Maintained by Google, this is a fast and reliable server that handles a huge amount of internet traffic every second.
- time.cloudflare.com – Provided by Cloudflare, this server uses a large global network, so replies are quick wherever you live.
- pool.ntp.org – This is a large virtual cluster of servers operated by volunteers around the globe. When you use this address, it points you to a time server physically close to your computer for the fastest response.
- time.windows.com – This is the default Microsoft server. If you have problems with another server, you can always switch back to this one.
Pick one server and stick with it unless you have a reason to change. Google’s server adjusts the clock slightly differently from most other servers, so it is not a good idea to mix it with others in a setup where several servers are used together. On a single home PC this does not matter.
If the current server is slow to respond or gives you an error, try a different one. Open the Control Panel date and time settings again, go to the Internet Time tab, and enter a new address from the list above. Time.windows.com and pool.ntp.org are both good options for keeping your clock accurate.
Fixing Common Time Synchronization Errors in 🪟 Windows 11
Most time sync errors come from a failed update message or from the Windows Time service getting stuck. You can usually fix them by checking your connection, making sure nothing blocks the sync, restarting the service and running a manual update.
Do not panic if you see an error. Work through these checks in order:
- Check your internet connection. Make sure your Wi-Fi or ethernet cable is connected and working. Open a web browser and load a website to confirm you have internet access.
- Disable third-party antivirus software temporarily. Some security programs, and some firewalls, block network traffic on unusual ports. Time servers communicate using port 123 (UDP). If your security software blocks this port, time sync fails. Check its settings, and turn your protection back on once you have tested.
- Restart the Windows Time service. Sometimes the background program that handles time sync gets stuck. Press the Win and R to open the Run dialog box. Type services.msc and press Enter. The Services window opens. Scroll down until you find Windows Time, right-click it and select Restart. If Restart is greyed out, the service is stopped, so select Start instead.
After these steps, go back to the Date and Time settings in the Control Panel and click Update now again. In almost all cases, the sync completes. If it still fails, try a different server from the list above.
Unique Expert Tip: Checking Time Server Status via Command Prompt
The Command Prompt can tell you whether your computer is really talking to your chosen time server. A built-in diagnostic command shows the health of the time service and your current server details. Use it after you change servers, or when the clock still looks wrong.
Follow these steps to run the check:
- Click the Start button and type cmd into the search box.
- Right-click Command Prompt in the search results and choose Run as administrator. Click Yes if Windows asks for permission.

- A black window appears. Type the following command exactly and press Enter:
w32tm /query /status- Read the text that appears. Look for the lines showing the current time source, the last successful sync time, and the polling interval.
These lines show how your computer manages time behind the scenes. If the last successful sync shows a recent date and time, and the source is the server you chose, your system is working properly. If the source shows your local hardware clock instead of a server, the PC is not syncing. If you see an error message, type this command to force a manual sync:
w32tm /resyncA successful run reports that the command completed. If you get an error saying the service is not running, start the Windows Time service as described in the troubleshooting section and try again. These command line tools help you find and fix stubborn time problems quickly.
Summary
Accurate time keeps software updates, sign-ins and file management working properly. If your clock drifts, switch to a reliable public server through the classic Control Panel settings, then confirm the result with Update now or the command line check.
Have a question about this guide?
Answered by AI from this guide. Good questions may be added to this page — please don't include personal details.
Did this guide fix your problem?

About the Author
Richard
Tech Writer, IT Professional
Richard is a writer at Geek Rewind who turns complex IT tasks into clear, step-by-step guides. He draws on years of hands-on experience in system administration and enterprise IT operations, focusing on Windows, Linux and WordPress: the problems people actually run into, and the fixes that work. His server and WordPress guides come from systems he runs himself. Richard builds and maintains the platform behind Geek Rewind, from its Ubuntu servers and Nginx configuration to its custom WordPress plugins. Many new tutorials start with readers' questions, and he's always glad to answer them in the comments.
No comments yet — be the first to share your thoughts!