Should You Enable Automatic Time Zone Updates in Windows 11 Date and Time Settings?

Automatic time zone updates in Windows 11 change your computer clock to match your current location without any manual effort. Windows combines your internet connection, nearby Wi-Fi networks and any location sensors in the device to work out when you have moved into a different time zone.
With the feature on, your system clock stays correct when you travel, which helps you avoid missed meetings and scheduling errors. The catch is that it depends on a steady internet connection and working location services. If Windows cannot pinpoint where you are, it can pick the wrong zone or fail to change at all.
Yes, for most people automatic time zone updates in Windows 11 are worth keeping enabled. Turn it on in Settings by selecting the Time & language tab, choosing Date & time, and toggling on Set time zone automatically. It prevents missed meetings when traveling and handles daylight saving time changes without manual intervention, though it requires a working internet connection and location services to function accurately.
The Pros of Turning on Automatic Time Zone Updates
For most people the feature is worth keeping on. The next few sections cover the main reasons.
Seamless Travel Experience
The biggest benefit is for anyone who travels. When your laptop connects to the internet in a new city, Windows detects the change and updates the time zone, usually within a few minutes. You do not have to open Settings every time you cross a border or move between regions of the same country.
This works best when the device has a Wi-Fi card and location services are enabled. A desktop PC on a wired connection has less to go on, so it is usually less accurate.
No More Daylight Saving Time Headaches
Automatic time zone updates also help with daylight saving time. Your clock moves forward or back by one hour at the right moment, and you do not have to touch any settings. Your calendar entries and reminders stay on the correct hour.
Check that it is on, or the twice-yearly change will not be applied for you.
Better App and Website Compatibility
An accurate clock and time zone also keeps apps and websites working properly. Calendar events, messages and video calls all rely on your device reporting the correct time. Many online services compare your clock with their servers. A clock that is off by an hour, or by several, can cause login errors, expired sessions and meetings that show at the wrong time.
Letting Windows manage the time zone removes one common cause of these problems.
The Cons and Limitations of Automatic Time Zone Updates
The feature is useful, but it is not perfect. There are a few downsides, and some situations where you may be better off turning it off.
Battery and Privacy Concerns
The first concern is battery life and privacy. To keep the time zone current, Windows has to check your location from time to time. On a laptop this can cause a small extra drain on the battery. The effect is usually minor, but you may notice it on an older machine.
Privacy is the bigger issue for some people. Automatic time zone detection needs location services, and many privacy-focused users prefer to keep location switched off completely. If that is you, set the time zone manually instead. The steps are at the end of this article.
Inaccurate Location Readings
The second problem is inaccurate location readings. Windows can only guess your position from network data. If your internet provider routes your traffic through a data center in another city, or you are using a VPN, Windows may read that location instead of yours. The result can be a wrong time zone even if you never leave your desk.
If your clock keeps showing the wrong zone, check whether you are on a VPN or a business network that routes traffic elsewhere. That is the most common cause.
Border Town Confusion
The third problem affects people who live near a time zone border. Your computer may move back and forth between two zones depending on which Wi-Fi network or cell tower it connects to that day. That can leave your calendar and alarms an hour out of step.
If this happens to you, turn the automatic setting off and pick the zone you actually live in. It will stay put from then on.
How to Enable Automatic Time Zone Updates in 🪟 Windows 11
Turning on automatic time zone updates takes only a minute in the Settings app. You need to be signed in with an administrator account, because changing device-wide time and location settings requires administrator rights.
- Click the Start button on the taskbar .
- Open the Settings app, which has a small gear icon. The Settings window opens.
- Click Time & language in the menu on the left side.

- Click Date & time on the right side of the window. You will see your current time, the time zone and several date and time switches.
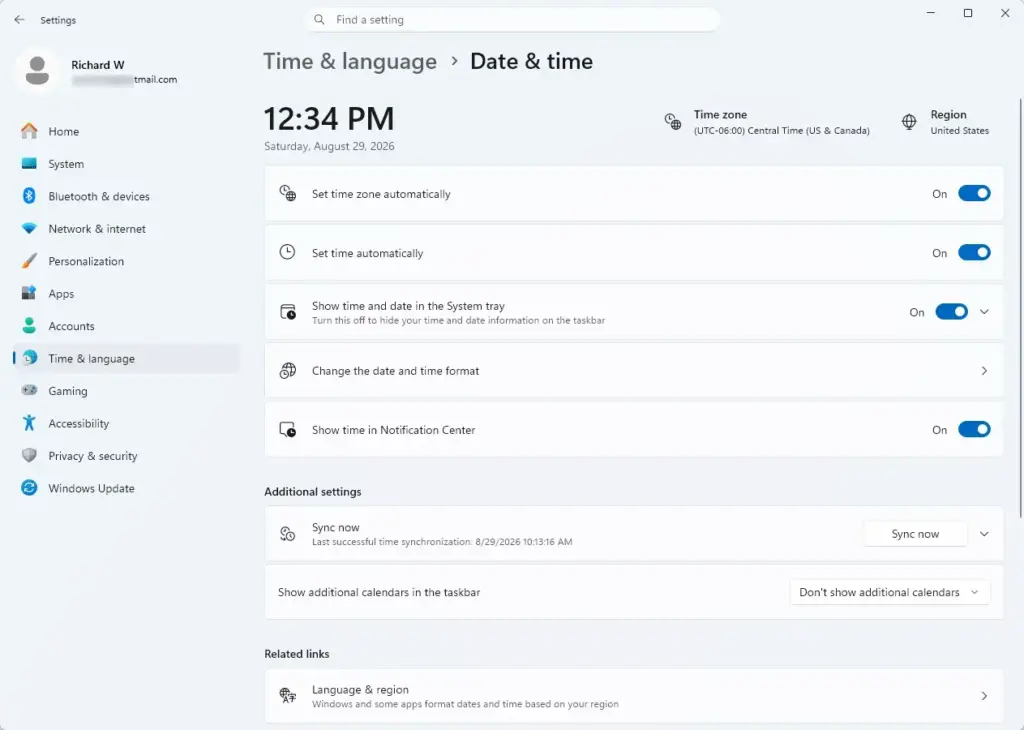
- Find the option called Set time zone automatically.
- Click the toggle switch next to it so that it shows On. The manual Time zone drop-down menu will usually turn grey, because Windows now controls it.
- If the toggle is greyed out, location services are probably switched off. Click the link shown in the settings page to enable location access for your device, or follow the troubleshooting steps in the next section.
Once you finish, Windows checks your location and applies the correct time zone. It can take a short while after you connect to the internet. To undo the change, return to this page and set the toggle back to Off.
Expert Tip: Fixing Greyed-Out Time Zone Settings
The toggle is usually greyed out because location access has been turned off, either for privacy or to save power. Turning location access back on normally makes the switch clickable again. Work Windows 11 devices may also have this restricted by an organization’s policy. If you cannot change the settings below, ask your IT administrator.
Follow these steps to get automatic updates working:
- Open the Settings app from the Start menu.

- Click Privacy & security in the menu on the left.
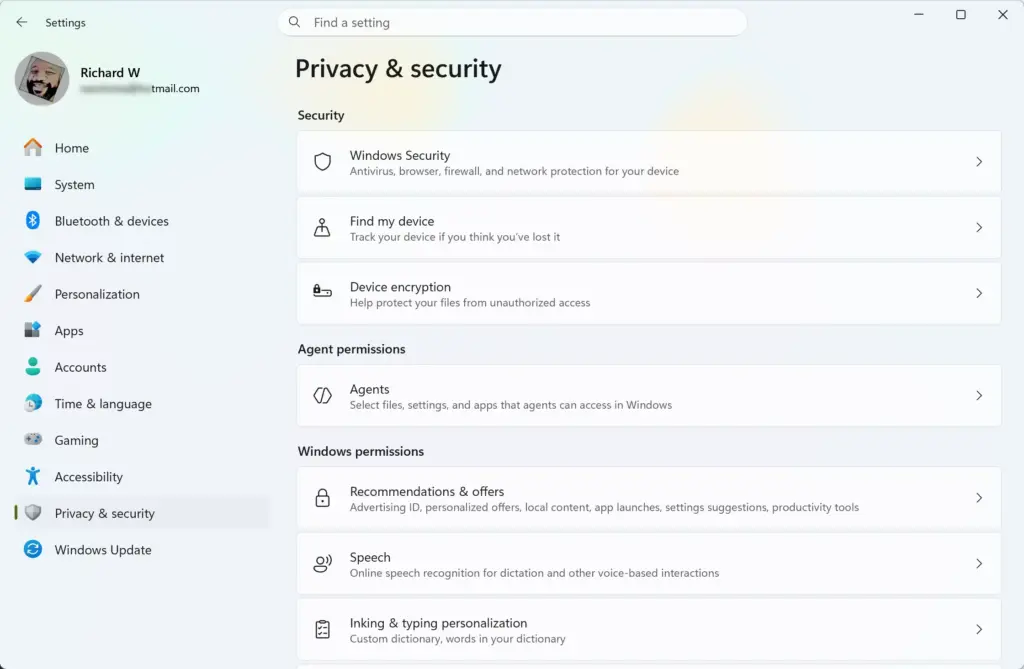
- Scroll down and click Location under the App permissions section.
- Set the main Location services switch to On. The other location options on the page become available.
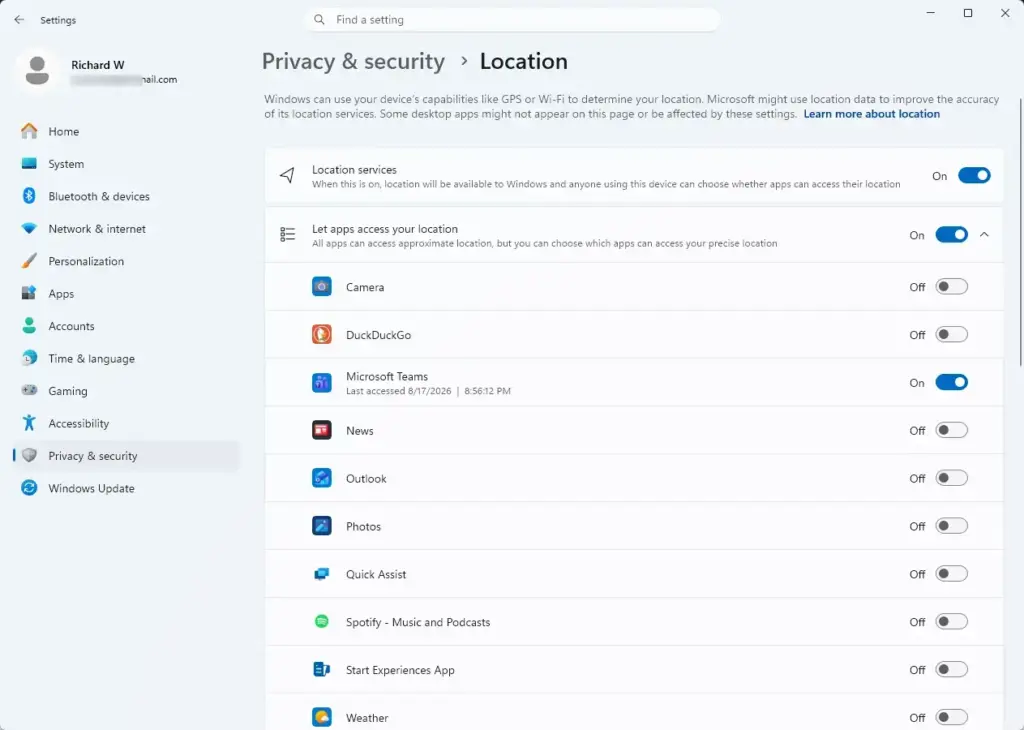
- Scroll down further on the same page and make sure Let apps access your location is also turned on.
- Look down the list of apps and make sure the entry for the operating system or system components is allowed to use your location.
- Go back to Time & language and then Date & time. The Set time zone automatically switch should now be available to turn on.
This is the most common reason people cannot enable automatic time zone updates. If the switch is still greyed out, restart the PC and check again. Also confirm that you are signed in as an administrator.
Alternative Method: Manual Time Zone Configuration
Setting the time zone manually gives you full control when automatic detection picks the wrong region, or when you would rather keep location services off. You turn off the automatic switch and choose your region from a list.
Follow these steps to set your time zone manually:
- Open the Settings app.
- Go to Time & language and click Date & time.
- Set the Set time zone automatically switch to Off. The Time zone drop-down menu is now active.
- Look a little further down the page for the Time zone drop-down menu.
- Click the menu and choose your local city or region from the list.
- Check the clock. It updates immediately to match your selection.
Manual selection is a good choice if you work from a fixed desk and rarely travel. It stops odd network routing from shifting your clock. If you do travel, remember to change the setting yourself, or turn the automatic switch back on when you arrive. Also check that the Adjust for daylight saving time automatically switch is on, so the clock still changes with the seasons.
Summary
Have a question about this guide?
Answered by AI from this guide. Good questions may be added to this page — please don't include personal details.
Did this guide fix your problem?

About the Author
Richard
Tech Writer, IT Professional
Richard is a writer at Geek Rewind who turns complex IT tasks into clear, step-by-step guides. He draws on years of hands-on experience in system administration and enterprise IT operations, focusing on Windows, Linux and WordPress: the problems people actually run into, and the fixes that work. His server and WordPress guides come from systems he runs himself. Richard builds and maintains the platform behind Geek Rewind, from its Ubuntu servers and Nginx configuration to its custom WordPress plugins. Many new tutorials start with readers' questions, and he's always glad to answer them in the comments.
No comments yet — be the first to share your thoughts!