Why Does Windows 11 Keep Resetting My Time Zone Automatically

Automatic time zone changes in Windows 11 happen when your computer guesses your location from Wi-Fi networks, your internet provider, or location services. A wrong guess makes Windows switch your clock to the wrong time zone without asking you.
The quickest fix is to turn off the automatic time zone setting in Settings Time & language > Date & time and pick your time zone by hand. That locks the clock to the zone you chose. If the clock still misbehaves after that, the later sections cover location permissions, time sync, the Windows Time service, VPNs, and a dead CMOS battery.
Windows 11 resets your time zone automatically because Location Services uses Wi-Fi networks, your IP address, and internet time servers to guess your location, then applies the wrong regional settings when the guess is incorrect. Turn off Set time zone automatically in Settings Time & language Date & time, then manually select your correct time zone from the dropdown menu to lock it in place.
Understanding Why 🪟 Windows 11 Changes Your Time Zone
Windows 11 changes your time zone on its own because it relies on Location Services, internet time servers, and Wi-Fi network data to work out where you are. When these background features get confused by your connection or signal strength, Windows applies the wrong regional settings and moves your clock.
- Location Services: Windows uses GPS (if your device has it), nearby Wi-Fi networks, and your IP address to estimate where you are. Desktop PCs usually have no GPS, so they depend on the less precise Wi-Fi and IP data.
- Internet Time Servers: Your computer contacts time servers over the internet to keep the clock accurate. These servers correct the time itself, not the time zone.
- Network Data: Your router or internet service provider may send region information that points to the wrong place.
Internet service providers sometimes route your connection through a data center in a different city or state. When Windows 11 checks where your traffic appears to come from, it can wrongly decide you have moved. It then updates your time zone to match that wrong location. If you travel often or use a virtual private network, the wrong reset happens more often.
A useful rule of thumb: if the time is right but the zone is wrong, suspect location. If the zone is right but the time is off by minutes or hours, suspect time sync, the Windows Time service, or the CMOS battery.
Basic Fix: Turn Off Automatic Time Zone Settings
To stop Windows 11 from changing your time zone automatically, open Settings Time & language > Date & time and turn off Set time zone automatically. Then choose your correct time zone from the list yourself. Windows will leave the zone alone from then on.
Lock in your correct time zone with these steps:
- Click the Start button on your taskbar and open the Settings app (the gear icon). The Settings window opens.

Taskbar - Click Time & language on the left side of the window.
- Click Date & time on the right side. You now see the clock settings, including a list of time-related options.
- Find the switch labeled Set time zone automatically. If it is on, click the toggle to turn it Off. If the switch is greyed out, you may need administrator rights to change it. On a work or school PC, an organization policy may also control it, and only your IT department can change that.
- Scroll down slightly to the Time zone setting. Click the drop-down menu and choose your correct local time zone from the list. The clock at the top of the page should change to the right local time.
The change applies immediately. You do not need to restart your computer.
To undo it later, come back to the same page and turn Set time zone automatically back on. Note that this setting depends on Location services. If location is switched off, Windows cannot work out your zone on its own, so automatic mode will not work properly.
Once you finish, Windows keeps the zone you chose. If the clock still acts strangely, check the settings in the next sections.
Check Location Services Permissions in 🪟 Windows 11
Checking location permissions stops apps and system features from feeding wrong regional data to your clock. Open Settings Privacy & security > Location, then either turn off the main location switch or limit which apps can use your position.
Here is how to review your location settings:
- Open the Settings app from your Start menu.

Settings - Click Privacy & security in the left menu.
- Under the "App permissions" section, click Location. The location settings page opens.
- Look at the main Location services switch and set it the way you want. If you want full control over your time zone, turning location services off completely is very effective. The trade-off is that maps, weather, and other apps lose location access too.
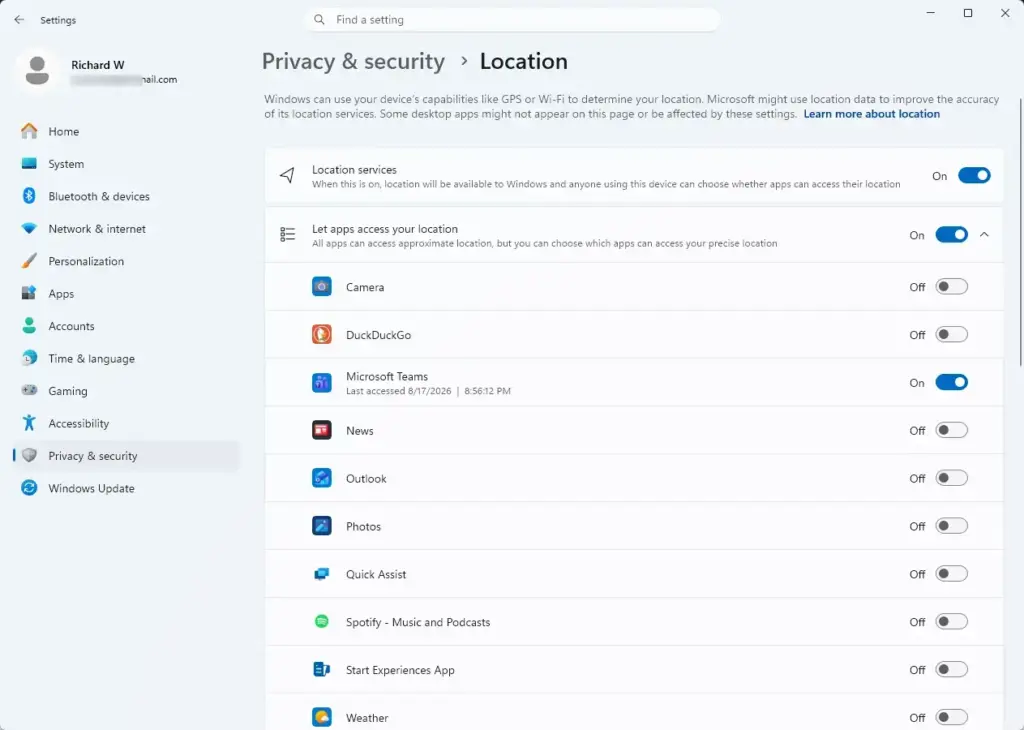
Settings › Privacy › Location - If you want location on for other apps, scroll down to Let apps access your location. Turn individual apps on or off in the list below it.
- Check the Recent activity list to see whether the time zone feature or a mapping app recently asked for your location. An app you do not recognize there is worth switching off.
Restricting location access keeps background processes from grabbing a wrong location fix and forcing a time zone update. To undo it, return to the same page and switch the settings back on. No restart is needed.
Sync Your Clock Manually Using the Internet Time Tool
Syncing your clock manually with the Internet Time tool fixes drift of a few minutes or seconds by checking your computer against an official time server. Open Control Panel, go to Date and Time, click the Internet Time tab, click Change settings, then click Update now.
Keep in mind that this tool corrects the time, not the time zone. It helps rule out a bad sync as the cause of your clock problems.
Here is how to use the Internet Time tool:
- Click the Start button, type Control Panel in the search box, and click the Control Panel app when it appears.

Control Panel - Change the View by setting in the top right corner to Large icons or Small icons so every option shows.
- Click Date and Time. A small window opens.
- Click the Internet Time tab at the top of that window. If you do not see this tab, your PC is probably joined to a work domain, where the domain controller sets the time instead.
- Click the Change settings button. This step needs administrator rights. If User Account Control asks for permission, click Yes. The Internet Time Settings window opens.
- Make sure the box next to Synchronize with an Internet time server is checked.
- Open the Server drop-down menu and select a reliable server, such as time.windows.com or time.nist.gov.
- Click the Update now button. You should see a message saying the clock was successfully synchronized. If you get an error, try the other server in the list, and check that your internet connection works.
- Click OK to save your changes and close the windows.
This refreshes your link to official time keepers and clears small time errors that can confuse the system.
Advanced Fix: Restart the Windows Time Service
The Windows Time service is a background program that syncs your clock with internet servers. Restarting it clears stuck processes and often fixes erratic clock behavior. Open the Start menu, type services, open the Services app, find Windows Time, and restart it.
You can restart the Windows Time service like this:
- Click the Start button, type Services in the search box, and click the Services app. Managing services requires administrator rights. The Services window opens with an alphabetical list.
Settings › Privacy & security › Search - Scroll down the list until you find Windows Time.
- Click Windows Time to select it.
- Click Restart, either in the left pane or after right-clicking the service name. If the service is not running, click Start instead. The Status column should show Running.
- Right-click Windows Time and choose Properties.
- Find the Startup type drop-down menu and change it to Automatic, so the service runs every time the computer boots.
- Click Apply, then click OK.
Restarting the service gives the clock system a clean slate and often stops odd time zone resets. No full restart of the PC is needed. If you want to undo the startup change, set Startup type back to its earlier value. The Services app is also where you check that the service is not disabled, which would stop syncing entirely.
This matters because a wrong clock breaks website logins, blocks secure software updates, and throws off calendar appointments on all your connected devices.
Unique Angle: How VPNs and Proxies Trick Your Windows Clock
Virtual private networks (tools that hide your real internet location) and proxy servers can confuse your Windows clock. They route your traffic through servers in other cities or countries, and Windows may take that remote location as your own and update the time zone to match.
For example, if you connect to a VPN server in another country, your traffic leaves from that remote computer. Windows 11 sees the remote connection and may assume you have traveled there too. It then changes your time zone to match the VPN server's location.
If your time zone changes only while a VPN is on, the VPN is the likely cause. You can also turn off location services by going to Settings Privacy & security > Location and switching Location services to Off. Combined with a manually chosen time zone, this stops the VPN from influencing your clock.
- Open your VPN app's settings and look for options related to "Local network access" or "Location spoofing".
- Disconnect the VPN when you do not need it. Or set your time zone manually, as shown in the manual steps earlier in this guide, and ignore the temporary mismatch while the VPN is active.
- Check your VPN provider's help page. Some advanced VPN clients can exclude system location services from the tunnel.
Unique Angle: Motherboard CMOS Battery Issues and Time Resets
Without charge, the battery can no longer keep the internal clock chip running while the PC is off or unplugged.
Every desktop and many older laptops have this small battery on the motherboard. It supplies a tiny trickle of power so the clock keeps running when the main power is off.
When the battery dies, the computer forgets the date and time each time it loses power. On the next start, Windows 11 boots, sees a wildly wrong date, and tries to fix it, sometimes picking the wrong time zone along the way. A typical sign is a clock that shows an old year or a default date after the PC has been off overnight.
To fix a failing CMOS battery:
- On a desktop, shut down, unplug the power cable, and open the case. Find the flat coin battery (usually a CR2032) on the motherboard, pop it out, and put in a new one. Touch bare metal on the case first to discharge static.
- On a modern laptop, the battery may be soldered in or hard to reach. Consider taking it to a repair shop for a replacement.
Then boot Windows and check the time zone in Settings Time & language > Date & time. These batteries usually last for years, so a new one typically ends the repeated resets for a long time.
Summary
A Windows 11 clock that will not stay correct is usually easy to fix once you know how location services, time servers, and hardware batteries interact. This guide covered how to turn off automatic time zone updates, manage location permissions, resync the clock, restart the Windows Time service, and troubleshoot hardware.
We also looked at hidden triggers such as VPN use, which can make Windows think you have moved, and a dying CMOS battery, which can wipe the clock completely. Work through the steps in order, and your clock should stay accurate and your schedules should stay on time.
Did this guide fix your problem?

About the Author
Richard
Tech Writer, IT Professional
Richard is a writer at Geek Rewind who turns complex IT tasks into clear, step-by-step guides. He draws on years of hands-on experience in system administration and enterprise IT operations, focusing on Windows, Linux and WordPress: the problems people actually run into, and the fixes that work. His server and WordPress guides come from systems he runs himself. Richard builds and maintains the platform behind Geek Rewind, from its Ubuntu servers and Nginx configuration to its custom WordPress plugins. Many new tutorials start with readers' questions, and he's always glad to answer them in the comments.
No comments yet — be the first to share your thoughts!