How to Dual Boot Windows 11 with Windows 10

Dual booting Windows 11 alongside Windows 10 sets up a startup menu on your PC. Each time you turn the computer on, you choose which operating system to run. This lets you test the newer system while your Windows 10 setup stays intact on its own partition.
You need three things before you start: at least 64GB of free drive space, a Windows 11 installation USB drive, and a PC that meets the Windows 11 requirements. Those requirements are UEFI firmware, Secure Boot, TPM version 2.0, at least 4GB of RAM, and a compatible processor. Check these first. If the PC fails any of them, the Windows 11 installer will stop with a compatibility message.
Back up your important files before you touch any partitions. Partition changes rarely go wrong, but a backup makes a mistake cheap to fix.
To dual boot Windows 11 with Windows 10, shrink your C: drive in Disk Management by at least 65536 MB, leaving the space unallocated. Then boot from a Windows 11 USB installer (at least 8GB), choose that unallocated space during setup, and pick your OS from the startup menu each time you power on.
Option 1Installing 🪟 Windows 11 First (The “Clean Slate” Approach)
This option installs Windows 11 onto a separate drive or partition by booting from a USB stick, before you use either operating system for the new install. You get a fresh Windows 11 that is separate from your current Windows 10 environment. This is the most reliable way to dual boot, because the installer lets you choose exactly where Windows goes.
Step 1Prepare Your Drive Space
You need free space for Windows 11. You can get it by shrinking your current partition in Disk Management, or by using a completely separate SSD or hard drive.
To shrink the current partition:
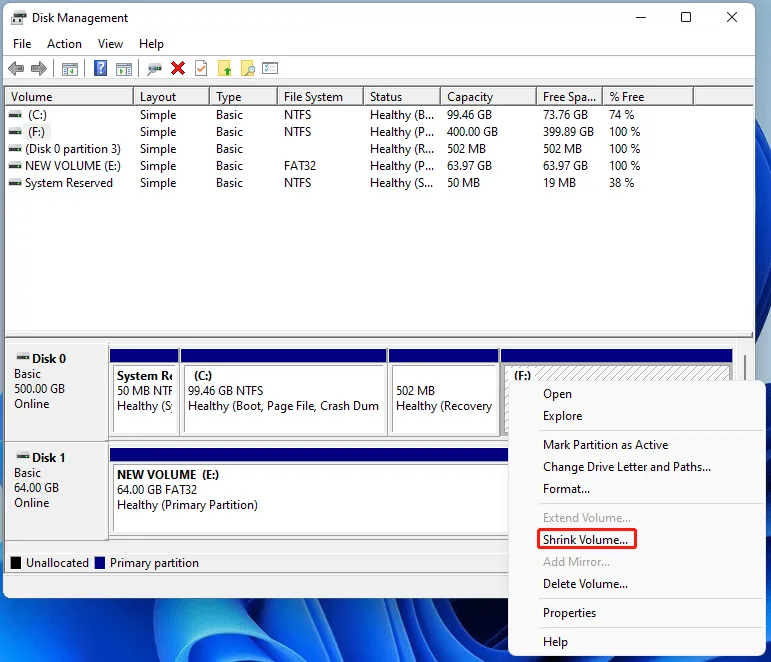
- Right-click the Start button and choose Disk Management. You will see a list of your drives and a graphical map of their partitions.
- Right-click your main drive (usually C:) and select Shrink Volume. Windows takes a moment to calculate how much space it can free.
- In the amount box, enter at least 65536 MB. That is 64GB, the minimum for Windows 11. Allow more if you plan to install apps on it.
- Click Shrink. A new block of Unallocated space, shown in black, appears next to your C: drive.
Leave that space unformatted. The Windows 11 installer will create the partition itself.
If Windows offers to shrink by much less than you expected, unmovable system files are sitting near the end of the partition. Close other programs and try again. If that fails, a partition tool that can move those files may help. If BitLocker or device encryption is on, suspend it before shrinking.
- Shrink an existing partition: If you have a large drive with lots of free space, you can make it smaller to create a new, empty space. Think of it like cutting a slice from a larger pie.
- Wipe a separate disk: If you have a second hard drive or SSD that you don't need, you can erase everything on it to make it ready for Windows 11. This will delete all data on that drive.
Double-check that you are working with the correct drive to avoid accidentally deleting important files. Check the disk number and the size shown in Disk Management, not just the drive letter.
Step 2Create Your 🪟 Windows 11 Bootable USB
You need a USB flash drive of at least 8GB to install Windows 11. Creating the installer erases everything on the stick, so use an empty one or copy its files elsewhere first.
- Download the Windows 11 Media Creation Tool from Microsoft and run it. Click Yes if User Account Control asks for permission.
- Accept the license terms. Choose your language and edition, or leave the recommended options checked.
- When asked which media to use, choose USB flash drive and click Next.
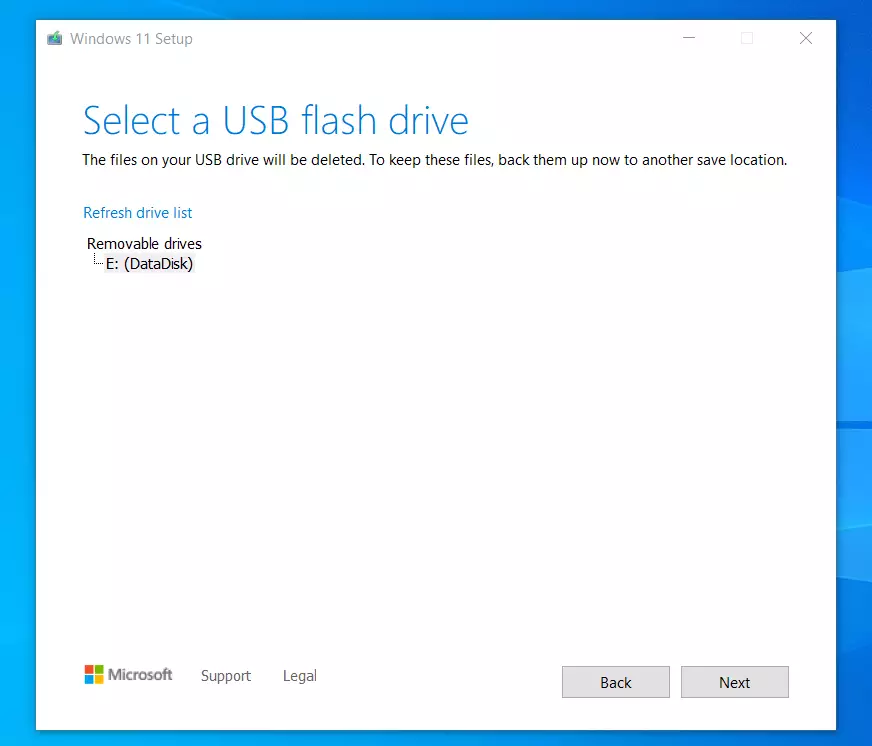
- Select your USB drive from the list and click Next. The tool downloads Windows 11 and writes it to the stick. Wait until it says the drive is ready, then click Finish.
Modern PCs start in UEFI mode, so the USB drive must boot that way. When you open the boot menu later, pick the entry for your USB drive that is labeled UEFI if you see two entries.
Step 3Disconnect Other Hard Drives (Temporarily!)
Disconnect extra hard drives before you run the installer. This prevents accidental data loss. It also stops Windows from scattering boot files across multiple disks.
- Shut the computer down completely and unplug it. On a laptop, shut it down and disconnect the charger.
- Open the tower or laptop case.
- Unplug the SATA or power cables from every secondary storage drive. Leave connected only the drive that holds Windows 10 and the drive or space you are installing to.
- Close the case, reconnect power, and continue.
- Avoid Mistakes: This stops you from accidentally installing Windows 11 on the wrong drive or erasing a drive you wanted to keep.
- Correct Boot Files: This makes sure the startup files (the small pieces of code that help your computer start) are installed on the drive where Windows 11 will be, not on another connected drive.
However, disconnecting the drives is the safest method. Reconnect the drives after the install is finished. Do this with the power off.
Step 4Boot from Your 🪟 Windows 11 USB
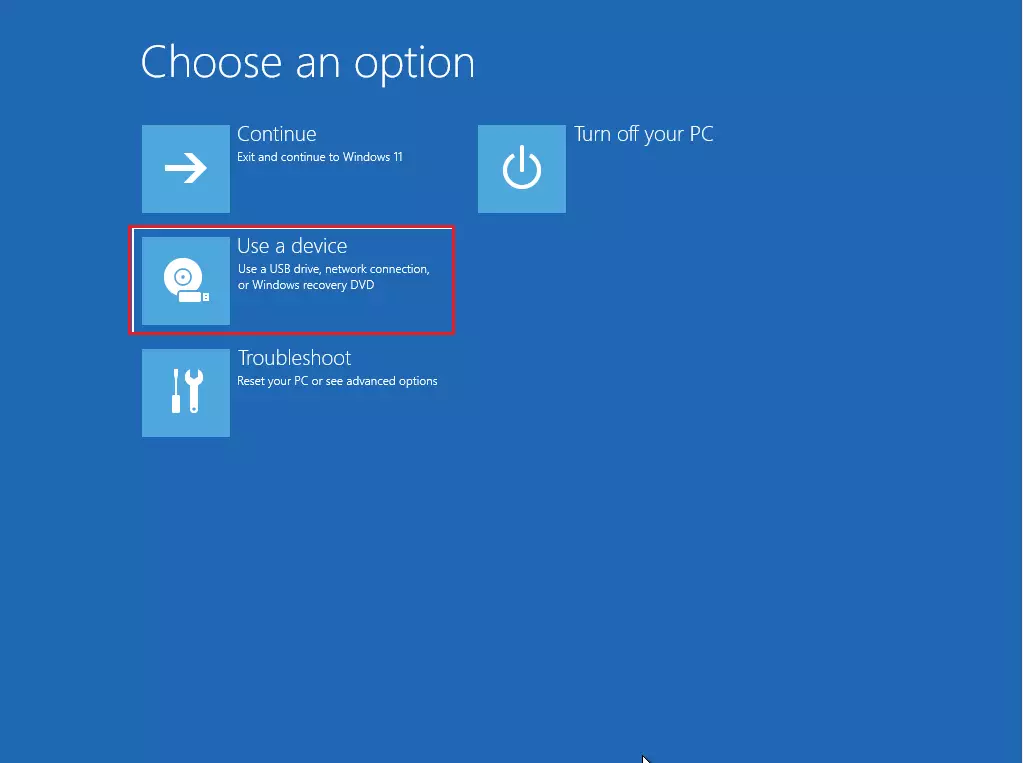
To boot from the Windows 11 USB drive, restart your computer and press your manufacturer's boot menu key repeatedly as it starts. Common keys are F12, F11, or Esc. Some makers use others, such as F10 or F2, so check your PC or motherboard manual if none of these work.
- Plug the USB drive into the PC and restart it.
- Tap the boot menu key as soon as the logo appears. A temporary list of boot devices opens.
- Use the arrow keys to select your USB drive and press Enter. If you see a "Press any key to boot from USB" message, press a key.
The Windows 11 setup screen appears. You can now install the operating system alongside Windows 10. If the PC goes straight to Windows 10 instead, you missed the window. Restart and try again, or check that the USB drive is listed as UEFI.
Step 5Install 🪟 Windows 11
Once your computer starts from the USB, the Windows 11 setup begins. Follow the instructions on the screen.
- Choose your language and keyboard settings, then click Next and Install now.
- Enter your product key if asked. If you don't have one, select I don't have a product key. Choose the edition you want, such as Home or Pro, if prompted.
- When asked what type of installation you want, choose Custom: Install Windows only (advanced). Do not choose the upgrade option, because it would replace Windows 10.
- On the "Where do you want to install Windows?" screen, select the Unallocated Space you created in the previous step, or the separate disk you prepared. Check the size against what you set up. Make sure you choose the correct location.
- Click Next. Setup copies files and restarts several times. Let it boot from the hard drive each time instead of the USB.
Windows 11 Home needs an internet connection and a Microsoft account during first setup. Pro offers a way to set up a local account.
Step 6Choosing Your Operating System at Startup
After a dual boot installation, the Windows boot manager runs every time you turn on your PC and asks which system to start. Select the top listed operating system to load Windows 11. Use the arrow keys to highlight your older Windows 10 installation and press Enter when you need your previous files. If you do nothing, the default entry loads after a short countdown.
You can rename the boot option later to clearly say "Windows 11." That makes it easy to identify which operating system to select from the boot menu, and it prevents accidentally starting the wrong version.
To change which system is the default, or how long the menu waits, click Change defaults or choose other options on the boot screen. You can also use System Properties Advanced Startup and Recovery from inside Windows.
Option 2Installing 🪟 Windows 11 from Within 🪟 Windows 10
This method is more like an upgrade. You start the Windows 11 installation while you are already running Windows 10. It can be easier if you prefer not to change boot menus and BIOS settings too much.
If you reach a screen that only offers to keep your files and apps or to replace Windows 10, and gives no choice of partition, stop. That path would replace Windows 10. Use Option One and boot from the USB drive instead.
Step 1Prepare a Dedicated Space for 🪟 Windows 11
The setup program needs somewhere to install. You can prepare that space from inside Windows 10 by shrinking an existing partition or by formatting a clean drive.
- Right-click the Start button and choose Disk Management.
- Right-click your primary C: drive and select Shrink Volume.
- Enter at least 65536 MB (64GB) and click Shrink. A block of Unallocated space appears.
- Leave it unformatted if you want the installation wizard to create the partition when it asks where to put the files. Or create a named partition as described below.
- Create a new partition: If you have space on a drive, create a new partition and give it a clear name, like "Windows 11." Make sure it's large enough for the installation.
- Format a separate disk: If you have an empty disk, you can erase everything on it and name it "Windows 11."
Naming the partition or disk "Windows 11" before installing helps you find the correct location during setup. This prevents accidental installation on the wrong drive, especially when you have multiple storage devices. A named partition is easy to spot by its label and size. Unallocated space shows up as Unallocated Space.
Step 2Disconnect Other Hard Drives (Again!)
Disconnect any hard drives that don't contain your current Windows 10 installation before starting the Windows 11 setup from within Windows 10. This prevents the setup from placing startup files on the wrong drive. It also greatly reduces the risk of accidentally erasing important data.
Shut the PC down fully before unplugging any internal drive, then power it back on and boot into Windows 10. Reconnect the drives when the installation is finished.
Step 3Get Your 🪟 Windows 11 Installation Ready
Getting the installation ready means having either the official ISO disk image file from Microsoft or a bootable flash drive built with the Media Creation Tool. Pick one of the two.
- Windows 11 ISO file: Download the Windows 11 ISO file from Microsoft. Once downloaded, you can "mount" it by double-clicking it in File Explorer. This makes it appear like a temporary DVD drive.
- Windows 11 USB drive: If you created a bootable USB drive using the Media Creation Tool (like in Option One), you can plug in that USB drive.
Either way, the setup program runs directly from Windows 10. After mounting the ISO, a new drive letter appears in File Explorer under This PC.
Step 4Launch the 🪟 Windows 11 Setup
- Open File Explorer (Windows key + E).
- Navigate to the mounted ISO or your connected USB drive.
- Look for the `sources` folder and open it.
- Inside, find `setup.exe` and double-click it to begin the Windows 11 installation.
The setup window opens and checks your PC. If your hardware fails a requirement, it tells you which one.
Step 5Follow the Installation Prompts
Follow the installation prompts carefully.
- Click Yes on the User Account Control window.
- Enter your product key if prompted.
- Choose the custom installation option. If you only see choices to keep or remove your files, read the caution earlier in this option before going on.
- Select the specific empty partition or unallocated drive space you created earlier. This lets Windows 11 install alongside your existing Windows 10 setup without overwriting your files.
When the Windows setup program asks where to install Windows, select the partition or disk you prepared earlier and named "Windows 11." Check the size before you click Next.
Step 6Selecting 🪟 Windows 11 at Startup
The "Windows Boot Manager" screen appears after your computer restarts. It may show a list of operating systems. Your newly installed Windows 11 should be clearly labeled in this list. Select Windows 11 to start your Windows 11 environment, and let setup finish its remaining restarts and first-run screens.
Fixing the Boot Menu Name (So It Says "🪟 Windows 11"!)
Sometimes both operating systems appear labeled as Windows 10 on the startup screen. The fix is in the Registry Editor. You open it, go to the boot-related key, and change the values so your startup options show the correct names.
Important Warning: Changing the Windows Registry can be dangerous if you are not careful. Incorrect changes can cause serious problems with your system. It is highly recommended to create a backup of your registry before making any changes. In Registry Editor, choose File Export, select All as the export range, and save the file somewhere safe. To undo later, double-click that file to merge it back.
Step 1Open Registry Editor
- Press Windows key + R to open the Run box.
- Type
regeditand press Enter, or click OK. - If a User Account Control prompt appears, click Yes.
The Registry Editor window opens, with a folder tree on the left and values on the right.
Step 2Navigate to the Boot Configuration Data Editor
In the Registry Editor, you need to go to a specific location. In the left-hand panel, click through the following path:HKEY_LOCAL_MACHINE\SOFTWARE\Microsoft\Windows\CurrentVersion\Setup
Click the small arrow next to each folder to expand it. When you reach the last key, its values appear in the right-hand panel.
Step 3Find and Modify the `CurrentOS` Value
The CurrentOS value tells the system which operating system is active in the dual boot menu. Find it in the right-hand panel of your registry path and double-click it.
Value Name: CurrentOS
Value Type: REG_DWORD
Value Data: This value tells the system which OS is the "current" one for the boot menu. It's usually 1 for Windows 10 and 2 for Windows 11. If your Windows 11 option is wrongly labeled as Windows 10, this value is probably set to 1. Change it to 2 to correctly identify Windows 11.
- Double-click
CurrentOSin the right-hand panel. An edit window opens. - In the Value data box, delete the number that is there and type
2. - Click OK. The new number shows in the Data column.
Write down the original number first. If the labels get worse, you can put it back the same way.
Step 4Restart Your Computer
A restart applies the registry changes to your startup menu.
- Close the Registry Editor.
- Open the Start menu, click the power button, and choose Restart.
- Check the startup screen and confirm that both operating systems display their correct names.
Tip: If changing CurrentOS doesn't fix it right away, or if you want to be extra sure, you can also look for a value named TargetOS in the same registry location. Setting TargetOS to 2 might also help. Always restart your computer after making changes to the registry.
Summary
Dual booting lets you use both Windows 11 and Windows 10 on the same PC, and you choose which to start each time you turn it on. The key steps are preparing at least 64GB of drive space, creating a bootable USB drive, and disconnecting extra drives during installation to avoid errors. After that, you check the startup boot menu and correct the labels if both entries say Windows 10.
Have a question about this guide?
Answered by AI from this guide. Good questions may be added to this page — please don't include personal details.
Did this guide fix your problem?

About the Author
Richard
Tech Writer, IT Professional
Richard is a writer at Geek Rewind who turns complex IT tasks into clear, step-by-step guides. He draws on years of hands-on experience in system administration and enterprise IT operations, focusing on Windows, Linux and WordPress: the problems people actually run into, and the fixes that work. His server and WordPress guides come from systems he runs himself. Richard builds and maintains the platform behind Geek Rewind, from its Ubuntu servers and Nginx configuration to its custom WordPress plugins. Many new tutorials start with readers' questions, and he's always glad to answer them in the comments.
No comments yet — be the first to share your thoughts!