How to Format Drive in Windows 11
Formatting a drive in Windows 11 completely erases all data on that drive and prepares the drive to store files again. This process is essential before you install a new operating system or if you want to securely remove all personal information from a drive.
Formatting a drive gives your drive a fresh start, making the drive work properly with Windows 11. You might need to format a drive if the drive is not working right, or if you want to clear everything off the drive before giving the drive to someone else.
For example, formatting a USB drive means all pictures, documents, and programs stored on it disappear forever. This is important to know before you begin.
Open Settings, navigate to System, then Storage, and Advanced storage settings. Select Disk & volume, choose your USB drive, click Properties, and then click Format. Confirm the action to erase and prepare the drive.
What Happens When You Format a Drive?
When you format a drive, Windows erases all existing files and creates a new organizational structure, called a file system, to manage data. This process prepares the drive for new information and allows you to choose the best file system for your needs, which is important when you format USB drive Windows 11.
- Erases Data: All the files and folders currently on the drive are removed.
- Creates a File System: This is the organizational structure that Windows uses to store, find, and manage files. You’ll get to choose which file system to use, and we’ll explain the common ones.
- Sets Up for Use: The drive is now ready to be used for saving and accessing files.
During the formatting process, you’ll encounter a few options:
- Volume Label: This is simply the name you want to give your drive. Think of it as a nickname that will show up in File Explorer (like “My Photos” or “Backup Drive”).
- File System: This is the most important choice. The most common options for USB drives are:
- FAT32: It’s old but very compatible. Works with almost everything, including older devices and Macs. However, it has a major limitation: you can’t store individual files larger than 4GB.
- exFAT: This is like a modern upgrade to FAT32. It doesn’t have the 4GB file size limit and works well with both Windows and macOS. It’s a great all-around choice for most USB drives.
- NTFS: This is the standard file system for Windows hard drives. It supports large files and offers features like file permissions and encryption. However, Macs can usually only read NTFS drives, not write to them without extra software.
- Allocation Unit Size: This refers to how the drive is divided into small blocks for storing data. For most users, the default setting is perfectly fine and doesn’t need to be changed.
Quick Format vs. Full Format:
- Quick Format: This is the fastest option. It basically just deletes the table of contents for your files, making them invisible and allowing new data to be written over them. It doesn’t check the drive for errors.
- Full Format: This takes much longer. It not only erases the data but also checks the entire drive for bad sectors (areas that can no longer store data reliably). Use this if you suspect your drive might be having problems or if you’re preparing it for sale/disposal to thoroughly wipe the data.
Ready to give your drive a fresh start? Let’s get formatting!
Method 1Formatting in File Explorer (The Quickest Way)
Formatting a USB drive in Windows 11 using File Explorer is the fastest and most common method, perfect for everyday users. You can quickly access this option by simply plugging in your USB drive and opening File Explorer to find it among your listed drives.
- Connect Your USB Drive
Plug your USB drive into an available USB port on your computer. Windows should recognize it and assign it a drive letter.
- Open File Explorer
You can do this by pressing the Windows key + E on your keyboard, or by clicking the folder icon on your taskbar.
- Find Your USB Drive
In File Explorer, look for “This PC” on the left-hand side. Click on it, and you’ll see all your connected drives listed under “Devices and drives.” Find your USB drive. It will likely have a name and a drive letter (like D:, E:, or F:)
Start the Formatting Process
To start formatting your USB drive in Windows 11, you can either right-click directly on the drive in File Explorer and select ‘Format…’, or click the drive once to select it and then use the ‘…’ button at the top of the window to find the ‘Format…’ option.
- Right-click directly on your USB drive icon and select Format… from the menu that pops up.
- Or, click once on your USB drive to select it, then look at the top of the File Explorer window. Click the button with three dots (…), and then choose Format… from the dropdown menu.
- Choose Your Formatting Options
A new window will appear with several options. Take your time here:
Capacity: You usually don’t need to change this. It shows the total size of your drive.
File system: Select the file system you want from the dropdown menu. For most USB drives, exFAT is a good choice for compatibility with different devices, or NTFS if you’re primarily using it with Windows.
Allocation unit size: Leave this at the Default unless you have a specific reason to change it.
Volume label: Type in a name for your drive here.
Format options:
Check the box for Quick Format if you want to format it quickly (recommended for most situations).
Leave Quick Format unchecked if you want to perform a full format, which takes longer but checks for errors.
Tip: If you’re unsure, stick with exFAT and Quick Format. It’s the most common and versatile setup for USB drives.
- Begin Formatting
Once you’ve selected your options, click the Start button at the bottom of the window.
- Confirm and Wait
Windows will give you one last warning that formatting will erase all data. If you’re absolutely sure, click OK.The formatting process will begin. A quick format usually takes just a few seconds to a minute. A full format can take much longer, depending on the size of your drive.
- Formatting Complete!
When it’s done, you’ll see a message saying “Format Complete.” Click OK, and then you can close the formatting window by clicking Close.Your USB drive is now formatted and ready for use!
Method 2Formatting in Disk Management (For More Control)
For more advanced control when you format a USB drive in Windows 11, Disk Management offers a detailed view of all your storage devices. This tool is useful if File Explorer has issues or if you need to manage drive partitions before formatting.
- Open Disk Management
There are a couple of ways to get here:
- Press the Windows key + X, and then click on Disk Management from the menu.
- Or, type “Create and format hard disk partitions” into the Windows search bar and select it.
- Locate Your USB Drive⚠️WarningIn the Disk Management window, you’ll see a list of all your drives. Look for your USB drive. It will be listed as a removable drive and should show its capacity and the drive letter. Be very careful to select the correct drive!Warning: Double-check that you’ve identified the correct drive. Formatting the wrong drive could lead to significant data loss.
- Start the Formatting Process
Right-click on the partition (the main part) of your USB drive that you want to format. From the context menu, select Format….
- Choose Your Formatting Options
A “Format” window will pop up. Here’s what you can set:
- Volume label: Give your drive a name.
- File system: Choose between FAT32, exFAT, NTFS, or ReFS. Again, exFAT is often the best choice for USB drives.
- Allocation unit size: Leave this at the Default.
- Perform a quick format: Check this box for a fast format. Uncheck it for a full, slower format that checks for errors.
- Enable file and folder compression: This option is only available for NTFS. You can check it if you want to save space by compressing files, but it can slow down access to those files. For most USB drives, you can leave this unchecked.
- Confirm and Format⚠️WarningClick OK when you’re ready. You’ll get a final warning about data loss. Click OK again to proceed.
- Wait for Completion
Disk Management will show the progress. Once it’s finished, the status next to your drive should show as “Healthy” again. You can then close Disk Management.
Method 3Formatting in 🪟 Windows 11 Settings (A Modern Approach)
Windows 11 Settings provides a modern and clean way to format your USB drive, integrating storage management directly into the system. You can access this by opening Settings, navigating to System, and then selecting Storage to find your drive.
- Open Settings
Press the Windows key + I, or click the Start button and select the Settings gear icon.
- Navigate to Storage Settings
In the Settings app, click on System in the left-hand menu. Then, on the right side, click on Storage.
- Access Advanced Storage Settings
Scroll down a bit on the Storage page. You’ll see a section called “Storage management.” Click on Advanced storage settings to expand it.
- Go to Disks & Volumes
Under Advanced storage settings, click on Disks & volumes. This will show you all the drives connected to your PC.
- Find and Select Your USB Drive
Look through the list for your USB drive. Once you find it, click the Properties button next to it.
- Initiate Formatting
In the drive’s properties window, you’ll see a button that says Format. Click it.
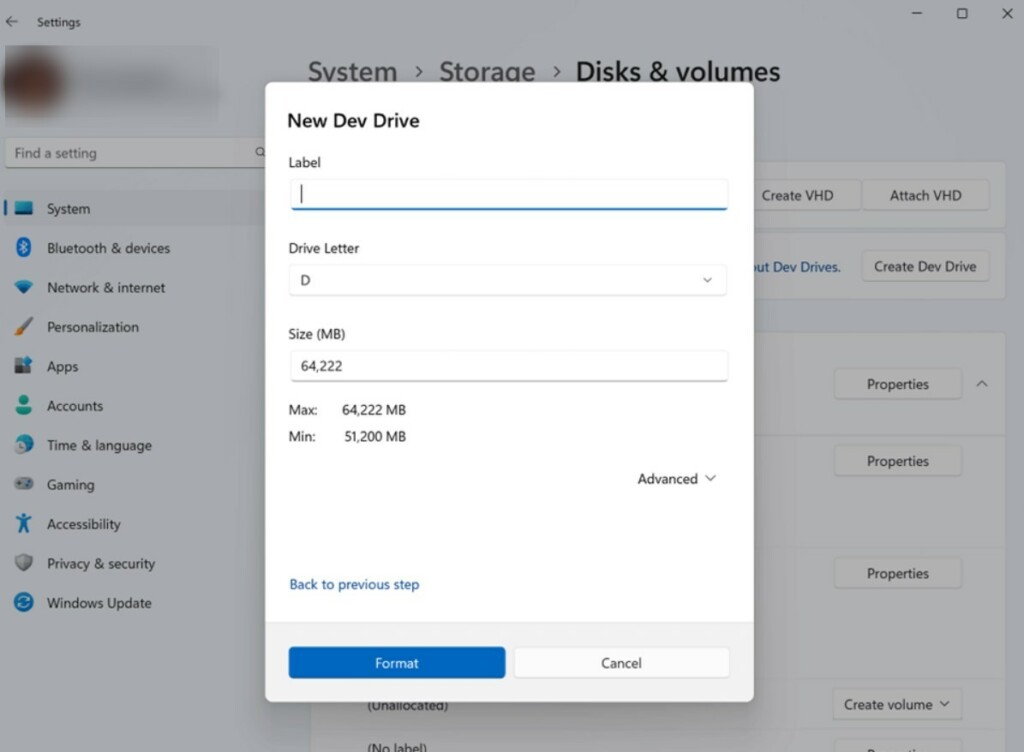
Set Up Formatting Options
When you format a USB drive in Windows 11, you’ll see a window with several options to set up. You can give your drive a ‘Label’ (name), choose a ‘File system’ like exFAT or NTFS, decide on the ‘Allocation unit size’ (usually best left at default), and select ‘Perform a quick format’ for speed.
- Label: Enter a name for your drive.
- File system: Choose your preferred file system (exFAT, NTFS, etc.).
- Allocation unit size: Leave this at the default.
- Perform a quick format: Check or uncheck this based on whether you want a quick or full format.
- Enable file and folder compression: Again, this is usually only relevant for NTFS and can often be left unchecked for USB drives.
- Format the Drive
Click the Format button. Confirm the warning about erasing data by clicking OK.
- Formatting Complete
Once finished, you can close the Settings app. Your drive is now ready.
Choosing the Right File System for Your USB Drive
Understanding file systems is key when you format a USB drive in Windows 11, as each has different strengths. FAT32 offers broad compatibility but limits file size, exFAT is a good balance for most USB drives, and NTFS is best for drives used only with Windows computers.
- FAT32: Best for maximum compatibility if you need to use the drive with very old devices, some gaming consoles, or if you frequently share files with macOS users who don’t have special software. The big downside is the 4GB maximum file size.
- exFAT: This is often the sweet spot for USB drives. It supports very large files and works seamlessly with both Windows and macOS. It’s the recommended choice for most modern USB flash drives and external hard drives.
- NTFS: If your USB drive will *only* be used with Windows computers, NTFS is a solid choice. It’s robust and supports advanced features. However, if you ever plug it into a Mac, you’ll likely only be able to read files, not write new ones, unless you install extra software on the Mac.
Practical Tip: For a USB drive that you might plug into different computers (Windows, Mac, or even some TVs or car stereos), exFAT is usually your safest bet.
Summary
Formatting a drive in Windows 11 is a simple process to erase data and prepare it for use, whether you format USB drive Windows 11 using File Explorer, Disk Management, or the Settings app. Key steps involve naming your drive and selecting a file system like exFAT for wide compatibility or NTFS for Windows-specific use.
Was this guide helpful?

About the Author
Richard
Tech Writer, IT Professional
Richard, a writer for Geek Rewind, is a tech enthusiast who loves breaking down complex IT topics into simple, easy-to-understand ideas. With years of hands-on experience in system administration and enterprise IT operations, he’s developed a knack for offering practical tips and solutions. Richard aims to make technology more accessible and actionable. He's deeply committed to the Geek Rewind community, always ready to answer questions and engage in discussions.

I tried this on my new PC with Windows 11 Home, but when I got the external drive selected and clicked on Properties, it opened but there wasn’t a Format option to select.
[…] On the next screen, enter the Label or name. Select a Drive Letter to assign to the Dev Drive, type in the drive size (at least 50GB), and click Format. […]