How to Set Up a New Hard Drive in Windows 11

Setting up a new hard drive in Windows 11 prepares a brand-new internal or external drive so you can save files, games, and apps on it. Most new drives do not show up in File Explorer right away. They arrive blank, with no partition style, no partitions, and no file system, so Windows has nothing to display until you set them up.
The job takes about 5 minutes with built-in Windows tools, and you do not need to install anything. There are two stages. First you initialize the disk so Windows can use it. Then you create a simple volume, which gives the drive a letter such as D: and formats it with a file system. This tutorial covers two ways to do it: the Settings app and the Disk Management tool. Neither needs a restart.
Open Settings System Storage Advanced storage settings Disks & volumes, find your new drive listed as “Not initialized”, click Initialize, choose GPT as the partition style, then click Create volume to format it and assign a drive letter.
Why Initialize a Hard Drive?
You need to initialize a new drive so Windows 11 can recognize it and store files on it. Initializing writes a partition style (GPT or MBR) to the disk. That gives Windows a map of where partitions can live. Until the disk has one, Windows lists it as “Not initialized” and will not let you save anything to it.
Before you start, make sure the drive is physically connected. For an internal drive, check that both the data cable and the power cable are seated. For an external drive, plug it in and make sure it has power. If the disk never appears in the tools below, the problem is usually a loose cable, a dead port, or a drive that is turned off, not a software setting.
Initializing erases the drive. Everything on that specific drive is wiped, so only do this on a new, empty disk or one you are happy to clear. Your other drives are not touched, but double-check which disk you are working on, because disk numbers can be confusing.
Try to repair the drive without erasing its data instead. Initializing it would make those files much harder to get back.
How to Set Up Your New Disk Using Windows Settings
The Settings app is the simplest way to initialize a drive. It is built into Windows 11 and works the same on Home and Pro. You move through the main system menus, initialize the disk, and then create and format a volume in the same place. If you cannot see the options below, or you use an older build of Windows 11 that lacks them, use the Disk Management method further down.
- Open the Settings app. Click the Start menu, then click Settings. You can also press Windows key + I on your keyboard. The Settings window opens.
- Go to System Storage In the Settings window, click System on the left side, then click Storage on the right. You will see a bar showing how much space your current drive uses.
- Open Advanced storage settings. Scroll down and click Advanced storage settings to expand the options. A short list of extra storage options appears.
- Select Disks & volumes. Click Disks & volumes. Windows now lists every physical disk it can see, with the volumes on each one.
- Find your new disk. Look for a disk that says "Not initialized" in the list. It is usually the one with no drive letter and a size that matches the drive you just installed. If it is not listed, shut down and recheck the cables, or try a different USB port for an external drive.
- Click the Initialize button next to the new disk. If there is no Initialize button, the disk is probably already initialized, so skip ahead to creating the volume.
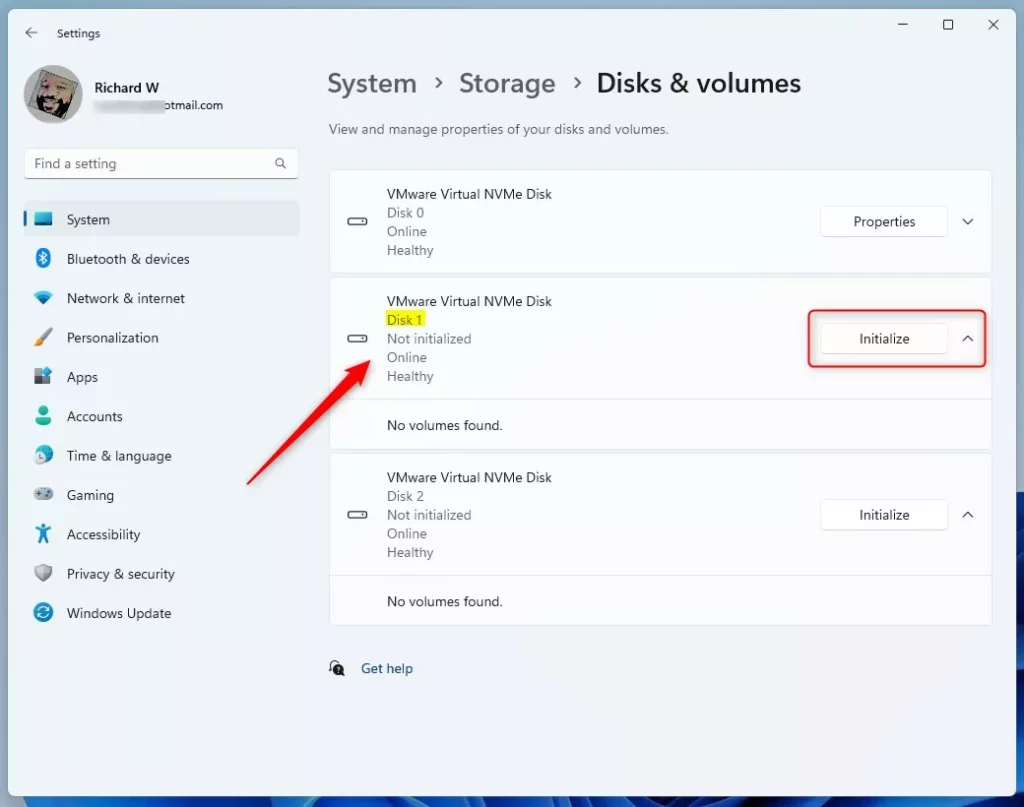
windows initialize disks pane - A window will pop up asking you to choose a partition style. What's the difference?
- GPT (GUID Partition Table) – Best for most modern computers. It works with large drives (over 2 TB). MBR cannot use more than 2 TB of a disk, so GPT is the safe choice for any big drive.
- MBR (Master Boot Record) – Older style. Use this for smaller drives or older computers that cannot read GPT disks.
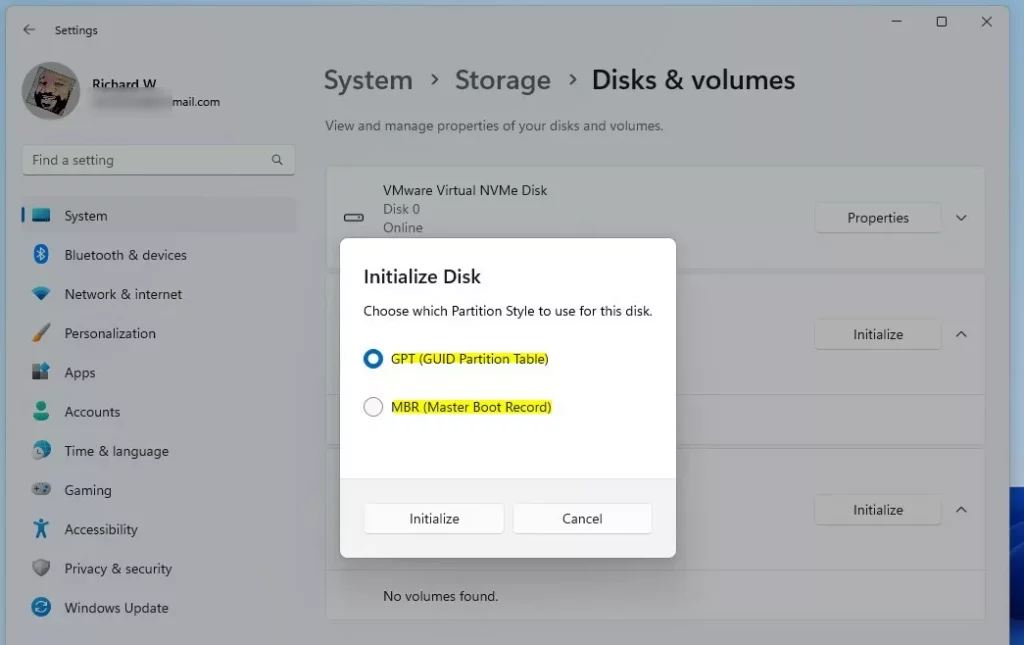
windows initialize disk choose partition style - Select GPT if you're unsure. Then click Initialize. This takes only a few seconds, and the disk's status changes once it finishes.
- After initializing, the disk will show as "Unallocated." Click Create volume to set up a partition. A new window opens where you configure the drive.
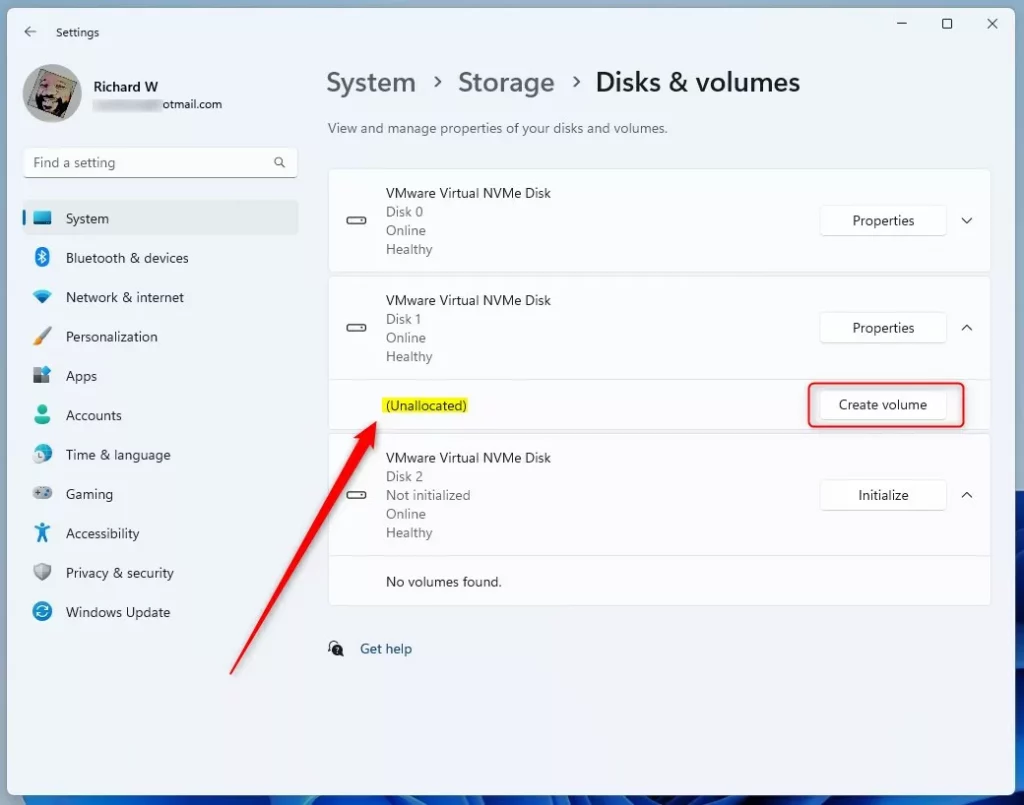
windows unallocated disk create volume - In the new window, set up the drive. You need to:
- Give the drive a name (called a label). Pick something you will recognize, such as "Games" or "Backup".
- Pick a drive letter (like D: or E:). Any free letter works, and you can change it later.
- Choose a file system (NTFS is standard for Windows). Pick exFAT instead only if you want to share an external drive with a Mac or other devices that cannot read NTFS.
- Click Format to finish setting up the drive. Windows creates the volume and formats it. On a new drive this is quick.
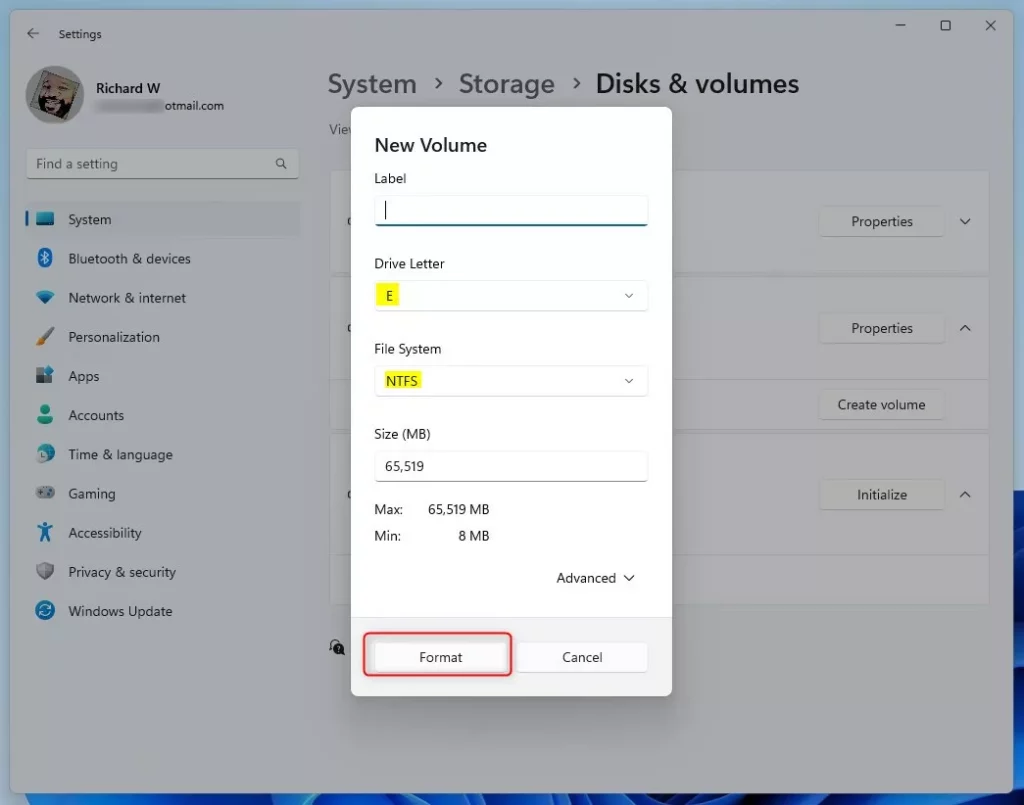
windows format disks prompt - Your new drive will now appear in File Explorer. Open File Explorer, look under This PC, and you should see it with the label and letter you chose. You can start saving files on it!
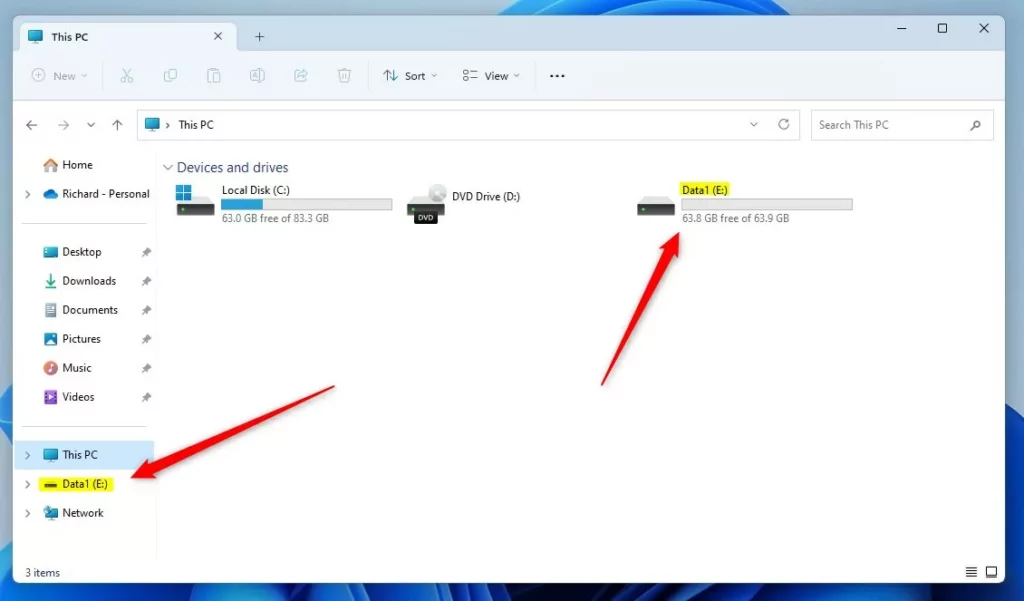
windows file explorer with drives
Another Way: Using Disk Management
Disk Management is the classic Windows tool for preparing disks. It works on both Home and Pro, and it shows every connected storage device along with its status. It is also the better choice when a disk shows as "Offline" or when the Settings app does not list your drive. You manage the disk with a simple right-click menu.
- Click the search box on the taskbar. Type
Disk Management. The Disk Management result appears in the search list. Windows may label it "Create and format hard disk partitions". - ⚠️ Admin Privilege Required: Right-click on Disk Management and select Run as administrator. Click Yes if asked. If you are signed in with a standard account, Windows asks for an administrator password. Disk Management opens with a list of volumes on top and a graphical map of disks below.
- Find your new disk. Look for one that says "Not Initialized" or "Offline" in the lower pane, labeled something like Disk 1 or Disk 2. Check the size to make sure it is the new drive and not one that holds your data.
- If it says "Offline," right-click it and select Online first. Then right-click it again and choose Initialize Disk. Right-click on the grey box on the left that holds the disk name (for example "Disk 1"), not on the blank space to the right. If the disk is already online, go straight to Initialize Disk.
- Pick the partition style (GPT or MBR). Click OK. Choose GPT for most modern PCs and for any drive over 2 TB. Choose MBR only for small drives or very old computers. The disk then shows as unallocated space.
- Right-click the unallocated space on the disk, which appears as a black bar. Choose New Simple Volume. The New Simple Volume Wizard opens. If the option is greyed out, the disk is probably not initialized or still offline, so repeat the earlier steps.
- Follow the setup wizard. Name your drive, pick a drive letter, and format it. Leave the volume size at the maximum unless you want to split the disk into several partitions. NTFS is the right file system for most uses, and the Perform a quick format option is fine for a new drive.
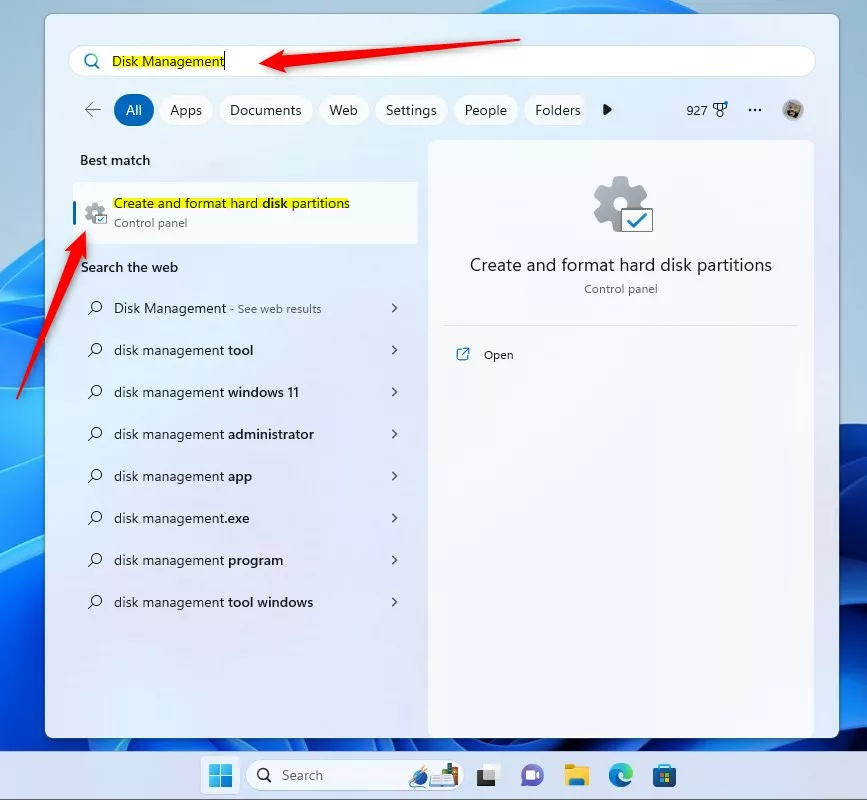
windows disk management tool - Your drive is now ready to use in File Explorer. Open This PC and look for the new drive and the letter you picked. If you change your mind about the setup, you can right-click the volume in Disk Management and choose Delete Volume. That erases the data on it and returns the space to unallocated, ready to be set up again.
Summary
To use a new drive, you must first initialize it, then create a volume and format it. You can do all of this through Windows Settings or the Disk Management tool. Both give the same result, and neither needs a restart. Remember that initializing wipes the disk, so never do it on a drive that holds files you want to keep.
Have a question about this guide?
Answered by AI from this guide. Good questions may be added to this page — please don't include personal details.
Did this guide fix your problem?

About the Author
Richard
Tech Writer, IT Professional
Richard is a writer at Geek Rewind who turns complex IT tasks into clear, step-by-step guides. He draws on years of hands-on experience in system administration and enterprise IT operations, focusing on Windows, Linux and WordPress: the problems people actually run into, and the fixes that work. His server and WordPress guides come from systems he runs himself. Richard builds and maintains the platform behind Geek Rewind, from its Ubuntu servers and Nginx configuration to its custom WordPress plugins. Many new tutorials start with readers' questions, and he's always glad to answer them in the comments.
No comments yet — be the first to share your thoughts!