How to Convert Disk to MBR or GPT in Windows 11

MBR (Master Boot Record) and GPT (GUID Partition Table) are the two ways Windows can lay out partitions on a disk. Switching a drive from one to the other fixes certain disk errors and lets Windows 11 use the drive properly. Windows 11 needs UEFI firmware, and a UEFI system drive has to be GPT. GPT also supports drives larger than 2TB.
MBR is the older format. It allows only 4 primary partitions and sees no more than 2TB of a disk. You will probably need to switch if Windows setup stops with a message like “Windows cannot be installed to this disk. The selected disk is of the GPT partition style” (or “MBR partition style”). The other common case is a new large drive that shows only 2TB of its real capacity.
Open Disk Management by pressing Win+R, typing diskmgmt.msc, and pressing Enter. Right-click each partition on your target disk and select Delete Volume until the entire disk shows Unallocated. Right-click the disk label and choose Convert to GPT Disk or Convert to MBR Disk. The conversion completes immediately, but erases all data on that disk.
Before You Start: Important Warnings!
Each method here deletes the partitions first, and you cannot recover the files afterwards. Before you convert the disk, copy everything you want to keep to an external drive or cloud storage.
- Back up your data: Copy all important files, and any program installers or settings you need, from the disk you plan to change. Open the backup copy and check that the files actually open before you continue.
- Close everything: Shut down any apps that might be using the disk. Open files or running programs can block the deletion and cause errors.
- Administrator access: You must be signed in to Windows as an administrator. Standard accounts cannot change disk layouts.
- Don’t target your Windows drive: You cannot delete the system or boot volume of the Windows installation you are running. These methods are for data drives, new drives, or a disk you are preparing for a fresh install. Microsoft has a separate tool that can convert a system disk without erasing it, but this guide does not cover it.
Once your backup is safe, you can choose a method.
Option 1Changing Your Disk Using Disk Management
Disk Management is the built-in Windows tool that shows your drives as a graphical map. It is the easiest method if you prefer clicking to typing. It is included in both Windows 11 Home and Pro.
Step 1Open Disk Management
The quickest way to open Disk Management is through the Run box.
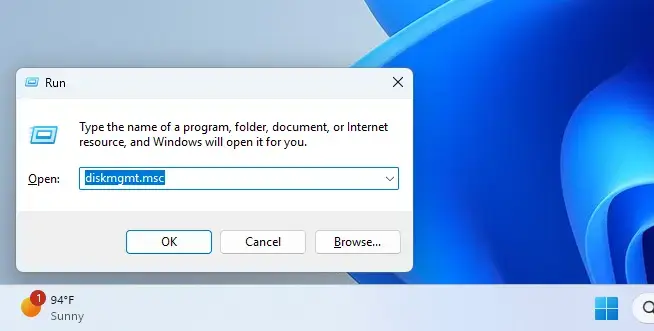
- Press Windows key + R on your keyboard. The Run dialog box opens.
- Type
diskmgmt.mscinto the box and press Enter or click OK. The Disk Management window opens.
The window lists your volumes in the top half and your physical disks in the bottom half. Each disk has its own row, labeled "Disk 0", "Disk 1" and so on, with its size and partitions shown as coloured blocks. You will work in the bottom half.
Step 2Delete All Existing Partitions
Disk Management only offers the conversion on a disk with no volumes. If the Convert to GPT Disk or Convert to MBR Disk option is greyed out later, a leftover partition is almost always the reason. So delete every volume first.
- In the bottom part of the Disk Management window, find the disk you want to change. It will be labeled something like "Disk 1" or "Disk 2". Check the disk number and its size against what you know about the drive. Make sure you choose the correct disk.
- Right-click the first partition (volume) on that disk.
- Select Delete Volume... from the menu.
- Click Yes to confirm when Windows warns that the data will be lost. The block turns into free space.
- Repeat for every partition on that disk until the whole disk shows as Unallocated, with a black bar.
If Delete Volume... is greyed out, the volume is a system, boot or page file volume, or the disk holds the Windows you are running. You cannot use this method on that disk.
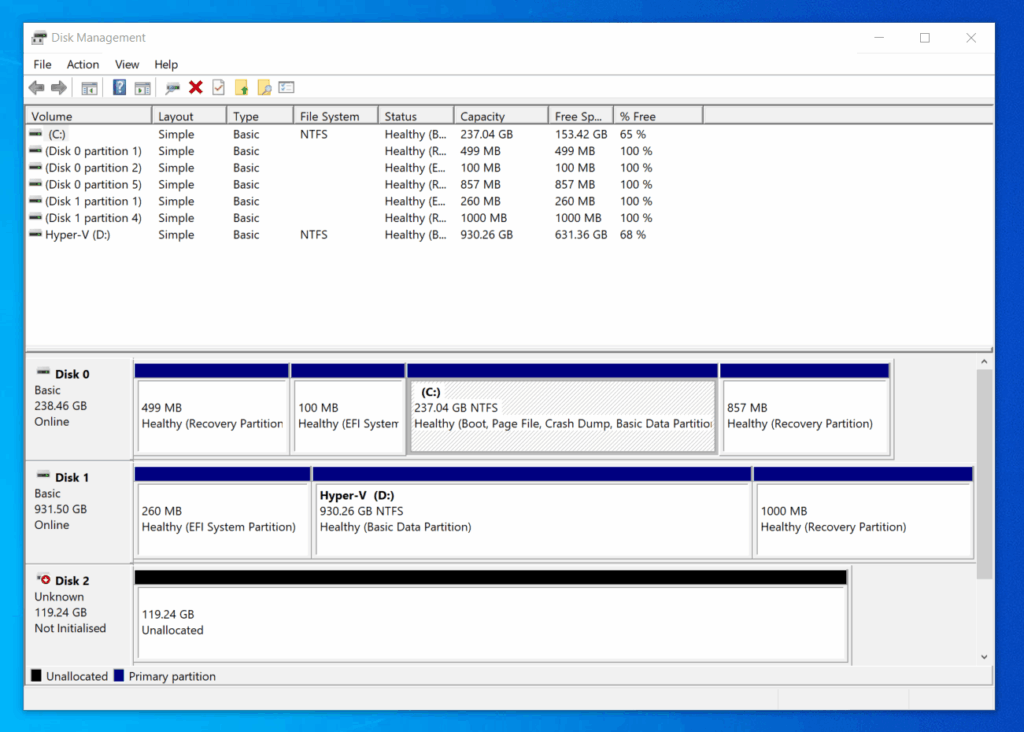
You don't want to accidentally erase your main Windows drive!
Step 3Convert the Disk
With the disk fully unallocated, you can convert it. The option sits on the disk's label box on the left, not on the black unallocated bar.
- Right-click the disk label on the left side of the disk row (the box that says "Disk 1", the disk size and "Online").
- Look at the menu. It offers either Convert to MBR Disk or Convert to GPT Disk, depending on the style the disk uses now. Windows only shows the other style.
- Click the option for the style you want. Disk Management converts the disk straight away, with no restart.
To confirm, right-click the disk label again and choose Properties, then open the Volumes tab. Partition style should show the new style. The menu should now offer the opposite conversion, which is how you undo the change if needed.
Step 4Create a New Partition
The converted disk is empty, so it cannot hold files until you create a partition on it. Do that now.
- Right-click the Unallocated space of the converted disk.
- Select New Simple Volume.... The New Simple Volume Wizard opens.
- Click Next and follow the wizard. You choose the size of the partition (the default uses all the space), give it a drive letter, and format it with a file system. Use NTFS, the standard for Windows.
- Click Finish. The disk now shows a healthy volume with your chosen drive letter, and it appears in File Explorer.
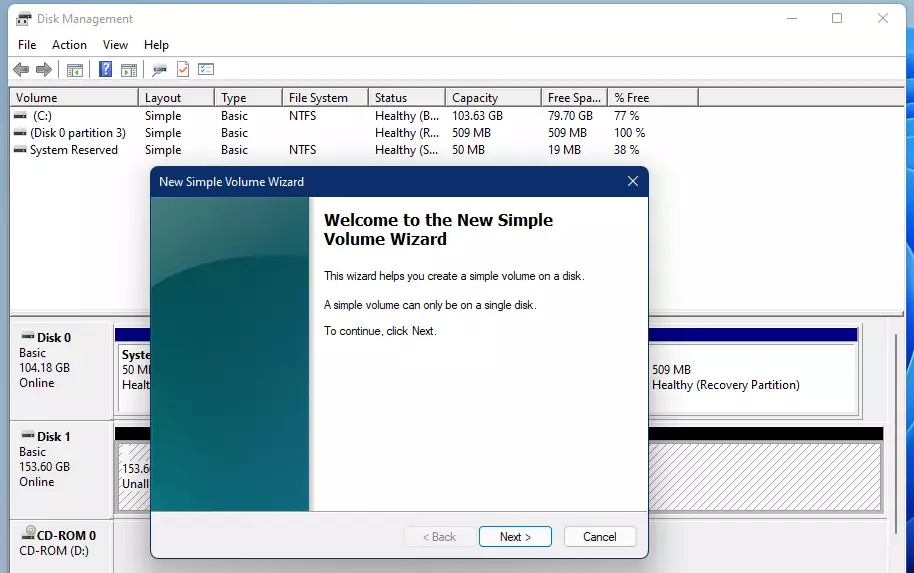
The disk now uses the partition style you chose and has a new volume ready for files.
Option 2Changing Your Disk Using Command Prompt (DiskPart)
DiskPart is a command-line disk tool that runs in Command Prompt. It works the same in Windows 11 Home and Pro. Once you know the commands it is fast, and it still works when the Disk Management option is greyed out for no clear reason.
Step 1Open Windows Terminal as Administrator
DiskPart needs administrator rights. Open Windows Terminal as an administrator.
- Click the Start button.
- Type
Windows Terminal. - In the search results, right-click Windows Terminal.
- Select Run as administrator.
- Click Yes if a User Account Control (UAC) window appears. The terminal opens.
- In Windows Terminal, make sure the Command Prompt profile is chosen. Windows Terminal may open PowerShell by default on some systems, so check the tab name and switch from the dropdown arrow if needed.
Step 2Start DiskPart
Next, start DiskPart.
- Type
diskpartinto the Command Prompt window. - Press Enter.
The prompt changes to DISKPART>. This means DiskPart is ready for your commands.
Step 3List Available Disks
Before you change anything, list your disks so you pick the right number. Mistakes here cost you data.
- Type
list diskat theDISKPART>prompt. - Press Enter.
DiskPart prints a table of every disk with its number, status and size. A disk that uses GPT has an asterisk (*) in the Gpt column. A blank Gpt column means the disk is MBR. Match the disk by size to what you expect, since a 1TB drive and a 500GB drive are easy to tell apart.
Step 4Select the Disk to Convert
Now select the disk. Every command after this acts on the selected disk.
- Type
select disk <number>, but replace<number>with the actual number of the disk you want to change (for example,select disk 2). - Press Enter.
DiskPart replies that the disk you chose is now the selected disk.
This is your last chance to confirm that you chose the correct disk. If you are not sure, type the list command again and check the asterisk and the size. All data on this disk is permanently erased in the next steps.
Step 5Clean the Disk
The clean command wipes all partitions and data from the selected disk. A disk has to be empty before DiskPart will convert it.
- Type
cleanat theDISKPART>prompt. - Press Enter.
DiskPart confirms that it cleaned the disk. The disk now shows as Unallocated in Disk Management, and you can change its style.
Step 6Convert to GPT or MBR
Now tell DiskPart which partition style you want. Pick one of the two commands below.
- To change to GPT, type
convert gptand press Enter. - OR, to change to MBR, type
convert mbrand press Enter.
DiskPart confirms the conversion. To undo it, clean the disk again and run the other command.
Step 7Create a New Partition
The disk has the right style but no partition yet, so create one. You have two choices.
- You can close DiskPart and use Disk Management (the first method above) to create a new simple volume.
- Or, you can keep using DiskPart commands if you are comfortable:
- Type
create partition primaryand press Enter to create a partition that uses all the unallocated space. - Type
format fs=ntfs quickand press Enter to format it quickly with NTFS. The formatting runs and shows a percentage; wait for it to finish. - Type
assign letter=<X>and press Enter. Replace<X>with the drive letter you want (for example,assign letter=D). Pick a letter that is not already in use.
The disk is now converted, formatted and visible in File Explorer. Close the terminal when you are done.
Option 3Changing Your Disk Using PowerShell
PowerShell is the newer command-line shell in Windows. It uses cmdlets (commands with a verb-noun name) instead of DiskPart's commands. It does the same job and works in both Windows 11 Home and Pro.
Step 1Open Windows Terminal as Administrator
As with Command Prompt, you need administrator rights.
- Click the Start button.
- Type
Windows Terminal. - In the search results, right-click Windows Terminal.
- Select Run as administrator.
- Click Yes if a User Account Control (UAC) window appears.
- In Windows Terminal, choose the Windows PowerShell profile from the dropdown menu, or use the default PowerShell tab if that is what opened.
Step 2List Disks
First, find out which disk you are working with.
- Type
Get-Diskat the PowerShell prompt. - Press Enter.
PowerShell shows a table of your disks with their numbers, names, sizes, status and partition style (MBR or GPT). Use it to check the current setup before you change anything.
Step 3Select the Disk Number
Find the disk you want to change and note its number.
- Look at the results from
Get-Diskand find the disk you want to change. Check its size and name to be sure it is the right one. - Write down its Number.
Step 4Remove Existing Partitions
Next, remove every partition from the disk. As with the other methods, the disk must be empty before you convert it.
- Type the following command. Replace
<DiskNumber>with the actual number of the disk you found in the previous step (for example,Get-Partition -DiskNumber 2 -EA SilentlyContinue | Remove-Partition -confirm:$false). - Press Enter.
The command finds all partitions on the disk you specified and removes them without asking for confirmation on each one. If it reports an error about a partition that is in use, close any apps using the disk and run it again.
Crucial Warning: Make sure you have the correct <DiskNumber>. This action cannot be undone and erases the disk completely.
Step 5Convert the Disk to GPT or MBR
With the disk empty, set the partition style. Use one of the two commands below, not both.
- To change to GPT, type the following command. Replace
<DiskNumber>with your disk's number (for example,Set-Disk -DiskNumber 2 -PartitionStyle GPT). Press Enter. - OR, to change to MBR, type the following command. Replace
<DiskNumber>with your disk's number (for example,Set-Disk -DiskNumber 2 -PartitionStyle MBR). Press Enter.
PowerShell applies the chosen style to the disk, with no restart needed. If you picked the wrong style, run the other command to switch back while the disk is still empty.
Step 6Create a New Partition
Now create a volume so the disk can hold files. You have two choices.
- You can close PowerShell and use Disk Management (the first method above) to create a new volume.
- Or, you can continue in PowerShell:
- To create a partition using all the unallocated space, type
New-Partition -DiskNumber <DiskNumber> -UseMaximumSize(replace<DiskNumber>with your disk number). - Then, to format it, type
Format-Volume -Partition (Get-Partition -DiskNumber <DiskNumber>) -FileSystem NTFS -Confirm:$false. - Finally, assign a drive letter:
Get-Partition -DiskNumber <DiskNumber> | Set-Partition -NewDriveLetter <X>(replace<X>with the letter you want).
The disk is now converted and ready to use. Open File Explorer to confirm that the new drive appears.
Understanding MBR vs. GPT
The partition style decides how a disk stores its partition table and how the computer's firmware boots from it. That is why you sometimes need to convert between them.
- MBR (Master Boot Record): This is the older standard, used by older PCs and by legacy BIOS boot. It supports disks up to 2TB and a maximum of four primary partitions.
- GPT (GUID Partition Table): This is the modern standard, used by most current computers and required for UEFI boot. It supports far larger disks and many more partitions (usually 128 in Windows). It also keeps a backup copy of the partition table, so it is generally more reliable and flexible.
Most people want their main Windows 11 drive to be GPT, since Windows 11 requires UEFI firmware. Secondary data drives can stay MBR if they need to work with very old systems. For any drive larger than 2TB, GPT is the right choice.
Summary
Converting a disk between MBR and GPT erases its data, but you can do it with Disk Management, Command Prompt (DiskPart) or PowerShell. Back up your data first, check the disk number twice, and then follow the steps for the method you prefer. When you finish, the disk has the partition style you need and a fresh volume ready for files.
Have a question about this guide?
Answered by AI from this guide. Good questions may be added to this page — please don't include personal details.
Did this guide fix your problem?

About the Author
Richard
Tech Writer, IT Professional
Richard is a writer at Geek Rewind who turns complex IT tasks into clear, step-by-step guides. He draws on years of hands-on experience in system administration and enterprise IT operations, focusing on Windows, Linux and WordPress: the problems people actually run into, and the fixes that work. His server and WordPress guides come from systems he runs himself. Richard builds and maintains the platform behind Geek Rewind, from its Ubuntu servers and Nginx configuration to its custom WordPress plugins. Many new tutorials start with readers' questions, and he's always glad to answer them in the comments.
No comments yet — be the first to share your thoughts!