How to Check Disk Drive Partition Style in Windows 11

Checking your disk’s partition style tells you whether the drive uses GPT (GUID Partition Table) or the older MBR (Master Boot Record). GPT is the modern format. It supports drives larger than 2 TB and is what Windows 11 expects on a UEFI system. MBR is the legacy format. It is limited to 2 TB per disk and four primary partitions. You need to know which one you have before you make changes to a drive or install a new system.
Windows 11 offers several built-in ways to see this. Disk Management is a built-in tool that shows your connected drives. The command line is a text-based way to query the same information. Checking is read-only, so none of these methods changes your data.
You will want to check the partition style when you:
- Install a new operating system, since the installer and your firmware (UEFI or legacy BIOS) must match the disk’s style.
- Create or change partitions (sections) on your hard drive.
- Use backup or recovery software that needs a specific style.
- Troubleshoot boot errors, which are often caused by a mismatch between the disk style and the boot mode.
This guide covers three methods: the Settings app, Disk Management, and the command line. Pick whichever you are most comfortable with. They all report the same result.
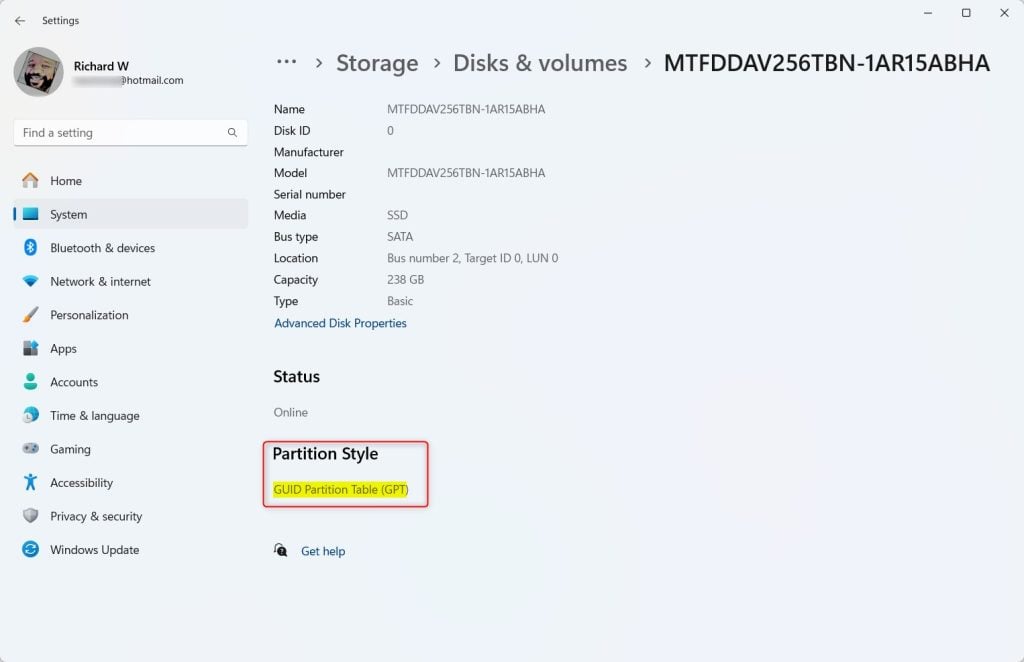
Open Settings System Storage Advanced storage settings Disks & volumes, find your disk, click its arrow to expand it, then click Properties. Look near the bottom for Partition style, which shows either GPT or MBR.
1Check Partition Style Using Windows Settings
The Settings app is the easiest option because it needs no extra tools. It works on both Windows 11 Home and Pro. The Disks & volumes page is only present in recent versions of Windows 11. If you do not see it, update Windows or use the Disk Management method below.
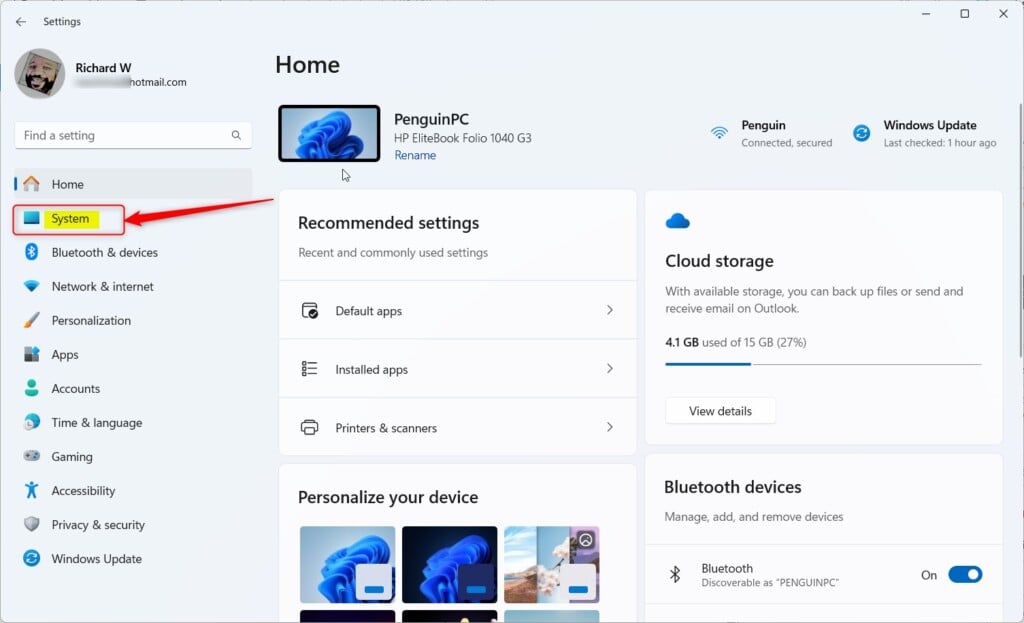
- Open Settings . Click the Start menu and select Settings, or press Win+I on your keyboard. The Settings window opens.
- Click System on the left side.
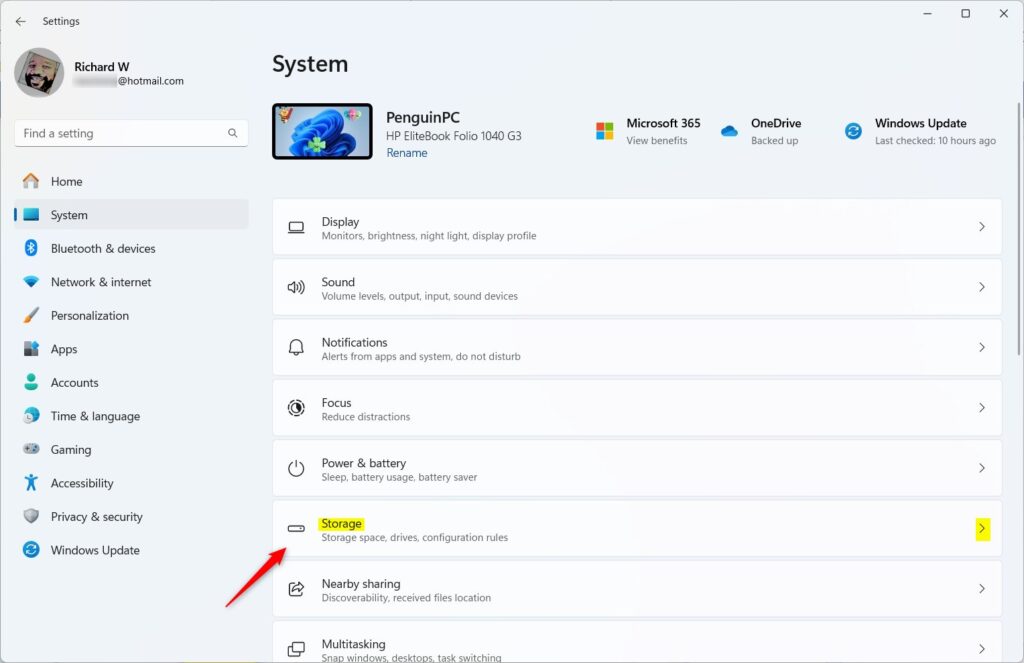
- Click Storage on the right side. You will see a bar showing how much space is used on your main drive.
- Scroll down and click Advanced storage settings. Then select Disks & volumes. A list of every physical disk connected to the PC appears.
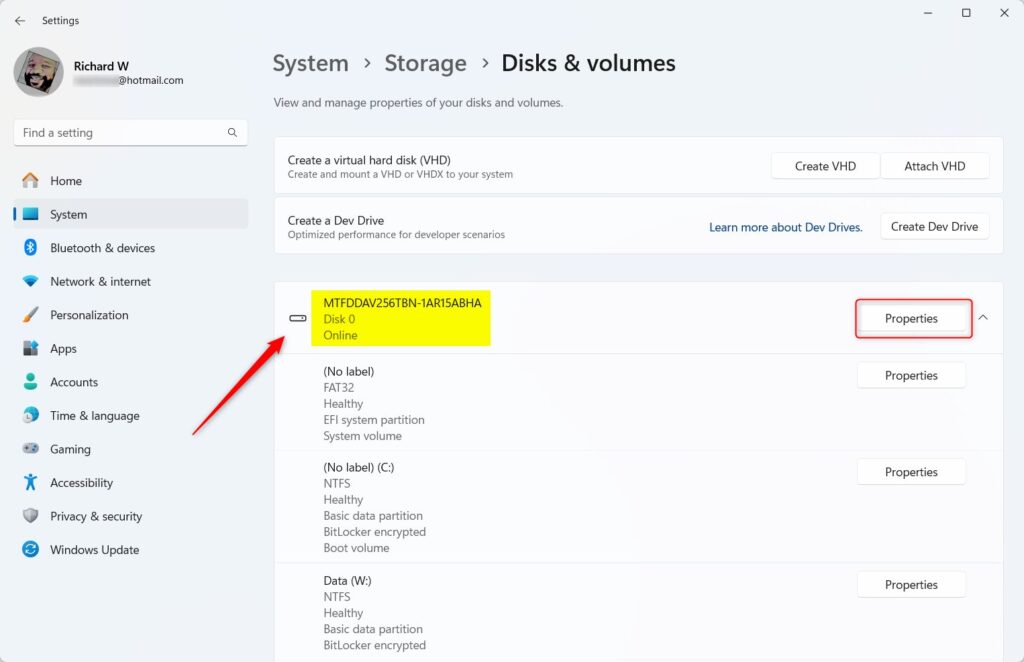
- Find the disk you want to check. Click the arrow to expand it. The partitions and volumes on that disk are listed underneath.
- Click the Properties button for that disk. A properties page opens.
- Look near the bottom of the properties page. You will see Partition style. It will say either GPT or MBR.
If you have more than one disk, make sure you expanded the right one. Check the disk name and size to be sure. External USB drives also appear in this list when connected.
2Check Partition Style Using Disk Management
It is included in every edition of Windows 11 and shows the partition style in the disk's properties. Just look at the properties. Do not use the right-click menu options to convert or delete anything unless you really mean to.
- Press Windows key + R. The Run dialog opens.
- Type
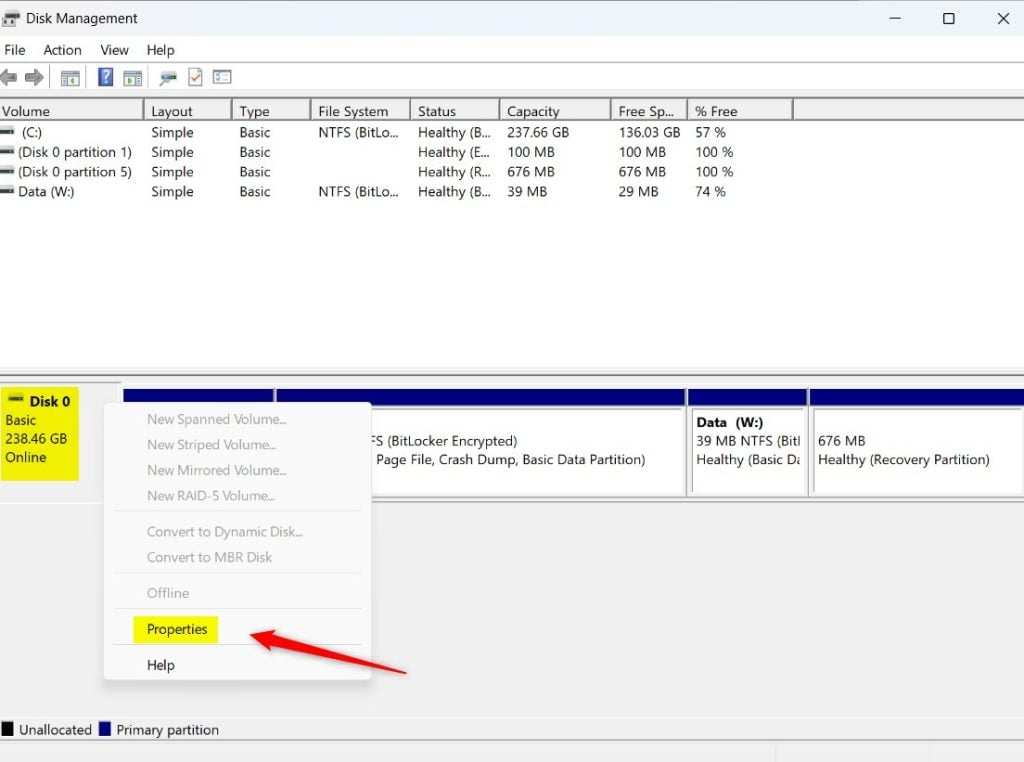
diskmgmt.mscand press Enter. Disk Management opens, with a list of volumes at the top and a graphical list of disks at the bottom. - In the bottom pane, right-click the disk label on the left side, not the partition itself. It will say something like Disk 0 or Disk 1. Choose Properties.
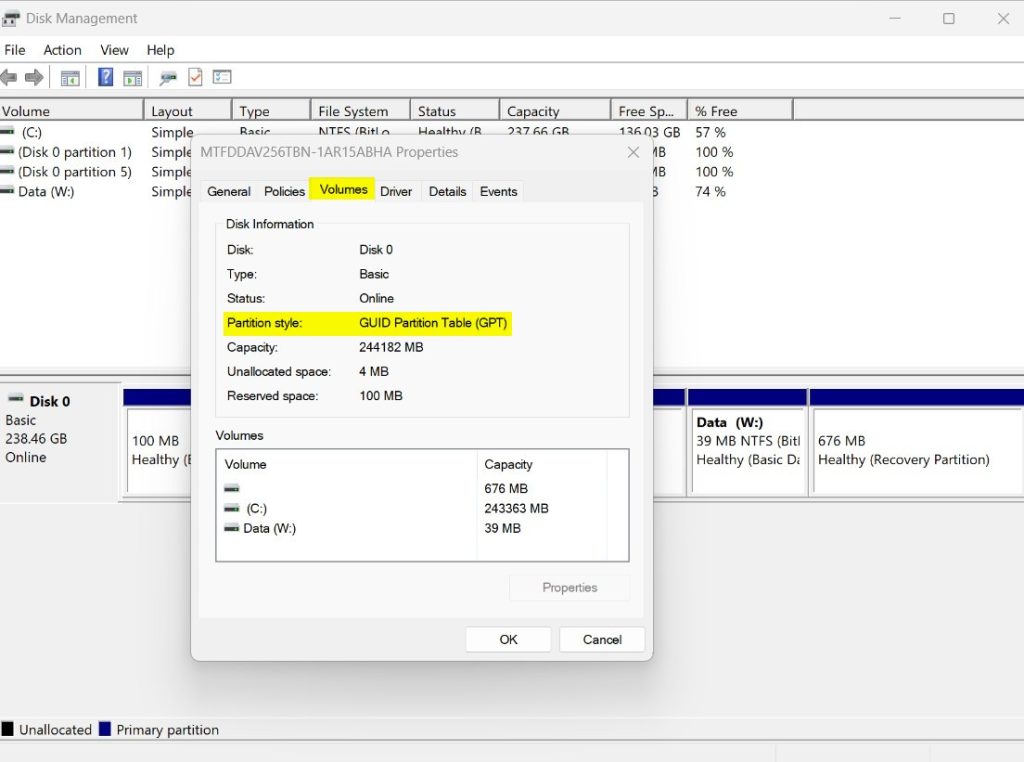
- Click the Volumes tab.
- Look for the Partition style information. It will say GUID Partition Table (GPT) or Master Boot Record (MBR).
If you right-click a partition instead of the disk label, the Properties window will not show the Volumes tab with the partition style. Close it and try again on the left-hand disk label. A brand-new disk may show as Not Initialized. In that case it has no partition style yet.
3Check Partition Style Using Command Line (PowerShell or Command Prompt)
The command line gives you two more ways to check. This is handy if you are working remotely or on a PC where the graphical tools are not available. The first uses PowerShell. The second uses DiskPart and needs administrator rights.
Using PowerShell (in Windows Terminal)
- Open Windows Terminal.
- Click the PowerShell tab. If PowerShell is already the active tab, you can stay on it.
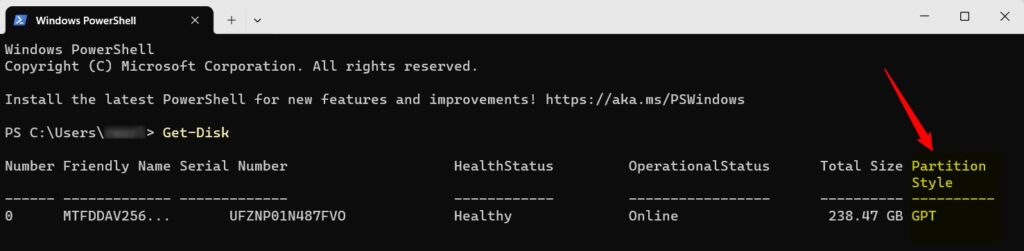
- Type the command below and press Enter:
PowerShell, accessible within Windows Terminal, allows administrators to inspect partition styles. Running Get-Disk populates a Partition Style column that reveals whether disks use GPT (GUID Partition Table) or MBR (Master Boot Record).
The output lists each disk with its number, name, size and details. Find the partition style for each disk in the output. It will read GPT or MBR.
Using Command Prompt
DiskPart can change disks, so only run the listing command shown here.
- ⚠️ Admin Required: Run Windows Terminal as an administrator. To do this, right-click the Start button and choose the Terminal (Admin) option, then approve the User Account Control prompt. Open the Command Prompt tab.
- Type
diskpartand press Enter. The prompt changes to show you are now inside DiskPart. - Then type
list diskand press Enter. A table of all disks appears. - Look at the right side of the list. If a disk has an asterisk (*) under the GPT column, it means the disk uses GPT. If it's empty, the disk uses MBR.
The disk numbers in this list match the ones in Disk Management, so you can cross-check if you are unsure which disk is which. Listing disks does not change anything. When you finish, close the window.
You can check partition style using Command Prompt by running a quick text command to list all connected storage drives. This method uses the built-in diskpart tool to show exact details about your hard drive format.Summary
- Your hard drive uses either the MBR or GPT style to organize data.
- You can check which one your disk uses from Windows Settings, Disk Management, or the command line.
- Knowing this helps you make sure your computer is ready for software installations and changes.
- These simple steps let you find your disk's partition style quickly and safely, because none of them changes the disk.
Your hard drive uses either the MBR or GPT partition style to organize data on Windows 11. You can check which format your computer uses at any time through the Settings app, Disk Management, or the command line. If you find that the style does not match what you need, stop and back up your data first. Changing the style of a disk is a separate task that carries real risk.
Have a question about this guide?
Answered by AI from this guide. Good questions may be added to this page — please don't include personal details.
Did this guide fix your problem?

About the Author
Richard
Tech Writer, IT Professional
Richard is a writer at Geek Rewind who turns complex IT tasks into clear, step-by-step guides. He draws on years of hands-on experience in system administration and enterprise IT operations, focusing on Windows, Linux and WordPress: the problems people actually run into, and the fixes that work. His server and WordPress guides come from systems he runs himself. Richard builds and maintains the platform behind Geek Rewind, from its Ubuntu servers and Nginx configuration to its custom WordPress plugins. Many new tutorials start with readers' questions, and he's always glad to answer them in the comments.
No comments yet — be the first to share your thoughts!