How to Calibrate HDR Display in Windows 11 Easily

The Windows HDR Calibration app fine-tunes your monitor’s brightness and color so High Dynamic Range (HDR) games and movies look correct. This free official tool runs through 4 test patterns to map your screen’s exact light limits: minimum luminance, maximum luminance, max full frame luminance, and color saturation.
HDR displays show a wider range of brights and darks than standard screens, but factory settings rarely match your specific panel. Running this tool makes sure your games use settings recommended by groups like the HDR Gaming Interest Group (HGIG).
You need three things before you start:
- A PC running Windows 11. The calibration app is built for Windows 11, and it works the same on Home and Pro.
- A monitor or TV that supports HDR, connected with a cable and graphics driver that can carry an HDR signal.
- About 10 minutes, and a chance to work in the room lighting you normally use.
Open the Windows HDR Calibration app from the Microsoft Store, turn on HDR under Settings System Display, then run its four test patterns to map your monitor’s minimum and maximum luminance and color saturation. Turn off dynamic contrast and game enhancer modes first, because they alter the image and skew the results. The whole process takes about 10 minutes.
Getting Started with HDR Calibration
Turn off any built-in picture effects on your monitor before you start. Dynamic contrast, “game enhancer” modes, local dimming boosts and similar options change the image after Windows sends it. That stops the app from reading your display correctly and can skew the results.
Some displays apply post-processing that interferes with calibration. If the Windows HDR Calibration app acts up, for example if a test pattern never disappears, check your monitor’s physical settings menu (the on-screen menu opened with the buttons on the monitor) for options to disable these enhancements. If your monitor has an HDR-specific picture mode, pick the most neutral one. Some displays call it “HDR Standard” or “HGIG”.
Calibrate under your typical lighting conditions. If you game in the dark, calibrate in the dark. Room light changes how dark the darkest pattern looks to you, so a profile made in daylight won’t suit a dark room.
Finally, be cautious with color saturation later on. Overly vivid colors can look unnatural and distracting. Aim for a balanced, natural look.
Step 1Download the Windows HDR Calibration App
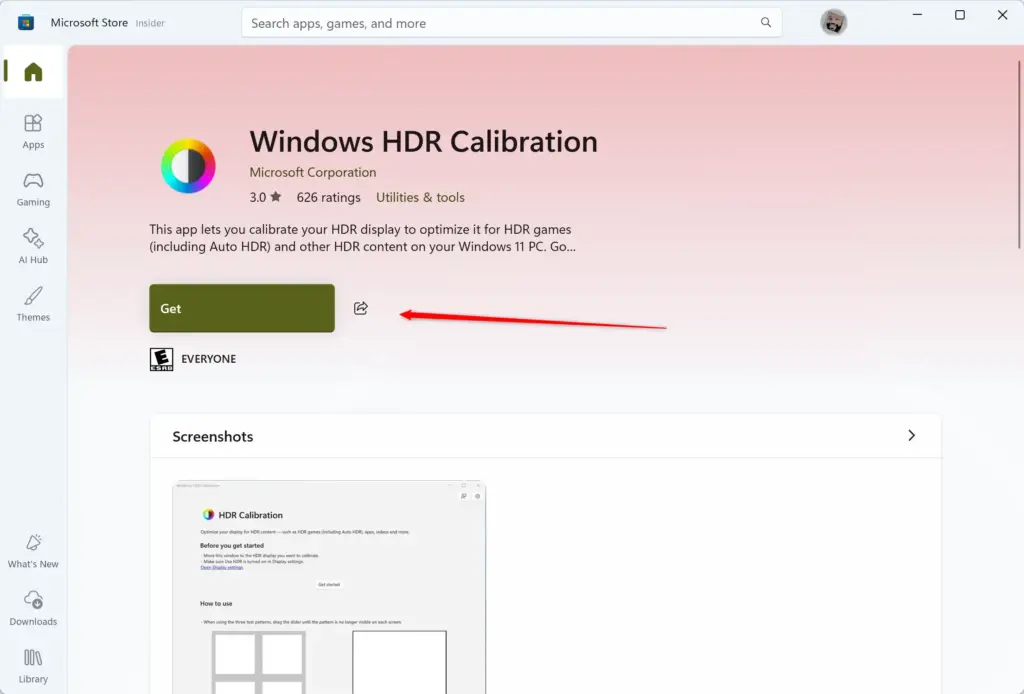
The calibration app is a free download from the Microsoft Store. Install it before you start adjusting your monitor.
- Click the Start button on your taskbar.
- Type Microsoft Store and select it when it appears. The Store window opens.
- Click the search bar at the top of the Store and search for Windows HDR Calibration.
- Find the app in the search results and click the Get or Install button to download and install it. The button changes to Open when the install finishes.
If the app doesn't appear in the results, check that you typed the full name and that you are signed in to a working Microsoft Store. The app is published by Microsoft, so check the publisher name if several similar results show up.
Step 2Prepare Your Display
The calibration only works properly when HDR is switched on in Windows and the app runs on the monitor you want to adjust. Open Display settings, make sure the correct screen is selected, and turn HDR on first.
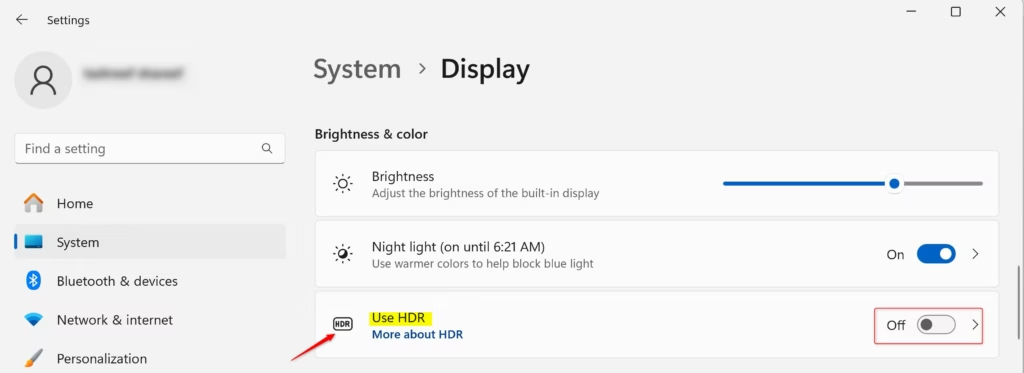
- Right-click an empty area of your desktop and choose Display settings. The Settings app opens on System Display
- Scroll down to the HDR section. On some Windows 11 versions you click the HDR entry to open its own page.
- Find the toggle switch for Use HDR and turn it On for the display you want to calibrate. The screen may flicker or go dark for a second, and then it looks brighter or a little washed out. That is normal for the desktop in HDR.
If Use HDR is missing or greyed out, Windows isn't detecting HDR support on that display. Check that HDR is enabled in the monitor's own menu, that you are using a cable that supports it (such as HDMI 2.0 or newer, or DisplayPort 1.4), and that your graphics driver is up to date. Some laptops also disable HDR on battery power.
If you have more than one display, make sure the correct one is selected at the top of the Display settings window before turning on HDR. Settings apply to the selected display only, so it is easy to switch HDR on for the wrong screen. If the numbers aren't clear, click Identify to show a number on each screen.
Step 3Launch the Calibration App
With HDR enabled and the app installed, you're ready to start calibrating. The app guides you through the process.
- Click the Start button again.
- Type Windows HDR Calibration and select the app when it appears.
- Move the app window onto the HDR display you want to calibrate. If the app asks you to run it full screen, do so, so the test patterns fill the display.
- Click the Get started button to begin. The first test pattern appears.
Calibrating Your Display's Brightness Levels
The brightness tests use simple sliders to fine-tune how your screen shows dark and bright images. The app shows a test pattern, and your goal is to adjust each slider until the pattern disappears. That position is the best setting for your display.
Sit where you normally sit when you play or watch, and look at the screen straight on. Viewing angle changes how brightness looks on many panels, especially IPS and VA models.
Step 4Adjusting Minimum Luminance
The minimum luminance slider sets the darkest shade your monitor can show without losing detail. You move it until the pattern blends into the background.
- Look for the slider labeled Minimum Luminance and the test pattern below it.
- Drag the Minimum Luminance slider to the right until the pattern is no longer visible. This tells the app the darkest level your display can show accurately.
- Click the Next button once the pattern disappears. The maximum luminance test appears.
If you overshoot, drag back to the left until the pattern is barely visible again, then bring it forward just until it vanishes. On OLED screens the pattern may disappear almost right away, because true black is already very dark.
Step 5Setting Maximum Luminance
The maximum luminance slider finds the brightest light output your screen can produce. Move the slider until the test pattern vanishes, then click Next to lock in the peak brightness limit.
- Look for the slider for Maximum Luminance and another test pattern.
- Adjust the Maximum Luminance slider to the right until the test pattern just becomes invisible. Stop at the first point where it is gone, not further.
- Click Next after you have made the adjustment. The full frame test appears.
Step 6Fine-Tuning Max Full Frame Luminance
The max full frame luminance test covers how your monitor handles bright images that fill the entire screen. Many displays can't hold their peak brightness across the whole panel, so this value is often lower than the one from the previous step. Setting it correctly keeps bright full-screen scenes, such as snow or a bright sky, looking natural.
- Find the Max Full Frame Luminance Test slider and its pattern.
- Move the slider until the pattern can no longer be seen.
- Click Next to continue. The color screen appears.
Adjusting Color Saturation and Finalizing
With the brightness levels set, the app moves on to color. This is where you can control how vibrant your colors look. This step is mostly a matter of taste, unlike the brightness tests.
Step 7Setting Color Saturation
The saturation step controls how rich and vivid colors appear for both standard dynamic range (SDR) and HDR content. Drag the slider to find the color intensity that looks the most natural and pleasing to you.
- Find the slider for SDR and HDR content color saturation. The default setting is on the left and a more saturated option is on the right.
- Drag the slider left or right to find the color saturation level that looks best to you. Remember: don't overdo it!
- Click Next when you are happy with the color balance. The app shows the results.
Trust your eyes to decide what looks most pleasing and natural.
Step 8Review and Save Your Settings
The last screen compares your original settings with your new profile. Check the before and after images to see whether the result looks better, and use the restart option if you want to adjust the sliders again.
- Compare the Before and After images. Do the calibrated settings look better? Are the colors more balanced? Is there more detail visible in the bright and dark areas?
- If you are not happy with the results, click the Restart button. This takes you back to the start of the tests so you can calibrate again.
- If you are satisfied with the calibration, click the Finish button. This saves your new settings as a custom color profile for your display.
Step 9Confirm the Profile Save
After you click Finish, you will likely see a confirmation message.
- Click OK on the confirmation dialog box.
You can now close the Windows HDR Calibration app. Your display is now calibrated! If you ever want to undo the result, run the app again, or remove the profile as described below.
Managing Your Display's Color Profiles
Each time you finish a calibration, Windows saves a custom color profile for that display. If you calibrate several displays, or the same one more than once, these profiles pile up, and you may want to remove the ones you no longer use.
To remove an unwanted color profile, use the Color Management tool in Windows. It shows all display color profiles in one place.
How to Remove a Color Profile
- Click the Start button.
- Type color management and select the Color Management app from the search results.
- In the Color Management window, click the All Profiles tab.
- Look through the list of all color profiles installed on your system and find the one you want to delete. It might have a name related to the HDR calibration or your display model.
- Click the profile to select it.
- Click the Remove button.
- If a confirmation prompt appears, click Yes or OK to confirm.
If you remove one by mistake, run the calibration app again to create a new one. Windows may also ask for administrator approval for this change.
Summary
The free Windows HDR Calibration app can greatly improve how your HDR display looks, making colors more accurate and details clearer for games and movies. Recalibrate if you change your monitor setup, move to a different room lighting, or switch displays. You can remove custom color profiles through the Color Management tool if needed.
Have a question about this guide?
Answered by AI from this guide. Good questions may be added to this page — please don't include personal details.
Did this guide fix your problem?

About the Author
Richard
Tech Writer, IT Professional
Richard is a writer at Geek Rewind who turns complex IT tasks into clear, step-by-step guides. He draws on years of hands-on experience in system administration and enterprise IT operations, focusing on Windows, Linux and WordPress: the problems people actually run into, and the fixes that work. His server and WordPress guides come from systems he runs himself. Richard builds and maintains the platform behind Geek Rewind, from its Ubuntu servers and Nginx configuration to its custom WordPress plugins. Many new tutorials start with readers' questions, and he's always glad to answer them in the comments.
No comments yet — be the first to share your thoughts!