How to Enable BitLocker with PIN and USB Key in Windows 11

BitLocker device encryption locks your Windows 11 drive so nobody can read your files if your PC is lost or stolen. You can make it much stronger by adding a startup PIN and a USB key. Windows then asks you to plug in a specific flash drive and type a secret code every time the computer starts.
This two-step startup check protects you better than a Windows password or a TPM chip alone. The PIN and USB key are checked before Windows loads, so they stop someone from simply booting the machine and guessing at the sign-in screen. Windows 11 Pro, Enterprise, and Education support this setup. Windows 11 Home users need to upgrade first, because Home has neither the full BitLocker settings nor the Group Policy Editor used below.
You need an administrator account, a spare USB flash drive, and a safe place to store your BitLocker recovery key. Back up the recovery key before you change startup options. If you lose both the PIN and the USB key, the recovery key is the only way back into the drive.
Enable BitLocker with a PIN and USB key by navigating to Control Panel System and Security BitLocker Drive Encryption. Click ‘Change how drive is unlocked at startup’, select ‘Enter a PIN (recommended)’, and then ‘Insert a USB flash drive’. Ensure your TPM is enabled or configure Group Policy if needed.
Prerequisites and TPM Requirements
Before you start, check that your PC has a TPM 2.0 chip and that it is enabled in the UEFI firmware, the low-level system software that runs before Windows. A startup PIN works only with a TPM. Without one, Windows can ask for a USB key or a password, but not a PIN.
- Open Settings Privacy & security Windows Security Device security
- Look for a Security processor section and select Security processor details. You should see a specification version of 2.0.
- If the section is missing, restart the PC, open the UEFI firmware settings, and turn the TPM on. Many boards call it Intel PTT or AMD fTPM. The name and menu differ by manufacturer.
If your PC has no TPM at all, you can still use BitLocker with a USB key, but you must first change a Group Policy setting. That is covered in the next two sections.
Common Errors: The device cannot use a Trusted Platform Module
If you see the error “device cannot use a Trusted Platform Module”, the TPM is missing or disabled in the BIOS. First check the TPM steps above. If the PC really has no TPM, you can get past the error by enabling the “Require additional authentication at startup” policy in the Group Policy Editor.
That policy includes a checkbox called “Allow BitLocker without a compatible TPM”. It lets BitLocker run on a USB key or password instead. The next section shows where to find it.
Configuring Group Policy for BitLocker
Group Policy controls which startup options BitLocker offers. Until the right policy is enabled, the PIN and USB choices can be missing or greyed out in the BitLocker wizard. You open the Local Group Policy Editor from the Run box, find the startup controls, and change them before you turn these features on.
The Local Group Policy Editor exists only in Windows 11 Pro, Enterprise, and Education. If it will not open, you are probably on Home.
- Press Win+R, type
gpedit.msc, and press Enter. The Local Group Policy Editor opens. - In the left pane, go to Computer Configuration Administrative Templates Windows Components BitLocker Drive Encryption Operating System Drives
- Double-click Require additional authentication at startup. A settings window opens.
- Select Enabled.
- If your PC has no compatible TPM, tick Allow BitLocker without a compatible TPM. Leave it unticked if you have a working TPM.
- In the same window, set Configure TPM startup key and PIN to require both a startup key and a PIN with the TPM. Without this, Windows may offer only one of the two.
- Click Apply, then OK.
The setting is saved straight away. If the BitLocker options still look unchanged later, sign out and back in, or restart the PC, so Windows reads the new policy. To undo the change, return to the same policy and select Not Configured.
Enable a PIN to Unlock BitLocker
To add a BitLocker PIN, use the Control Panel to change how your drive unlocks at startup. The PIN is a numeric code of 6 to 20 digits that you type every time you turn on the computer, before Windows loads. It adds a second factor on top of the TPM.
Pick a number you can remember but others cannot guess easily. Avoid birthdays and repeated digits. Keep in mind that the PIN is typed on the pre-boot screen, which uses a basic keyboard layout and does not show your usual language settings.
- Open the Control Panel and go to
Control Panel\System and Security\BitLocker Drive Encryption. - Find your Windows drive, usually C:, and click Change how drive is unlocked at startup.
- Approve the User Account Control prompt if it appears.
If BitLocker is not yet on for the drive, you will see Turn on BitLocker instead. Start that wizard, and it offers the same startup choices.
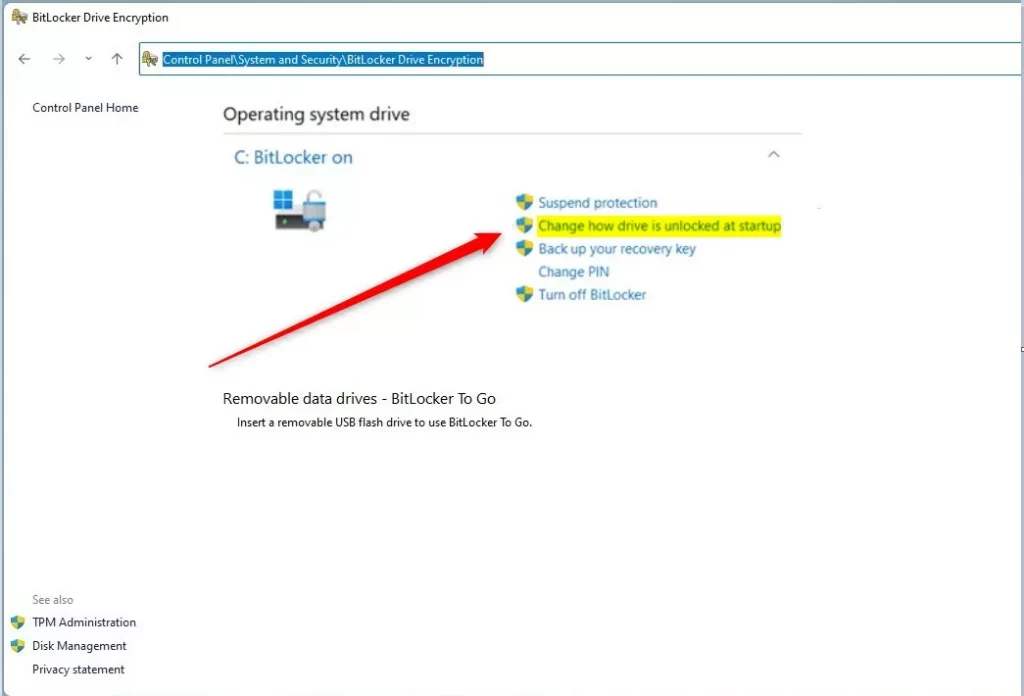
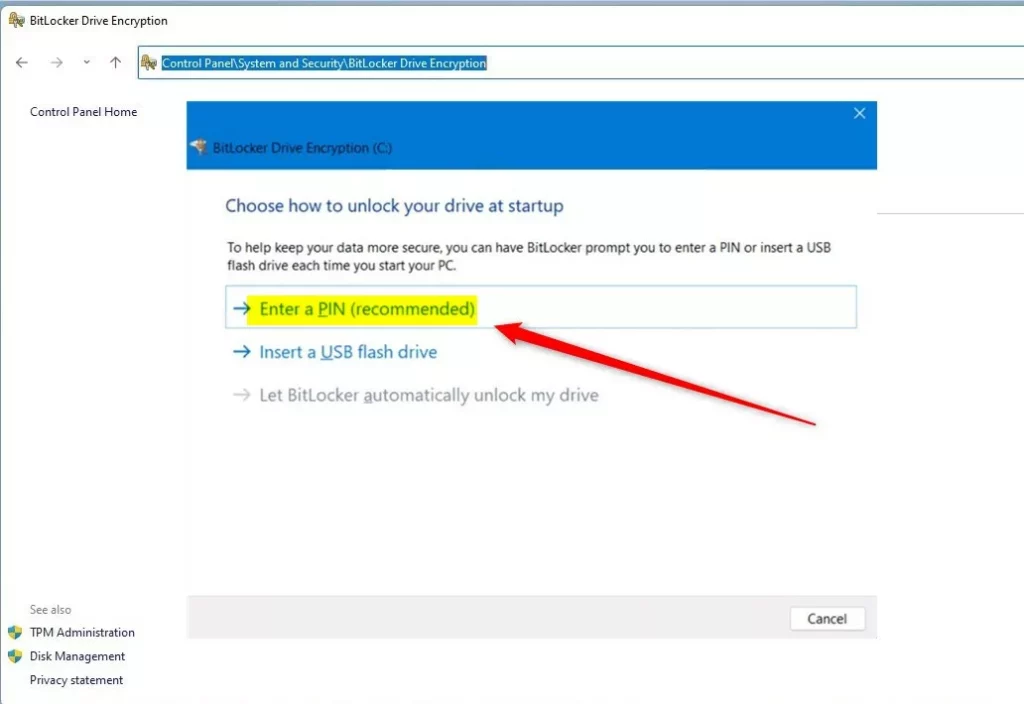
- Select Enter a PIN (recommended).
You should now see a window with two boxes for the new PIN. If this option is missing or greyed out, the Group Policy setting from the previous section is not applied yet, or the PC has no usable TPM.
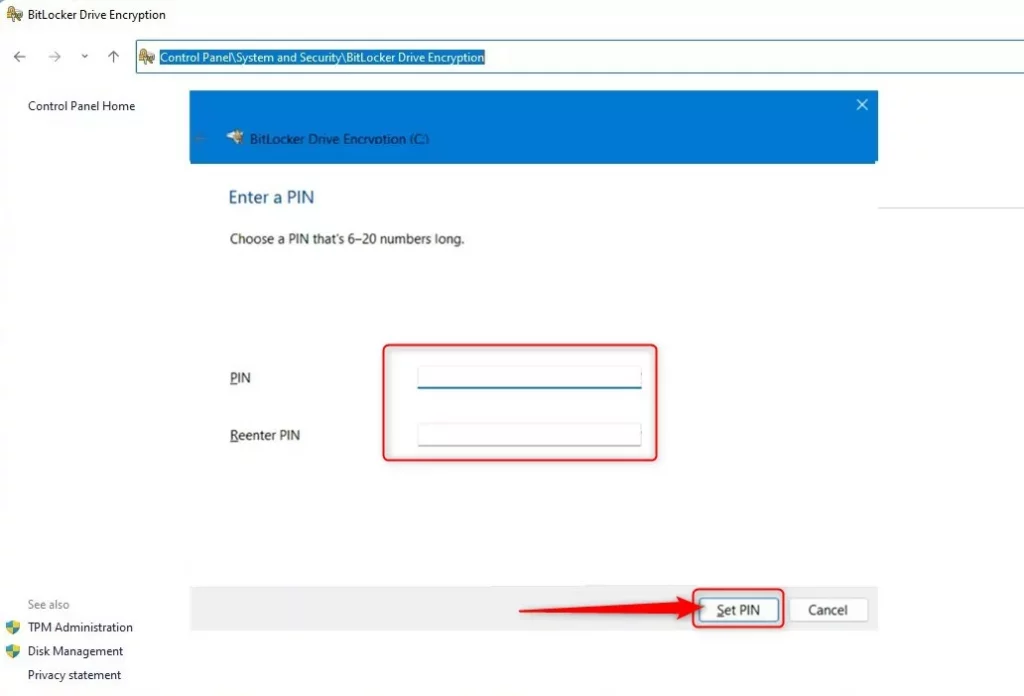
- Type a numeric PIN between 6 and 20 digits long in the first box.
- Type the same PIN again in the second box to confirm it.
- Click Set PIN.
Windows saves the PIN and takes you back to the BitLocker screen. If you ever want to change it, return to this screen and choose the PIN change option. Write the PIN down and store it somewhere safe until you know it by heart.
Unlock with a USB Drive at Startup
If you are signed in with a standard account, Windows asks for an administrator’s credentials.
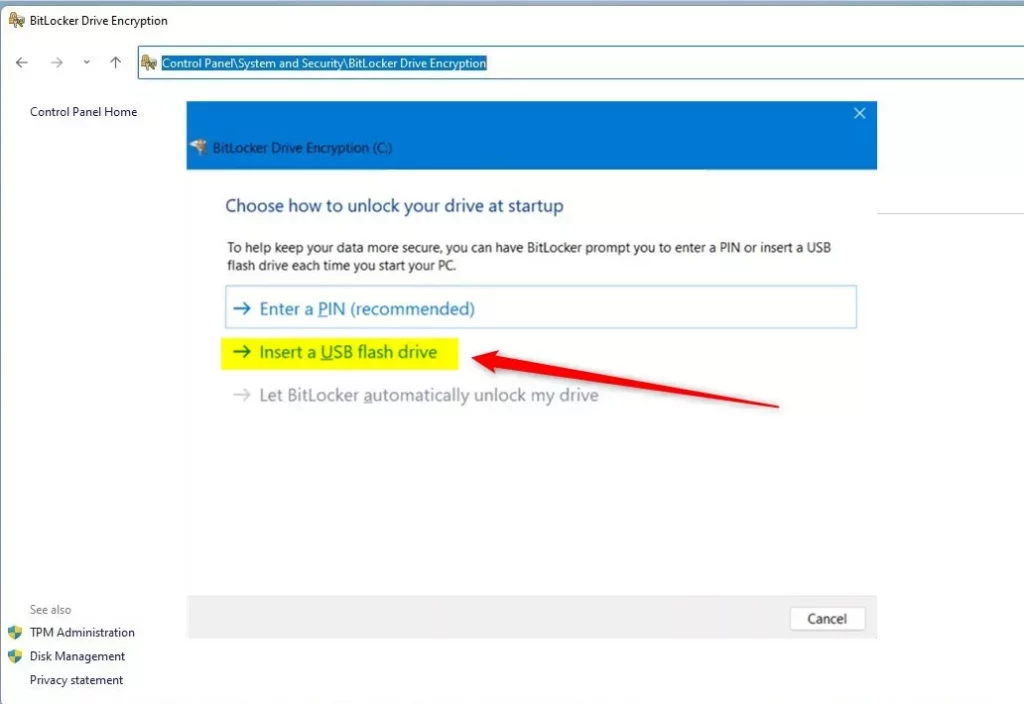
The USB key is a startup key file that Windows saves on a flash drive. At boot, the drive must be plugged in. Use a drive you can keep somewhere safe and separate from the PC, and not one you also use for daily work. Any data on it is not erased, but the drive does need to be readable.
- Return to the BitLocker menu for your Windows drive.
- Select Insert a USB flash drive.
If the option is missing, the Group Policy setting may be set to allow only a PIN. Check the policy steps above and make sure the startup key is allowed or required.
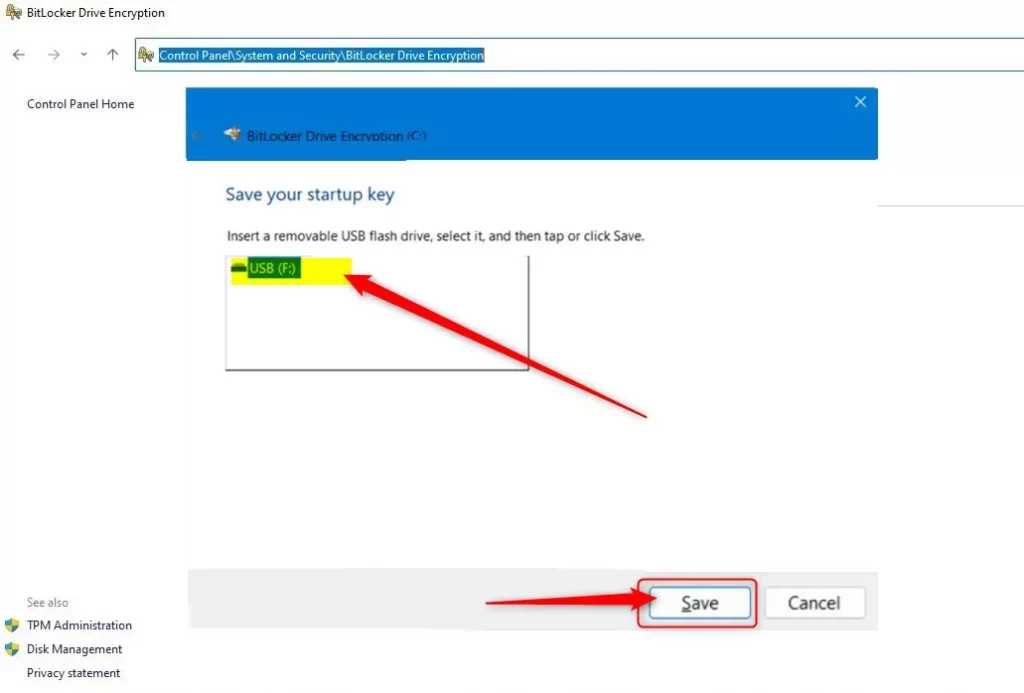
- Plug in the USB flash drive if you have not already.
- Choose the target drive from the dropdown list.
- Click Save.
Windows writes the startup key to the drive and confirms that it was saved. If your drive does not show up in the list, unplug it, plug it in again, and reopen the dialog.
Leave the flash drive connected and restart the PC to test the setup. A restart is needed for the new startup check to take effect. At boot you should see a BitLocker screen asking for your PIN. Type it and press Enter, and Windows should then continue to sign-in.
If the screen asks for a recovery key instead, the USB key was not detected or something went wrong. Enter the recovery key you backed up, then check the steps again. Do not remove the only copy of the recovery key until you have confirmed that the PIN and USB key both work.
Command Line Configuration
Power users can manage these settings from PowerShell or Command Prompt instead of the Control Panel. Open either tool as an Administrator, because without elevated rights the drive encryption commands are refused. This route is also useful when the Control Panel wizard offers only one startup method at a time and you want to combine the TPM, a PIN, and a startup key.
To open one as Administrator, right-click the Start button, choose Terminal (Admin), and approve the prompt.
manage-bde -protectors -add C: -TPMAndPIN
Summary
With the PIN and USB key configured, your Windows 11 machine now demands both a physical key and a numeric code before it boots. Keep your recovery key and a spare copy of the startup key in separate, safe places, and test them occasionally. If you later decide this is too much trouble, you can remove the extra protection from the same BitLocker menu, or turn the policy back to Not Configured.
Have a question about this guide?
Answered by AI from this guide. Good questions may be added to this page — please don't include personal details.
Did this guide fix your problem?

About the Author
Richard
Tech Writer, IT Professional
Richard is a writer at Geek Rewind who turns complex IT tasks into clear, step-by-step guides. He draws on years of hands-on experience in system administration and enterprise IT operations, focusing on Windows, Linux and WordPress: the problems people actually run into, and the fixes that work. His server and WordPress guides come from systems he runs himself. Richard builds and maintains the platform behind Geek Rewind, from its Ubuntu servers and Nginx configuration to its custom WordPress plugins. Many new tutorials start with readers' questions, and he's always glad to answer them in the comments.
[…] you have set up BitLocker to require users to insert a USB drive that contains a startup key and a PIN at sta… before the computer starts, the steps below show you how to revert to the default […]
[…] users can add additional security by requiring a USB flash drive and a PIN to unlock BitLocker at […]