How to turn On or Off AutoSwitch for Wi-Fi Network in Windows 11

Wi-Fi AutoSwitch in Windows 11 helps your PC decide which Wi-Fi network to use automatically.
This feature controls whether your computer actively searches for and switches to different Wi-Fi networks it knows, based on signal strength or priority.
When AutoSwitch is on, Windows 11 might change your connection if it finds a stronger Wi-Fi signal or a network you’ve marked as more important. If AutoSwitch is off, your PC generally sticks with the Wi-Fi network it’s currently connected to, even if a better one is available.
The AutoSwitch setting can help you stay connected as you move between Wi-Fi networks. However, Windows might sometimes switch networks when you do not want it to, or fail to switch networks when it should.
Enable or disable WiFi autoSwitch in Windows 11 by checking or unchecking “Look for other wireless networks while connected to this network” in your WiFi’s Wireless Properties. You can also manage this via Command Prompt by setting the autoswitch parameter to Yes or No.
Method 1Change Wi-Fi AutoSwitch Using Settings
You can change your Wi-Fi autoSwitch setting in Windows 11 easily through the Settings app. This feature helps your computer decide when to switch to a better Wi-Fi signal. We’ll show you how to find it in the Network & internet section and manage your known networks.
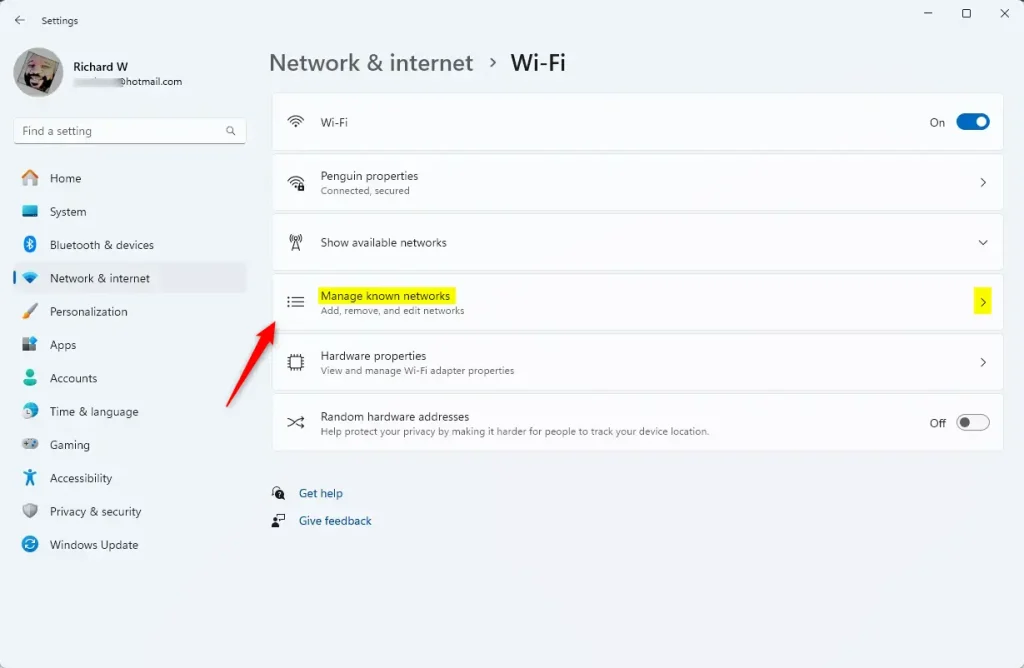
- Go to Network & internet. In the Settings window, click Network & internet on the left side. Then, on the right side, click Wi-Fi.
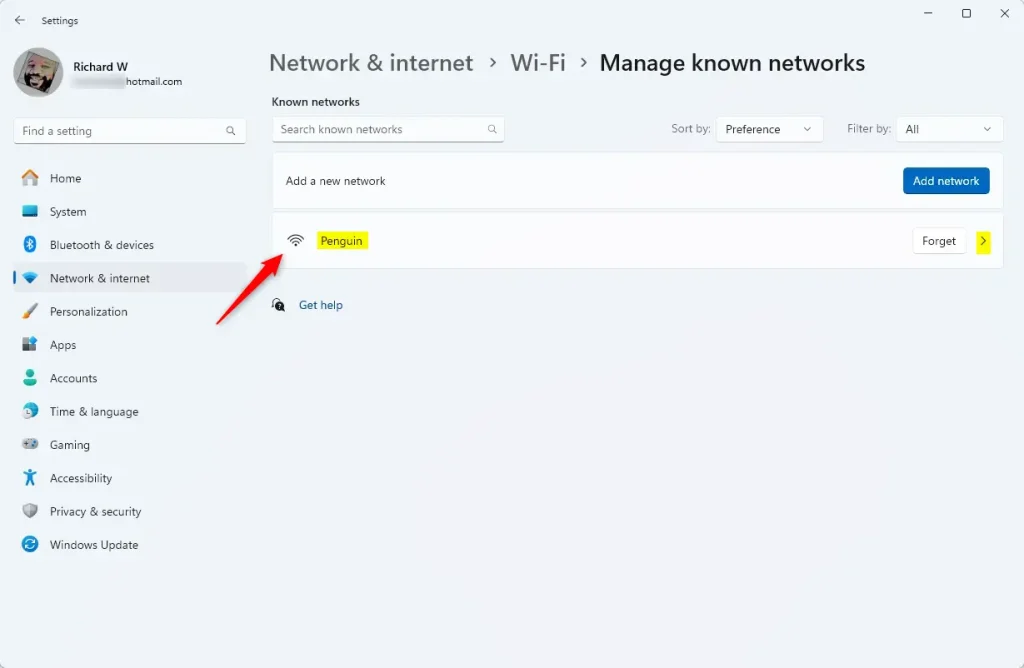
- Find your known networks. Scroll down and click Manage known networks. This shows all the Wi-Fi networks your PC remembers.
- Select the network. Click the name of the Wi-Fi network you want to adjust.
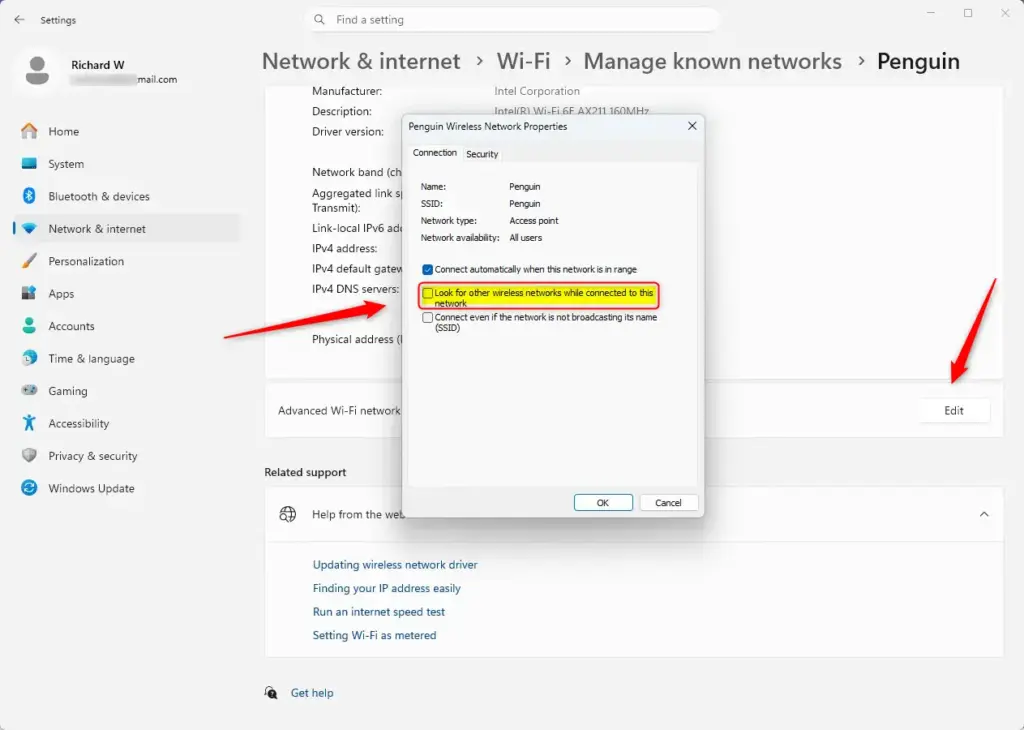
- Open advanced settings. Click the Edit button. This opens the advanced settings for that Wi-Fi connection.
- Control the autoSwitch setting. You will see a box labeled Look for other wireless networks while connected to this network.
- To turn on autoSwitch: Check this box. Your PC will look for and potentially switch to other preferred Wi-Fi networks.
- To turn off autoSwitch: Uncheck this box. Your PC will try to stay connected to the current network.
📝Good to KnowThe 'Connect automatically' option must be on for a network before you can change its autoSwitch setting. If the 'Connect automatically when this network is in range' box appears grayed out, it signifies that this option is currently off for that specific network. - To turn on autoSwitch: Check this box. Your PC will look for and potentially switch to other preferred Wi-Fi networks.
- Save your changes. Click OK.
- Close Settings. You can now close the Settings app.
Method 2Adjust AutoSwitch Using Network and Sharing Center
You can adjust your Wi-Fi autoSwitch settings using the older Network and Sharing Center in Windows 11. This method works best if you’re already connected to the Wi-Fi network you want to change. We’ll guide you through opening the Control Panel and finding your network connection details.
- Open Network and Sharing Center. Search for ‘ Control Panel’ and open it. Make sure your view is set to ‘Large icons’ or ‘Small icons’ (not ‘Category’), then click Network and Sharing Center.
- Click your Wi-Fi connection. Under ‘Connections:’, click the name of the Wi-Fi network you are connected to. It will be a link.
- Open Wireless Properties. In the ‘ Wi-Fi Status’ window, click Wireless Properties.
- Set up the autoSwitch setting. In the ‘ Wireless Network Properties’ window, find the box labeled Look for other wireless networks while connected to this network.
- To turn on autoSwitch: Check this box. Your PC will look for other available Wi-Fi networks.
- To turn off autoSwitch: Uncheck this box. Your PC will be less likely to switch away from your current connection.
The autoSwitch option will be grayed out if the "Connect automatically when this network is in range" setting is not turned on for a specific Wi-Fi network. You must turn on the "Connect automatically when this network is in range" setting first if you want to change the autoSwitch setting for that network.
- To turn on autoSwitch: Check this box. Your PC will look for other available Wi-Fi networks.
- Apply your choice. Click OK.
- Close Network and Sharing Center. Click Close in the Wi-Fi Status window, and then close the Network and Sharing Center.
Method 3Fine-Tune AutoSwitch Using Command Prompt (Windows Terminal)
For advanced users or when other methods fail, you can fine-tune your Wi-Fi autoSwitch in Windows 11 using the Command Prompt within Windows Terminal. This section will show you how to open Windows Terminal and use a specific command to list your Wi-Fi network profiles.
- Open Windows Terminal. Search for ‘Windows Terminal’ in the Start menu and open it. You can select ‘Windows PowerShell’ or ‘Command Prompt’ from the menu.
- List your Wi-Fi profiles. Type the following command and press Enter:Code
netsh wlan show profilesThis command shows all the Wi-Fi networks your PC has saved.
- Find the network name. Look for the exact name (SSID) of the Wi-Fi network you want to change. Make sure to type it correctly, as commands are case-sensitive.
- Change the autoSwitch setting. Use one of the following commands. Replace
[Network Name]with the actual name of your Wi-Fi network.- To turn on autoSwitch: Use this command: Code
netsh wlan set profileparameter name="YourNetworkName" connectionmode=auto autoswitch=YesThis command tells Windows to connect automatically and look for other preferred networks.
- To turn off autoSwitch: Use this command: This command turns off autoSwitch, making your PC more likely to stay on the current network.Code
netsh wlan set profileparameter name="YourNetworkName" autoswitch=No
💡TipTo make sure the network is set to connect automatically, you can add/allowIntegratedHotspot = trueto the command. For example, to turn off autoSwitch but keep auto-connect on:netsh wlan set profileparameter name="YourNetworkName" connectionmode=auto autoswitch=No
- To turn on autoSwitch: Use this command:
- Press Enter after typing your command.
- Close Windows Terminal. Once the command runs, you can close the window.
Summary
You can easily manage Wi-Fi autoSwitch in Windows 11 using the Settings app, Network and Sharing Center, or Command Prompt. Turning autoSwitch on lets your PC automatically connect to a stronger Wi-Fi signal, while turning it off keeps you on your current network. Remember to enable ‘Connect automatically’ for a network first.
Why does Wi-Fi disconnect automatically in 🪟 Windows 11?
Nearby devices or networks might be competing for the same channels, causing disruptions in your connection. Additionally, problems with your router can play a crucial role. Overheating or outdated firmware in your router can be at the heart of ' WiFi keeps disconnecting Windows 11.
Was this guide helpful?

About the Author
Richard
Tech Writer, IT Professional
Richard, a writer for Geek Rewind, is a tech enthusiast who loves breaking down complex IT topics into simple, easy-to-understand ideas. With years of hands-on experience in system administration and enterprise IT operations, he’s developed a knack for offering practical tips and solutions. Richard aims to make technology more accessible and actionable. He's deeply committed to the Geek Rewind community, always ready to answer questions and engage in discussions.


No comments yet — be the first to share your thoughts!