
Microsoft Edge running slow on Windows 11 usually happens when too many open tabs, piled-up cache files, or heavy extensions slow down the built-in web browser for your PC. Ten quick fixes solve this speed problem, starting with steps like clearing browser history and updating to version 120 or newer.
Work through the fixes in order and test Edge after each one. The early ones take a minute or less, and you will often find the cause before you reach the end of the list.
Close all Microsoft Edge windows and wait five seconds for background processes to shut down, then reopen Edge. If the slowdown persists, open Edge, click the three dots in the top-right corner, select Help and feedback, click About Microsoft Edge, and install any available updates. Clearing cache and disabling unused extensions also restore speed.
Why Does Microsoft Edge Slow Down?
Microsoft Edge slows down primarily because of too many background extensions, accumulated cache files, and resource-heavy tabs. When these add-ons and temporary files build up over time, they consume available memory and processor power, dragging down browser responsiveness and causing noticeable lag across Windows 11.
Here are the usual causes, and each one has a fix later in this guide:
- Too many add-ons: Browser add-ons are small programs that add features. They run in the background and use your computer’s memory and processing power. Having too many can slow down both Edge and the rest of your PC.
- Old temporary files and cookies: Edge saves temporary files (called cache) to make websites load faster. Over time, this cache can grow very large or become corrupted. Bad cookies can also cause problems.
- Graphics settings: Edge uses your graphics hardware to draw web pages. On some systems, usually because of a driver conflict, this feature causes stuttering and slows things down instead of speeding them up.
- Too many open tabs: Every open tab uses memory. With many tabs open, your computer has to work much harder. To see which tab is using the most, press Shift+Esc in Edge to open the browser task manager .
- Outdated browser version: Microsoft regularly releases updates for Edge. These updates fix bugs, improve speed, and close security holes. An old version misses all of that.
- Tracking prevention settings: This feature protects your privacy by blocking websites from tracking you. If it is set too strictly, it can slow down how quickly pages load.
Pinpointing the underlying bottleneck makes the repair process much faster.
Solution 1: Restart Microsoft Edge Completely
Restarting Microsoft Edge completely closes all lingering background processes to give the browser a clean slate. This action purges temporary data that causes performance hiccups, helping the application run faster on Windows 11 when standard closing methods fail to stop hidden tasks.
How to restart Edge:
- Close all Edge windows. Make sure they are fully closed, not just minimized to the taskbar.
- Wait for five seconds so the background processes can shut down.
- Click the Windows Start button.
- Type Microsoft Edge in the search bar.
- Click the Edge icon to open it again. Edge should open with a fresh window.
Restore only the ones you need, since a pile of restored tabs can bring the slowdown straight back.
Launch a few random websites afterward to verify whether browsing speeds have improved.
Solution 2: Update Microsoft Edge to the Latest Version
Updating Microsoft Edge to the latest version installs crucial patches that fix speed issues and boost overall performance. Keeping the application current ensures your system benefits from the latest speed enhancements, bug fixes, and security improvements released by Microsoft.
How to update Edge:
- Open Microsoft Edge.
- Click the three dots (Settings and more) in the top-right corner.
- Select Help and feedback.
- Click About Microsoft Edge. Edge opens a page that starts checking for updates right away.
Microsoft Edge checks for and installs software updates automatically to safeguard performance. When the download finishes, a Restart button appears. Click it so the new version takes full effect. This step guarantees the application operates on its most efficient codebase.
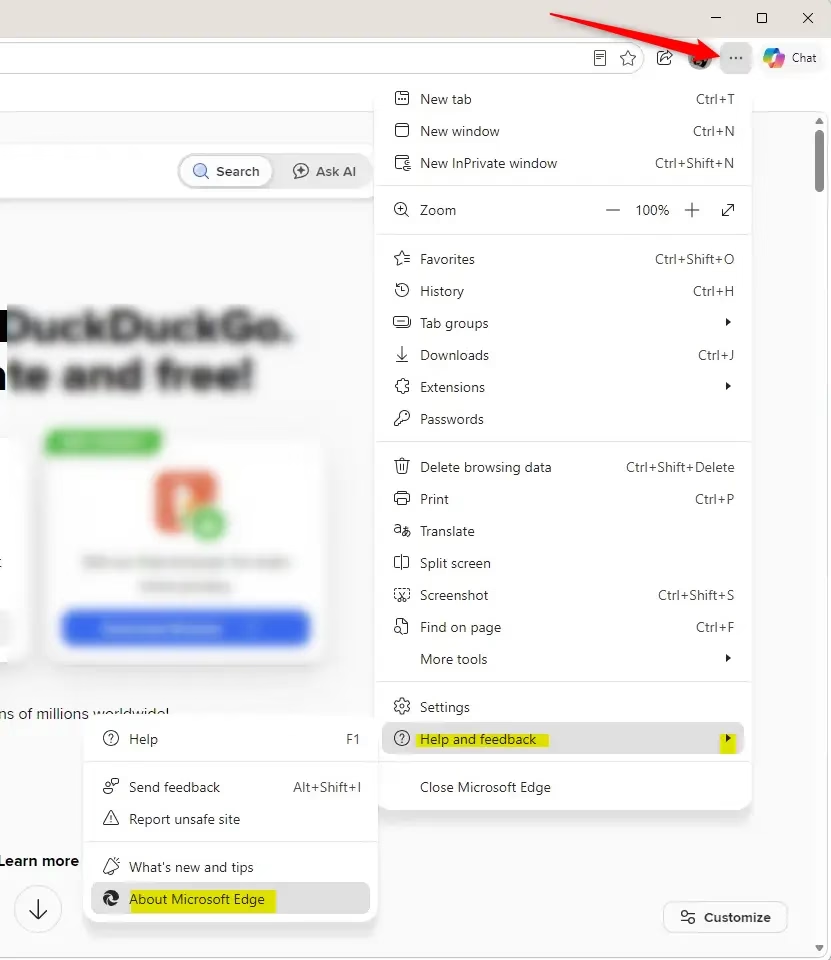
The version number appears directly on this page. Review it again after the update to confirm the build changed. If the page says Edge is up to date, you are already on the newest version and can move on to the next fix.
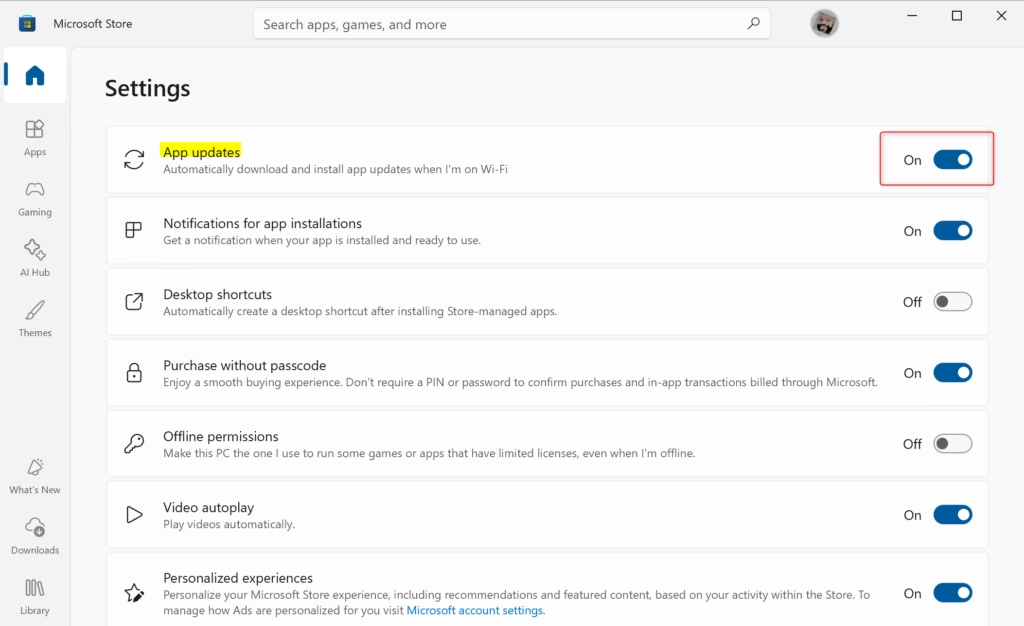
The Microsoft Store app provides an alternative update route if the manual method fails:
- Click the Windows Start button.
- Type Microsoft Store and open it.
- Click your profile icon in the top-right corner.
- Select App settings.
- Turn on Update apps automatically. The toggle should now show as on.
Running updates through the store keeps the software optimized. Search for Microsoft Edge inside the Microsoft Store and click the Update button if a newer package exists. Edge is normally updated by its own built-in updater, so it may not show up in the Store on every PC. If you see no Edge entry, rely on the About Microsoft Edge page instead. This process installs performance patches that can eliminate lag.
Solution 3: Disable Extensions That You Don't Use
Disabling extensions you do not use speeds up Microsoft Edge by stopping background add-ons from consuming processor power and memory. Turning off these unneeded helper programs frees up valuable system resources so web pages load much faster.
How to manage extensions in Edge:
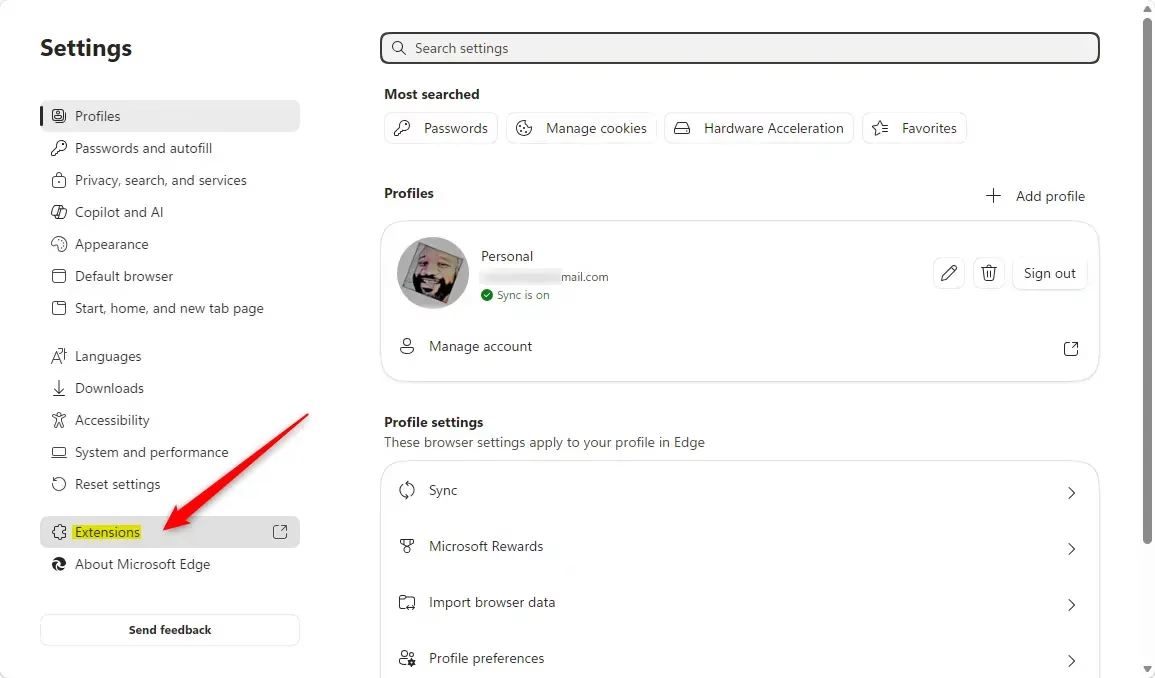
- Open Microsoft Edge.
- Click the three dots (Settings and more) in the top-right corner.
- Select Extensions.
- Click Manage extensions. A page opens listing every installed extension with an on/off toggle.
For any extension you do not use daily, click its toggle to turn it off. The toggle turns gray. Turning an extension off does not uninstall it, so you can switch it back on at any point.
Add-ons often act as hidden performance killers. Isolate the offender by toggling extensions off one by one and testing page load speeds after each change. Turn an extension back on if switching it off made no difference, then check the next candidate.
Frequent culprits behind browser slowdowns include:
- Antivirus add-ons (they check every webpage).
- VPN add-ons (they send your internet traffic through an encrypted connection).
- Multiple ad blockers running at the same time. One is enough.
- Password managers (though good ones are usually efficient).
- Price comparison tools (they check product prices on shopping sites).
Unused browser add-ons drain system resources continuously. Turn off any add-on you have not used in 30 days or more. If you want one back later, it is still on the Manage extensions page.
Solution 4: Clear Cache and Cookies
Clearing cache and cookies in Microsoft Edge resolves lag triggered by corrupted temporary data and frees up storage space on your hard drive. Clearing these stored website files from time to time keeps the browser running smoothly and prevents common loading errors.
How to clear cache and cookies:
- Open Microsoft Edge.
- Press Ctrl + Shift + Delete on your keyboard. This opens the Clear browsing data window. If you prefer menus, skip to the next step instead.
- Alternatively, click the three dots (Settings and more), then select Settings.
- Click Privacy, search, and services on the left side.
- Under Clear browsing data, click Choose what to clear. A small window appears.
- Check the boxes for Cookies and other site data and Cached images and files.
- Open the Time range dropdown menu and select All time to clear everything.
- Click Clear now. The window closes once Edge finishes.
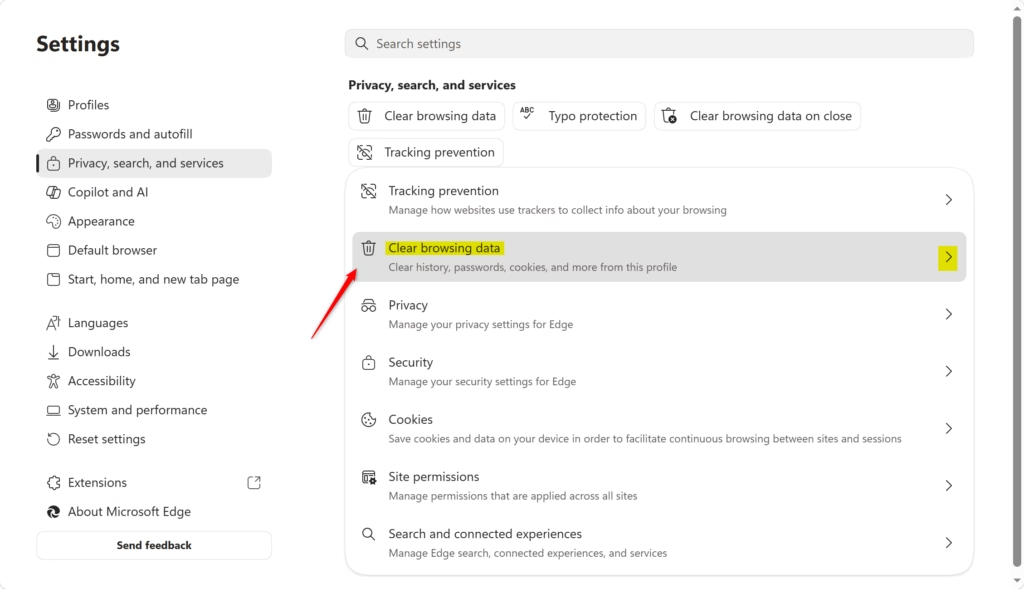
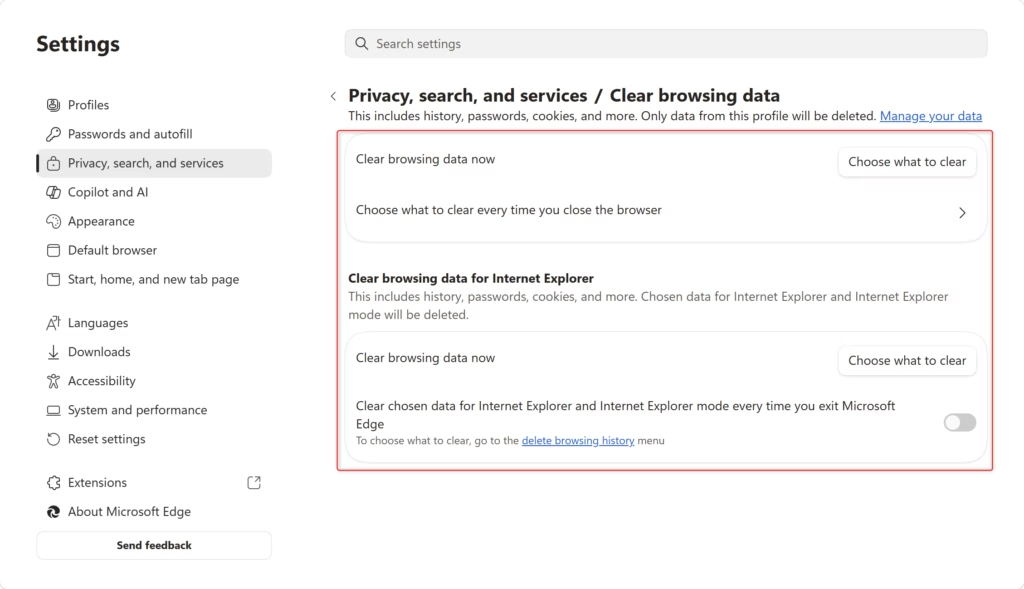
Websites load slightly slower immediately following a data purge because Microsoft Edge rebuilds its local file cache. Subsequent visits load much faster, and overall web performance normalizes within forty-eight hours.
You will need to sign in again to email, social media, and banking sites. Cookies store those login sessions locally, which accounts for the prompt. Passwords you saved in Edge are not removed unless you tick the passwords box in the same window, so leave that box unchecked.
Solution 5: Disable Graphics Acceleration
Disabling graphics acceleration shifts webpage rendering duties from your graphics processor back to the main CPU, which bypasses hardware conflicts that make Microsoft Edge crawl. This troubleshooting step helps fix stuttering and freezing issues on certain computer setups, often ones with an outdated graphics driver.
How to disable graphics acceleration in Edge:
- Open Microsoft Edge.
- Click the three dots (Settings and more) in the top-right corner.
- Select Settings.
- Click System and performance on the left side.
- Scroll down and find the Graphics acceleration toggle. In some versions the label reads "Use graphics acceleration when available."
- Click the toggle to turn it OFF. It should turn gray.
- Click Restart if Edge shows that button next to the setting.
Restart Edge to apply the change. If no restart button appears, close all Edge windows and reopen it.
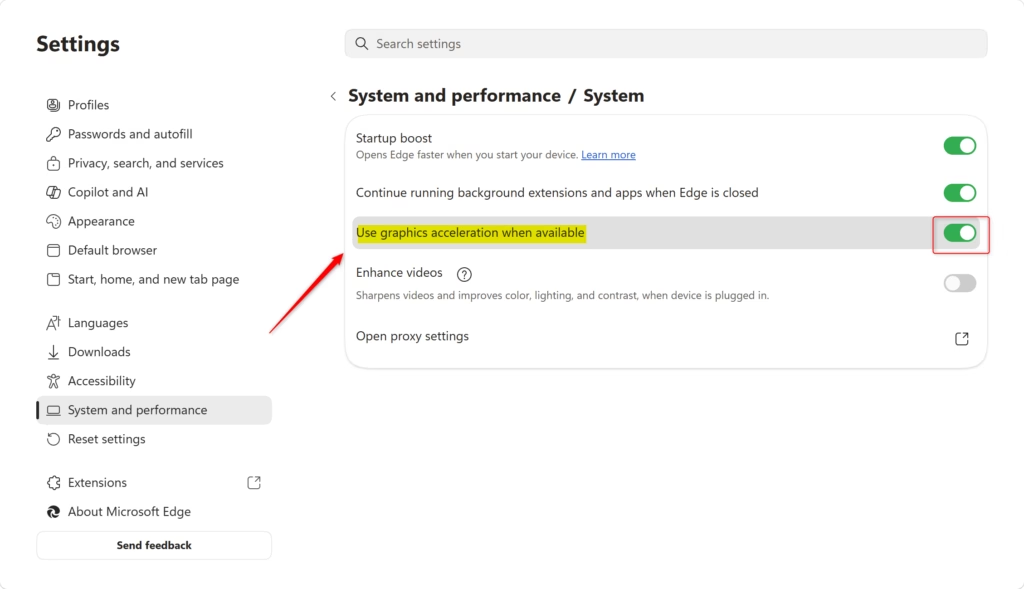
Test browsing speed after the change to see whether the toggle helped. Leave graphics acceleration off if responsiveness improves. If speed stays the same, turn the setting back on by following the same steps and move to the next fix. Updating your graphics driver is also worth doing, since a bad driver is the usual reason this setting causes trouble.
Solution 6: Enable Efficiency Mode
Enabling Efficiency Mode in Microsoft Edge curbs excessive resource consumption by saving battery power and putting inactive tabs to sleep. This setting keeps your Windows 11 operating system snappy and reserves computing power for other open applications.
How to enable Efficiency Mode:
- Open Microsoft Edge.
- Click the three dots (Settings and more) in the top-right corner.
- Select Settings.
- Click System and performance on the left side.
- Find Efficiency mode and click the toggle to turn it ON. It should turn blue. In some versions this is a dropdown with several options instead of a simple toggle. Pick the option that keeps it on.
Windows 11 battery saver mode engages automatically once notebook power dips below 20 percent. This function conserves electricity by throttling background tasks and dimming visual animations.
Close and restart Edge.
Raw browsing speed might show little change. The gain is mostly in overall system performance, which you will notice during heavy multitasking.
Solution 7: Disable Preloading the New Tab Page
Disabling new tab page preloading stops Microsoft Edge from rendering blank pages prematurely in the background. Stopping this background feature conserves memory and keeps the browser from dragging down your system performance.
How to disable preloading:
- Open Microsoft Edge.
- Click the three dots (Settings and more) in the top-right corner.
- Select Settings.
- Click Start, home, and new tabs on the left side.
- Scroll down and find Preload new tab page for a faster experience. If you cannot find it, your Edge version may not include this option, and you can skip this fix.
- Click the toggle to turn it OFF. It should turn gray.
Close and restart Edge.
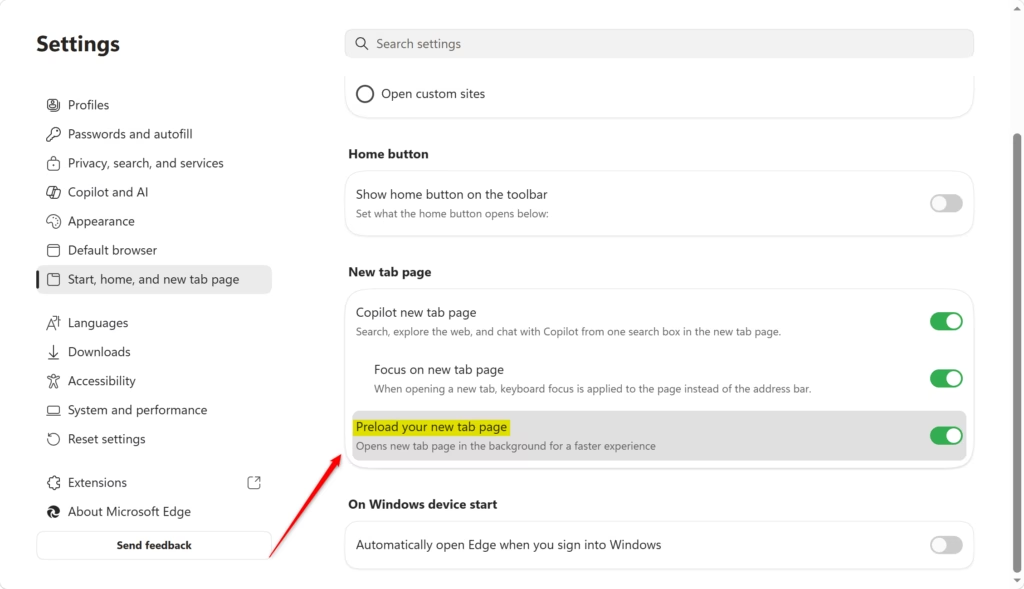
This tweak is minor on its own, but combined with the earlier fixes, it contributes to a leaner browsing environment. To undo it, turn the toggle back on.
Solution 8: Switch Tracking Prevention to Basic
Switching tracking prevention to the Basic setting in Microsoft Edge accelerates page rendering by intercepting fewer tracking scripts than the Strict alternative. Reducing this overhead lowers processing demands and helps websites load faster.
How to change tracking prevention:
- Open Microsoft Edge.
- Click the three dots (Settings and more) in the top-right corner.
- Select Settings.
- Click Privacy, search, and services on the left side.
- Under Tracking prevention, you will see three options: Basic, Balanced, and Strict.
- Click the Basic option. It should show as selected.
Close and restart Edge.
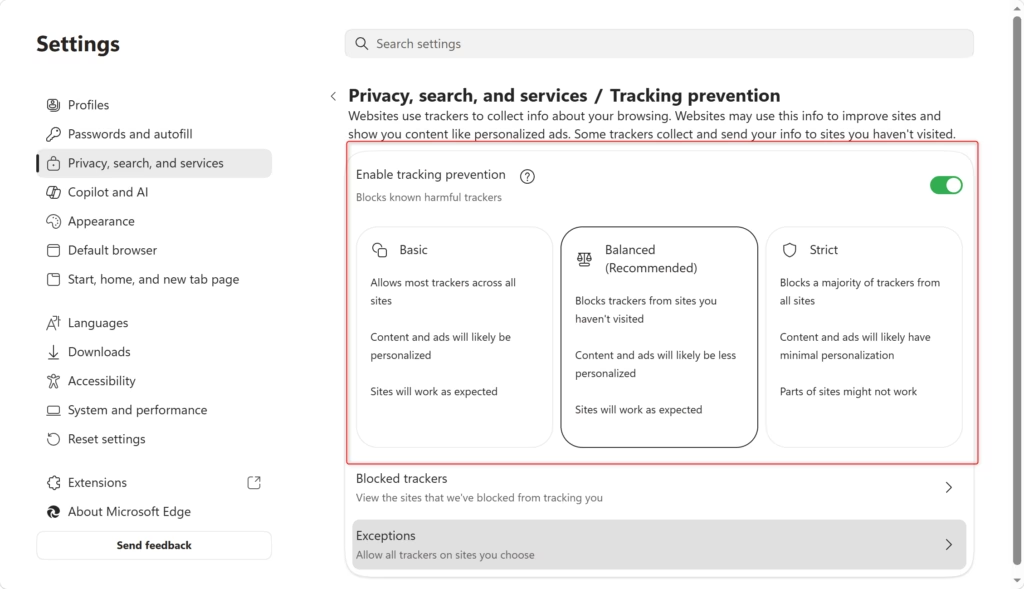
Basic blocks fewer trackers, so you give up some privacy for speed. If you do not want that trade-off, go back to Balanced, which is Edge's default. Shifting from Basic to Balanced also resolves broken website layouts if you see any. If privacy matters more to you than speed, select Strict and accept a possible performance dip. Version 118 of Microsoft Edge strikes a deliberate balance between speed and privacy management.
Solution 9: Reset DNS and Clear Network Cache
Flushing local DNS records and clearing network caches resolves browser lag tied to faulty network routing and outdated server entries. This network reset forces your computer to query fresh server routes, eliminating connectivity bottlenecks that slow down page loads.
Your computer relies on the Domain Name System (DNS, a directory that translates web addresses into numeric IP addresses). Outdated entries accumulate over time and degrade connection speed. Flushing the DNS table dumps stale records, forcing the operating system to query fresh, accurate host destinations.
How to clear DNS cache in Windows 11:
- Right-click the Windows Start button.
- Select Windows Terminal (Admin). On some Windows 11 builds the entry is labeled Terminal (Admin). This requires administrator privileges.
- Click Yes if User Account Control asks for permission. A terminal window opens.
- Type the DNS flush command for this fix exactly as it is written in the code block for this section.
- Press Enter.
Verification appears as an on-screen prompt reading, "Successfully flushed the DNS Resolver Cache."
Close the terminal window.
Restart Microsoft Edge.
Command Prompt serves as a viable alternative if Windows Terminal (Admin) is missing from the Start button menu. The designation "Admin" grants the elevated privileges required to change system settings. Note that this is a Windows Command Prompt, so you need an elevated one for the command to work.
- Click the Windows Start button.
- Type Command Prompt in the search box.
- Right-click Command Prompt in the results and select Run as administrator. This requires administrator privileges.
- Click Yes if User Account Control asks for permission.
- Type the same command, exactly as written.
- Press Enter. You should see the same confirmation message.
Close the window.
Solution 10: Reset Edge Settings to Default
Restoring default Microsoft Edge configurations undoes performance drags caused by corrupted custom profiles, rogue settings, or unwanted toolbars. This reset reverts the browser's settings to their defaults without deleting your saved passwords, history, or bookmarks.
How to reset Edge:
- Open Microsoft Edge.
- Click the three dots (Settings and more) in the top-right corner.
- Select Settings.
- Click Reset settings on the left side.
- Click Restore settings to their default values. A confirmation pop-up appears asking if you are sure. It summarizes what will be reset.
- Click Reset to confirm.
Edge restarts automatically.
Startup pages, custom homepages, and other settings return to their defaults. Extensions are turned off and temporary data such as cookies is cleared, so you will need to sign in to sites again and turn back on only the extensions you want. This is also a useful way to check which of your extensions was the problem. Rebuild your customizations manually, testing speed as you go.
Advanced Solution: Check for Malware and Browser Hijackers
Checking for malware and browser hijackers finds malicious background software that eats up processor time and cripples browser performance. Running a thorough security scan removes these hidden threats and restores normal operating speed to Microsoft Edge.
How to scan for malware:
- Click the Windows Start button.
- Type Windows Security. Searching for "Windows Defender" also finds it.
- Click Windows Security to open it.
- Click Virus & threat protection on the left side.
- Click Scan options.
- Select Full scan.
- Click Scan now. A progress bar shows the scan running.
The scan can take anywhere from 30 minutes to several hours, depending on drive capacity. You can keep using the PC, but it may feel slower until the scan finishes.
Windows Security quarantines detected threats automatically.
Reboot the machine when prompted.
If Windows Defender reports nothing but the slowdown continues, a second opinion from a third-party tool such as Malwarebytes is a reasonable next step.
Summary
Resolving sluggish behavior in Microsoft Edge on Windows 11 involves restarting the application, applying updates, turning off extensions, clearing caches, and adjusting settings like Efficiency Mode and graphics acceleration. Change one thing at a time and test after each step, so you know which fix worked. If Edge is still slow after all ten, check that Windows itself is up to date and that your PC has enough free memory and disk space.
Why is Edge so slow on 🪟 Windows 11?
Edge slows down when too many extensions run in the background, cache files pile up over time, or you have too many tabs open at once. Each of these consumes your computer's memory and processor power. Corrupted cookies and outdated graphics settings can also drag down performance.
How do I make Microsoft Edge run faster?
Clear your browsing cache and cookies, disable unused extensions, and close unnecessary tabs. Update Edge to the latest version, restart your browser, and check your graphics settings. Disabling hardware acceleration sometimes helps if it's causing problems instead of speeding things up.
How to fix Microsoft Edge on 🪟 Windows 11?
Start by clearing your cache and cookies in Edge settings. Disable or remove extensions you don't use. Update Edge to version 120 or newer. Close extra tabs, restart your browser, and check that your graphics drivers are current. If problems persist, reset Edge to factory settings.
Why is Microsoft Edge taking so long?
Too many background extensions, accumulated cache files, or excessive open tabs consume your system's memory and processing power. Old corrupted cookies and outdated graphics settings also cause slowdowns. The more data Edge stores and extensions it runs, the longer pages take to load.
Was this guide helpful?

About the Author
Richard
Tech Writer, IT Professional
Richard is a writer at Geek Rewind who turns complex IT tasks into clear, step-by-step guides. He draws on years of hands-on experience in system administration and enterprise IT operations, focusing on Windows, Linux and WordPress: the problems people actually run into, and the fixes that work. His server and WordPress guides come from systems he runs himself. Richard builds and maintains the platform behind Geek Rewind, from its Ubuntu servers and Nginx configuration to its custom WordPress plugins. Many new tutorials start with readers' questions, and he's always glad to answer them in the comments.


No comments yet — be the first to share your thoughts!