How to Stop Connecting Automatically to Wi-Fi in Windows 11


- 2 ways to do it
- Needs administrator rights
- Includes a restart or sign-out
Automatic Wi-Fi connection in Windows 11 joins any previously used wireless network as soon as it comes into range. That can pull your PC onto a slow public hotspot, a weak signal from the next building, or a network you no longer want to use. Turning the feature off stops your PC from grabbing those signals and gives you manual control over your internet access.
The setting is per network, not global. You switch off “connect automatically” for each saved network you want to control, and Windows still remembers its name and password. This guide covers five ways to do it: Quick Settings, the Settings app, Windows Terminal, the Registry Editor and PowerShell. It also covers phones. All of them work on both Windows 11 Home and Pro.
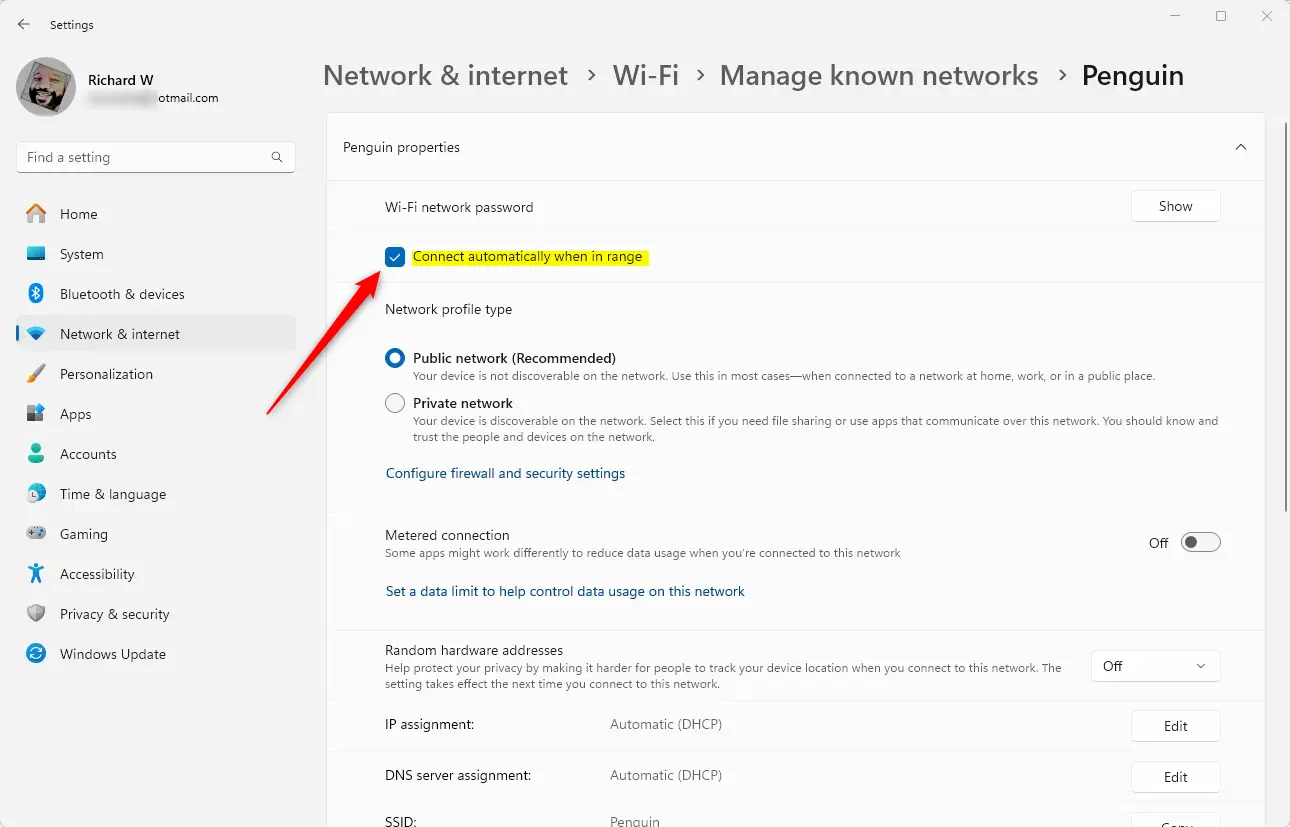
Disable the “Connect automatically when in range” option for specific Wi-Fi networks. Access this setting via Quick Settings or Windows Settings Network & internet Wi-Fi Manage known networks. Unchecking this box prevents your PC from joining previously connected networks without your manual approval.
What happens when done?
When you disable automatic connection for a network, your PC stays off it until you pick it from the Wi-Fi list and click connect. It does this even if the password is saved. Nothing is deleted, so you can switch the option back on at any time. Other saved networks keep their own settings.
Method 1Stop Automatic Connection via Quick Settings
The quickest way to change this is from the taskbar, using the Quick Settings menu. It works best for the network you are connected to right now. For a saved network that is out of range, use the Settings app method later in this guide.
Open the menu in the bottom right corner of your screen, click the arrow next to your Wi-Fi icon, select your current network, and uncheck the box for connecting automatically. Your computer then stops joining that network on its own.
- Open your Quick Settings menu in the bottom right corner of your taskbar . Click the cluster of Wi-Fi , speaker and battery icons, or press Win+A. A panel with tiles such as Wi-Fi , Bluetooth and Airplane mode should appear above the taskbar .
- Click the arrow next to your Wi-Fi icon. The panel should change to a list of the wireless networks in range.
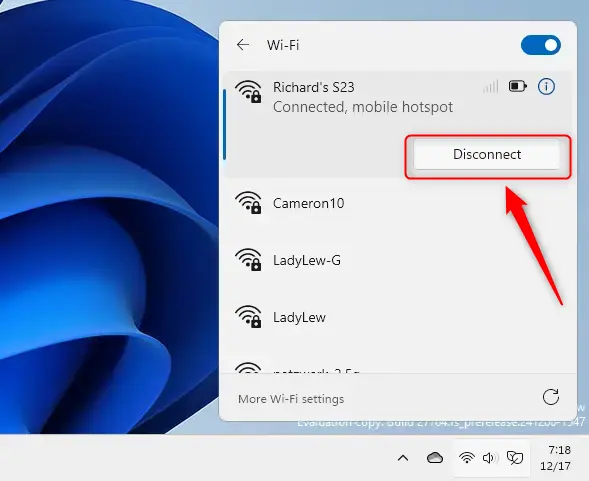
- Select the network you are using and click Disconnect. Your PC drops off that network, and the entry should expand to show more options.
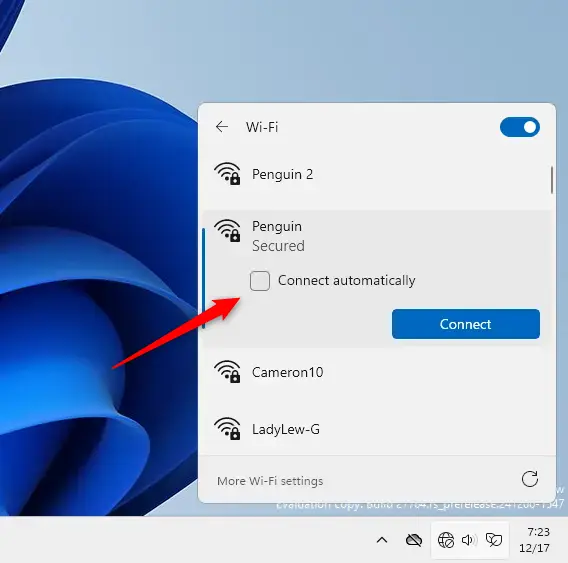
- Uncheck the box that says Connect automatically. The box should now be empty. To undo this later, open the same list, select the network and tick the box again.
Method 2Stop Automatic Connection via Settings
To disable Wi-Fi auto connect for saved networks that you are not currently connected to, use the main Windows Settings app. This is the method to use for a hotspot you joined months ago, because the network does not have to be in range. The path is Settings Network & internet Wi-Fi Manage known networks, and it lists every saved access point on your PC.
- Press the Win+I on your keyboard to open Windows Settings . The Settings window should open with a list of categories on the left.

- Click on Network & internet in the left menu.
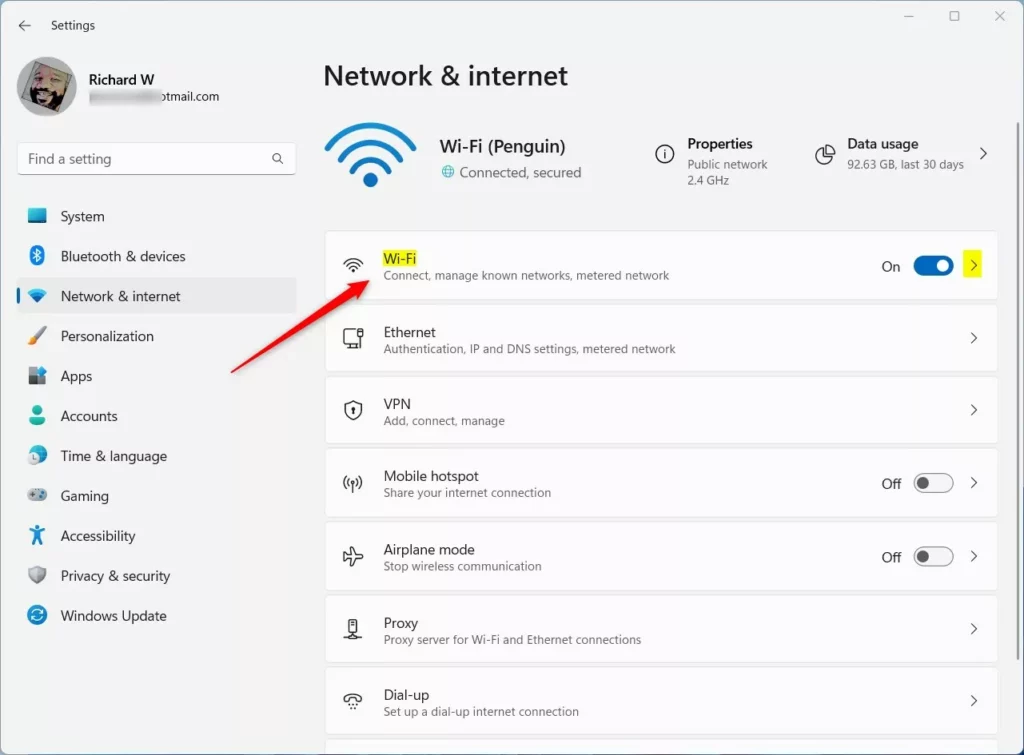
- Select Wi-Fi on the right side. If you don’t see this entry, your PC may have no wireless adapter, or Wi-Fi may be turned off or disabled in Device Manager.
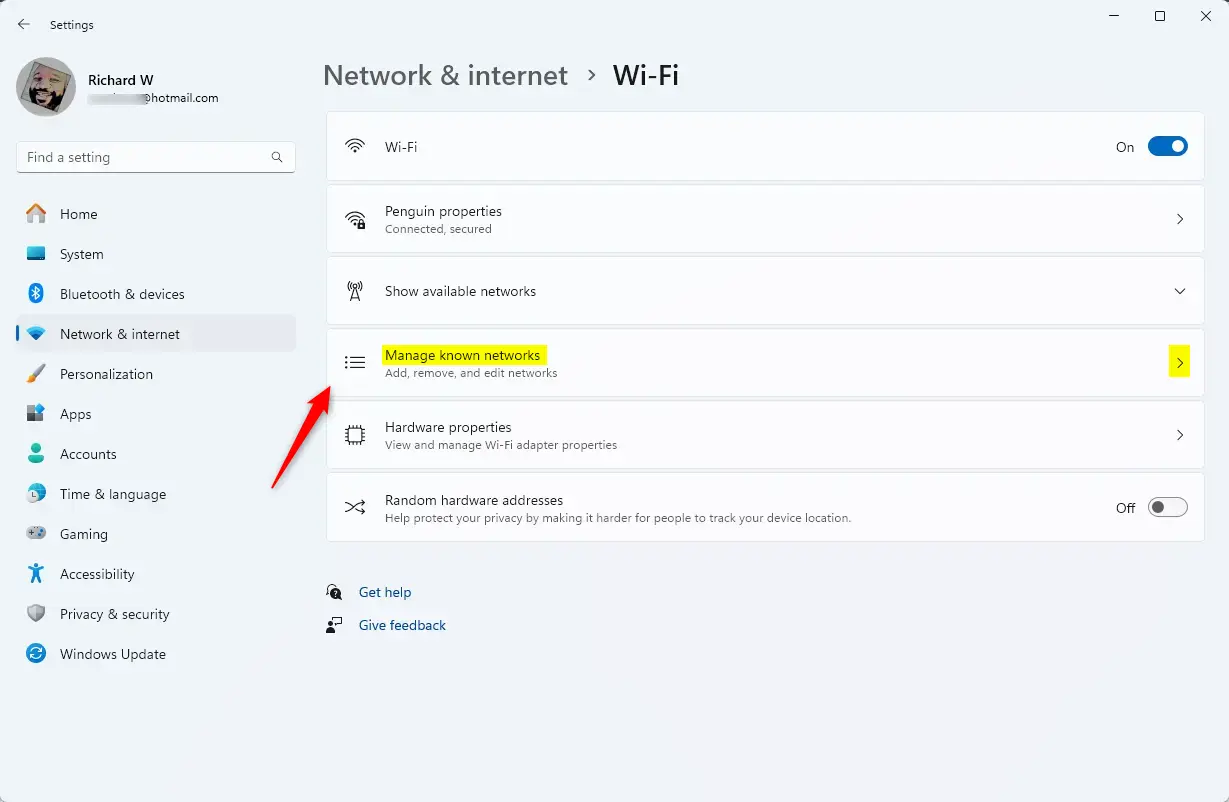
- Click on Manage known networks. You should see a list of every network your PC has saved, with the most recently used ones first.
- Find the network you want to change in the list and click on it. Its settings should expand or open below the name.
- Uncheck the box labeled Connect automatically when in range. The change applies straight away, and you don’t need to restart. To reverse it, come back here and tick the box again.
Advanced: Command Line Method (Netsh)
You can also disable Wi-Fi auto connect from Windows Terminal using netsh commands. This is handy if you manage several PCs or want to change many saved networks quickly. You open Terminal as an administrator, list your saved profiles, and then update the one network you want to stop joining automatically.
Profile names must be typed exactly as they appear in the list. If a name contains spaces, put it in quotation marks.
- Right-click the Start button and select Terminal (Admin). Click Yes if User Account Control asks for permission. A Terminal window should open.
- Type the following command to see your profiles:
netsh wlan show profiles. The output should list each saved Wi-Fi network by name. Note the exact name of the one you want to change. - To disable auto-connect for a specific network, type:
netsh wlan set profileparameter name="NetworkName" connectionmode=manual. Replace the example profile name with your own. Windows should report that the profile was updated. If it says the profile was not found, check the spelling against the list from the previous step.
Advanced: Registry Editor Method
You can disable Wi-Fi auto connect by modifying the Windows registry keys for your network profiles. Use this only if the other methods are not available to you, because a wrong edit in the registry can cause problems. Before you start, back up the key you are about to change. In Registry Editor, right-click it, choose Export and save the file somewhere safe.
Open Registry Editor using the Run dialog box, go to the NetworkListProfiles path in your system registry, and find the subkey for your network. The subkeys are named with long ID codes, not network names. Click each one and check its ProfileName value to find the right one.
- Press Win+R, type
regedit, and hit Enter. Click Yes if User Account Control appears. Registry Editor should open. - Navigate to:
HKEY_LOCAL_MACHINE\SOFTWARE\Microsoft\Windows NT\CurrentVersion\NetworkList\Profiles. Expand the key in the left pane. You should see one subkey for each network profile saved on the PC. - Locate the subkey for your network and change the EnableAutoConnect value to 0. To do this, double-click the value, type 0 in the Value data box and click OK. If you can’t find the value in your subkey, don’t create it by guesswork. Use the Settings app or netsh method instead. Sign out and back in, or restart, to make sure the change is picked up. To undo it, set the value back to 1 or import your exported backup file.
Cross-Platform: Mobile Devices
Phones and tablets save Wi-Fi networks separately from your PC, so a network you fixed in Windows can still auto-connect on your phone. The steps below cover the two main platforms. Menu names can vary a little by phone maker and software version.
Android: Go to Settings Network & internet Internet. Tap the gear icon next to your network and toggle off Auto-connect.
iOS: Go to Settings Wi-Fi. Tap the ‘i’ icon next to the network and toggle off Auto-Join.
Troubleshooting Persistent Issues
Stubborn connections usually point toward corrupted network profiles that refuse standard fixes. If a network keeps joining after you have cleared the checkbox, the saved profile may be damaged. PowerShell helps clear out the damaged data, though administrator privileges are required.
Be aware that clearing a profile can remove the saved network entirely. If it does, you'll need to enter the Wi-Fi password again the next time you want to connect. Make sure you know the password first.
- Open PowerShell (Admin). Right-click the Start button and choose the admin option for your terminal, then click Yes at the User Account Control prompt. A window with a prompt should appear.
- Run:
Set-NetConnectionProfile -Name "NetworkName" -NetworkCategory Public. When it finishes, reconnect to the network if you still want it, then repeat one of the methods above to turn off automatic connection for it.
Summary
Disabling Wi-Fi auto connect helps keep your computer more secure, especially on public networks. Your PC won't quietly join an open hotspot or a look-alike network with a familiar name. It can also save battery life by preventing constant scanning.
The trade-off is that you must connect by hand each time. A good approach is to leave automatic connection on for your home and work networks and turn it off for cafés, airports and other public hotspots. If you change your mind, tick the same box again for that network.
Have a question about this guide?
Answered by AI from this guide. Good questions may be added to this page — please don't include personal details.
Did this guide fix your problem?

About the Author
Richard
Tech Writer, IT Professional
Richard is a writer at Geek Rewind who turns complex IT tasks into clear, step-by-step guides. He draws on years of hands-on experience in system administration and enterprise IT operations, focusing on Windows, Linux and WordPress: the problems people actually run into, and the fixes that work. His server and WordPress guides come from systems he runs himself. Richard builds and maintains the platform behind Geek Rewind, from its Ubuntu servers and Nginx configuration to its custom WordPress plugins. Many new tutorials start with readers' questions, and he's always glad to answer them in the comments.
dude, everybody knows this already. i bet every bit of traffic for this particular page is from people who are connecting automatically even though auto connect is off. it’s a windows 11 bug.