How to Turn On or off Auto Arrange Icons on Desktop in Windows 11


Auto arrange icons in Windows 11 keeps your desktop tidy by snapping files and shortcuts into rows and columns, starting from the top-left corner. While it is on, you can’t drop an icon wherever you like, because Windows moves it back into the grid. Turning it off lets you place icons anywhere on the desktop.
The setting is in the desktop right-click menu , and it takes one click to change. The same steps work on Windows 11 Home and Pro.
Right-click an empty space on your desktop, hover over View, and click Auto arrange icons to toggle it on or off. A checkmark means it is on; your icons snap into a grid. No checkmark means it is off, and you can drag icons anywhere.
How to Turn Auto Arrange Icons On or Off Using the Context Menu
The right-click menu is the fastest way to switch auto arrange on or off. It needs no administrator rights and no restart, and the change applies immediately.
- Right-click an empty space on your desktop. If you right-click an icon, you get that icon’s menu instead.
- Hover over View. A submenu opens with the icon size options, Auto arrange icons, Align icons to grid and Show desktop icons.
- Click Auto arrange icons to switch it. The menu closes and the setting changes right away.
A checkmark next to Auto arrange icons means it is on. Your icons snap into a neat grid and you can’t drag them to a free spot. No checkmark means it is off, and you can drag icons anywhere.
If you turn it off, icons stay where they were at that moment. They don’t jump back to their old positions. To undo the change, open the same menu and click the option again.
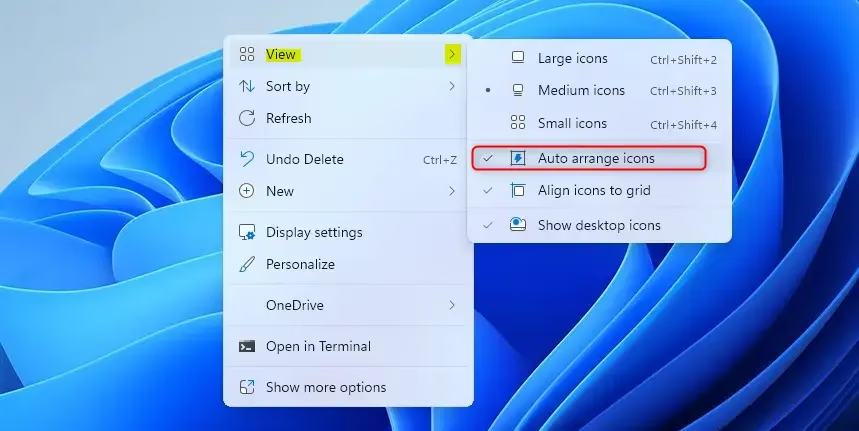
The same View menu has Align icons to grid. This is a separate setting. When it is on, icons you drag snap to an invisible grid, so they line up neatly but can still sit in any grid spot. Click it to switch it on or off. A checkmark means it is on.
If you can't see any icons at all, check Show desktop icons in this menu. When that option is unchecked, Windows hides every icon on the desktop.
Advanced Method: Using the Registry Editor
You can also set icon arrangement in the Registry Editor, the tool for Windows settings stored in the registry database. Use this method if the right-click menu doesn't work for you, if the options are missing, or if you want to set both options in one go.
A wrong edit can cause problems elsewhere in Windows, so take your time and follow the steps exactly.
Accessing the Registry Editor
- Press Windows key + R to open the Run dialog box.
- Type regedit and press Enter, or click OK.
- If User Account Control asks for permission, click Yes. You need an administrator account for this. You should now see the Registry Editor window, with a folder tree on the left and values on the right.
Click File Export, choose a location, give the file a name and click Save. If something goes wrong later, double-click that file to restore the settings.
Changing Icon Arrangement Settings
The setting is controlled by a value named FFLAGS in the desktop folder of the registry. Windows reads this value to decide how to handle the desktop layout.
- In the Registry Editor, go to this key. You can paste the path into the address bar at the top of the window, or expand the folders in the left pane one by one:
HKEY_CURRENT_USER\Software\Microsoft\Windows\Shell\Bags\1\Desktop - Look in the right pane for a value named FFLAGS.
- If it doesn't exist, right-click an empty area of the right pane and choose New DWORD (32-bit) Value. Type FFLAGS as the name and press Enter.
- Double-click FFLAGS. The Edit DWORD (32-bit) Value window opens.
- Enter one of the values below in the Value data box, then click OK.
Pick the combination you want:
- Auto arrange icons OFF, Align icons to grid OFF: set FFLAGS to
40200220 - Auto arrange icons ON, Align icons to grid OFF: set FFLAGS to
40200221 - Auto arrange icons OFF, Align icons to grid ON (the default): set FFLAGS to
40200224 - Auto arrange icons ON, Align icons to grid ON: set FFLAGS to
40200225
When you have finished, close the Registry Editor and restart your computer so the change takes effect. After the restart, right-click the desktop and open View to check that the checkmarks match what you set.
To undo the change, set FFLAGS back to the default value, which is the third option in the list above, and restart again. You can also double-click the backup file you exported earlier.
Summary
For most people, the right-click menu under View is all you need. Use the Registry Editor only when you want to set both options together or when the menu method doesn't work.
Was this guide helpful?

About the Author
Richard
Tech Writer, IT Professional
Richard is a writer at Geek Rewind who turns complex IT tasks into clear, step-by-step guides. He draws on years of hands-on experience in system administration and enterprise IT operations, focusing on Windows, Linux and WordPress: the problems people actually run into, and the fixes that work. His server and WordPress guides come from systems he runs himself. Richard builds and maintains the platform behind Geek Rewind, from its Ubuntu servers and Nginx configuration to its custom WordPress plugins. Many new tutorials start with readers' questions, and he's always glad to answer them in the comments.

No comments yet — be the first to share your thoughts!