How to Turn On or off Paging File Encryption in Windows 11

Paging file encryption protects the temporary data Windows 11 writes to your drive when your PC runs low on RAM. Windows keeps this overflow data in a hidden file named pagefile.sys. With encryption on, someone who steals the drive or reads it offline cannot make sense of that file.
You can turn the setting on or off from Windows Terminal, the Local Group Policy Editor, or the Registry Editor (a built-in tool for viewing and changing system settings). The Group Policy method needs Windows 11 Pro, Enterprise, or Education. Encryption protects your data from physical theft and offline attacks, but it adds a small performance cost.
Encrypting your paging file in Windows 11 protects sensitive data. Use the `fsutil behavior set encryptpagingfile` command in Windows Terminal, the Local Group Policy Editor, or the Registry Editor to enable or disable this feature. Always restart your computer after making changes.
What is Paging File Encryption?
When RAM fills up during heavy tasks, Windows moves some of its contents into the paging file, a hidden virtual memory file on your drive. By default, Windows does not encrypt this file. Anyone who gets access to the drive could read what is in it. That can include fragments of documents, web pages, or other data that was in memory.
Turning on paging file encryption scrambles this data so it can’t be read without the proper access. This is worth considering on laptops and other portable PCs, where theft is a real risk.
What is the trade-off? Your data is safer, but Windows has to do extra work every time it reads or writes the paging file. On most modern PCs the slowdown is small. You are most likely to notice it on older hardware or when the system is already short on memory. You can turn the setting off again at any time.
How to Check and Change Paging File Encryption
There are three ways to turn this setting on or off. All three control the same underlying setting, so pick whichever suits your edition of Windows:
- Windows Terminal (or Command Prompt). It works on any edition and is the quickest method. It also lets you check the current state.
- The Local Group Policy Editor. It is available only on Pro, Enterprise, and Education.
- The Windows Registry. Use it when Group Policy Editor isn't available, such as on Home.
Whichever method you use, restart the PC afterwards. The change does not take effect until the next boot.
Method 1Use Command Prompt or Windows Terminal
Windows Terminal lets you check or change paging file encryption with a single command, with no menus to click through. You need an elevated (administrator) window for this.
- Open Windows Terminal as Administrator as an administrator. Search for "Windows Terminal" in the Start menu, right-click the result, and select Run as administrator. ⚠️ Admin required
- Click Yes if the User Account Control prompt appears. An elevated Terminal window opens. It will use PowerShell or Command Prompt depending on your default profile, and the command works in either.
- Type this command and press Enter to check whether encryption is on or off:
fsutil behavior query encryptpagingfile - Read the result:
- If you see EncryptPagingFile = 0, encryption is off.
- If you see EncryptPagingFile = 1, encryption is on.
- To turn on encryption, type this command and press Enter:
fsutil behavior set encryptpagingfile 1
⚠️ Admin required - To turn off encryption, type this command and press Enter:
fsutil behavior set encryptpagingfile 0
⚠️ Admin required - Run the check command from step 3 again to confirm the new value. If you get an access denied error, the window is not elevated. Close it and repeat step 1.
- Restart your computer. The change won't take effect until you do.
Method 2Use Local Group Policy Editor
The Local Group Policy Editor gives you a plain on/off setting for paging file encryption, with no command line needed. It is included in Windows 11 Pro, Enterprise, and Education. It is not available on Home, so if the Run command below fails with a "cannot find" error, use the Registry method instead.
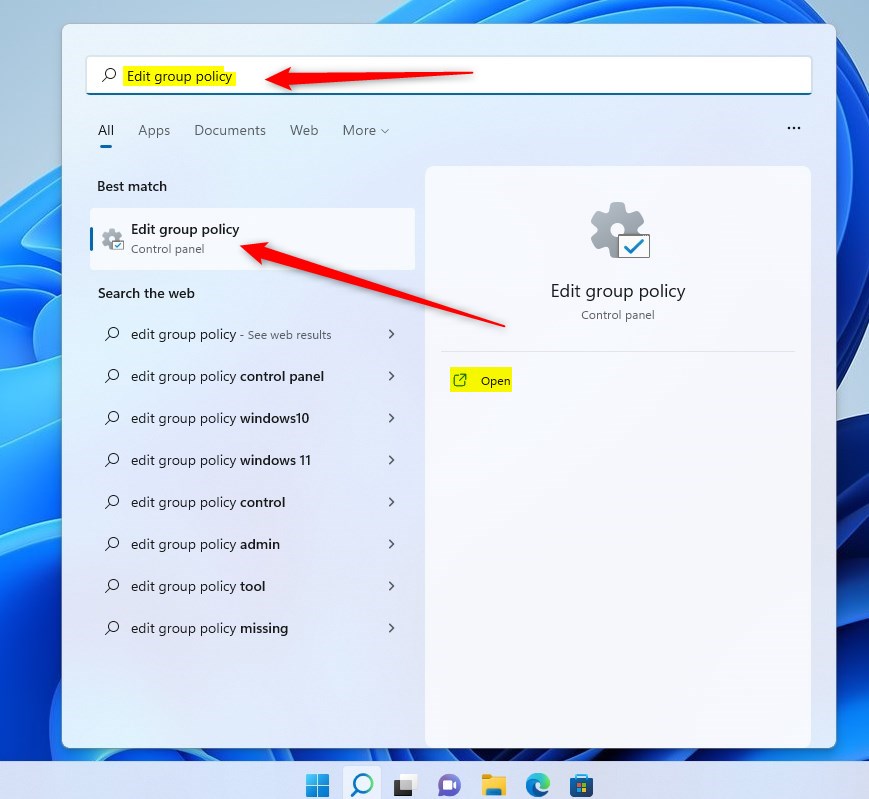
- Press Windows + R to open the Run dialog.
- Type
gpedit.mscand press Enter. The Local Group Policy Editor opens. ⚠️ Admin required - In the left pane, go to this folder:
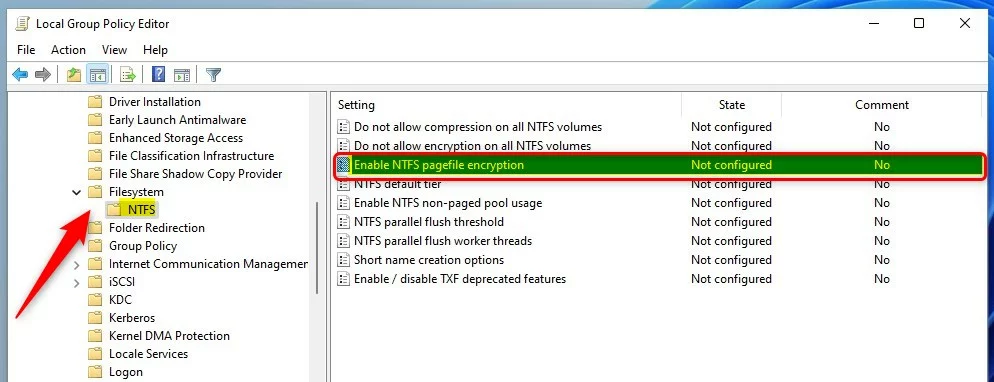
Computer Configuration\Administrative Templates\System\Filesystem\NTFS - In the right pane, find Enable NTFS pagefile encryption and double-click it. A settings window opens.
- Choose one of these options:
- Not Configured – The default setting. Windows does not apply any policy.
- Enabled – Turns on pagefile encryption.
- Disabled – Turns off pagefile encryption.
- Click OK, then close the editor.
- Restart your computer to apply the change.
To undo the change later, set the policy back to Not Configured and restart.
Method 3Use Windows Registry Editor
The Registry Editor works when the Group Policy Editor is missing, as it is on Windows 11 Home. You change one system value, and Windows applies it at the next restart. Registry changes can break things if you edit the wrong value, so follow the steps closely. Consider creating a restore point first.
One caution: paging file encryption relies on NTFS encryption. Home edition doesn't include the full set of encryption features found in Pro and above, so on Home the value can be set but may not have the effect you expect.
- Press Windows + R to open the Run dialog.
- Type
regeditand press Enter. Click Yes if User Account Control asks for permission. The Registry Editor opens. ⚠️ Admin required - Go to this location:
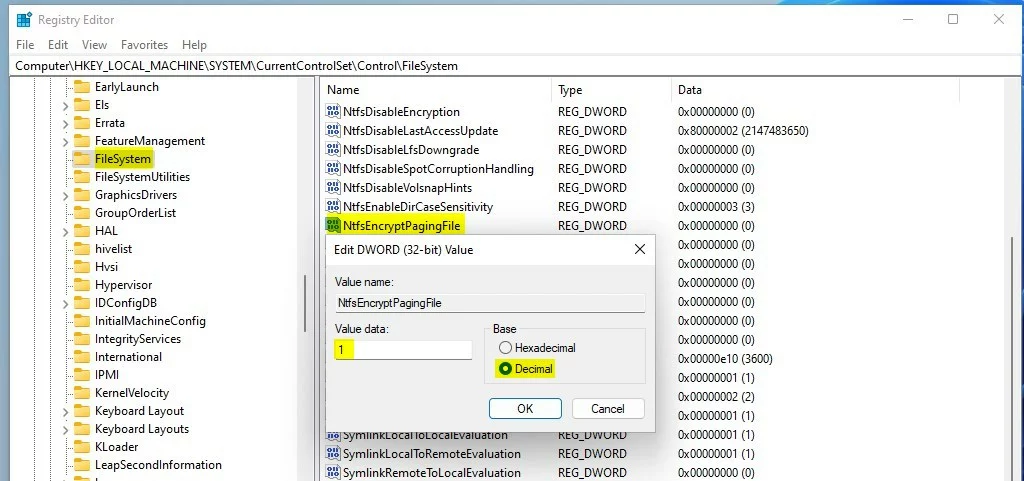
HKEY_LOCAL_MACHINE\SYSTEM\CurrentControlSet\Control\FileSystem - In the right pane, find NtfsEncryptPagingFile and double-click it. If the value isn't listed, right-click an empty area, choose New DWORD (32-bit) Value, and name it exactly NtfsEncryptPagingFile. Then double-click it.
- In the Value data box, enter:
- 1 to turn encryption on
- 0 to turn encryption off
- Click OK, then close the Registry Editor.
- Restart your computer to apply the change.
To undo the change, set the value back to 0 and restart.
Summary
Paging file encryption in Windows 11 keeps your temporary data safe from prying eyes if your computer is lost or stolen. While it improves security by locking down virtual memory, it can slightly slow down your system because your processor has to constantly lock and unlock the data.- Why encrypt your paging file? It keeps your data safer by stopping others from reading temporary files on your hard drive.
- What's the downside? Turning on encryption may cause your computer to work a little harder, which can slow it down slightly.
- How many ways can you do this? You can use the Command Prompt, Local Group Policy Editor, or Registry Editor to change this setting.
- Don't forget! Always restart your computer after making changes for them to take effect.
- Need more help? Check the official Microsoft page: Enable Pagefile Encryption - Microsoft
Did this guide fix your problem?

About the Author
Richard
Tech Writer, IT Professional
Richard is a writer at Geek Rewind who turns complex IT tasks into clear, step-by-step guides. He draws on years of hands-on experience in system administration and enterprise IT operations, focusing on Windows, Linux and WordPress: the problems people actually run into, and the fixes that work. His server and WordPress guides come from systems he runs himself. Richard builds and maintains the platform behind Geek Rewind, from its Ubuntu servers and Nginx configuration to its custom WordPress plugins. Many new tutorials start with readers' questions, and he's always glad to answer them in the comments.
No comments yet — be the first to share your thoughts!