How to Manage Microsoft Teams Chat Notifications


Control when Microsoft Teams alerts you about new messages by managing your chat notifications. This guide covers the Teams desktop app on Windows 11.
Microsoft Teams combines chat, video calls, and file sharing for workplace collaboration.
The desktop app, often found on your Windows 11 Taskbar, offers many settings to customize your experience.
You can turn “Chat message notifications” on or off within the Teams app to reduce distractions. Which way you set it depends on your work. Turn it off if you need to stay focused on a task. Leave it on if you can’t afford to miss important conversations.
Turning off chat notifications cuts down on interruptions while you work. For example, turning off alerts for the "General" channel stops all new message banners from appearing on your screen. Chats and channels can have separate notification settings, so if banners keep appearing after you change the Chat option, check the channel-related options on the same Notifications and activity page.
Manage Microsoft Teams chat notifications by going to Settings and more (…) > Settings Notifications and activity. In the Chat section, choose “Show in banner” for pop-up alerts or “Off” to disable them.
Turn on or off Chat message notifications in Teams
Microsoft Teams notifications let you choose whether you see pop-ups and hear sounds for new messages. You can turn chat message notifications on to stay updated right away, or turn them off completely if you want fewer interruptions while you work. The change takes effect straight away. You don’t need to restart Teams or Windows.
Here’s how to do it.
- Click the Start menu .
- Select All Apps in the Start menu , then find Microsoft Teams in the list and click it.
Teams should open in a new window. If it is already running, Windows brings it to the front.

You can also launch the app from the Taskbar or Taskbar overflow. If you use Teams every day, pinning it to the Taskbar saves a few clicks each time.

When you first launch the Teams app, the mini window will open. This small window is not enough for the settings you need, so open the full app.
- Click the expansion button on the menu bar of the mini window.
The full Teams window should now open, with your chats and navigation bar visible.

- In the full Teams window, click the Settings and more ( …) button next to your profile picture.
- Select Settings from the menu.
The Settings page should now open, with a list of categories on the left.

- Select the Notifications and activity tab on the left of the Settings page.
- Find the Chat section on the right.
- Open the drop-down menu in that section and pick the option you want.
Your options are:
- Show in banner: a banner appears on your screen whenever a new chat message arrives.
- Off: no banner appears for chat messages. The messages still arrive, and you will see them when you open Teams.
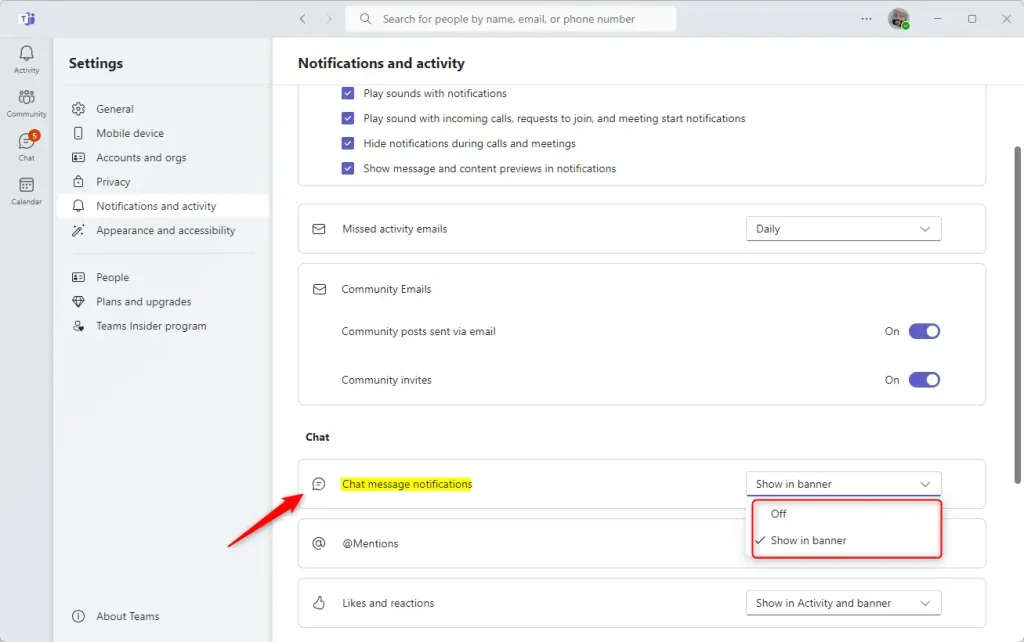
That should do it! To undo the change, go back to the same drop-down menu and choose the other option.
If you set Show in banner but still see no pop-ups, the cause is usually outside Teams. Check that Windows isn’t blocking them: open Settings System Notifications and make sure notifications are on for Teams. Windows 11’s Do not disturb mode also hides banners, as does setting your Teams status to Do not disturb.
Conclusion
Managing Microsoft Teams notifications helps you control how and when you get alerts for chats and calls. You can adjust these settings at any time by opening the main app window and changing your preferences in the settings menu.
- Begin by launching the Teams app from the Start menu, Taskbar, or Taskbar overflow.
- Open the full Teams window by clicking the expansion button on the mini window's menu bar.
- You can access the Settings by clicking the "Settings and more ( ...)" button next to your profile picture and selecting "Settings" from the menu.
- Navigate to the "Notifications and activity" tab and select it on the left of the Settings page. Then, under "Chat," choose between "Show in banner" or "Off" for chat notifications.
Microsoft Teams chat message notifications help you manage alerts according to your preferences. You can configure these notification settings. If you find errors or have more information, use the comments section.
Have a question about this guide?
Answered by AI from this guide. Good questions may be added to this page — please don't include personal details.
Did this guide fix your problem?

About the Author
Richard
Tech Writer, IT Professional
Richard is a writer at Geek Rewind who turns complex IT tasks into clear, step-by-step guides. He draws on years of hands-on experience in system administration and enterprise IT operations, focusing on Windows, Linux and WordPress: the problems people actually run into, and the fixes that work. His server and WordPress guides come from systems he runs himself. Richard builds and maintains the platform behind Geek Rewind, from its Ubuntu servers and Nginx configuration to its custom WordPress plugins. Many new tutorials start with readers' questions, and he's always glad to answer them in the comments.
[…] incoming calls and meetings, enable or disable notifications during calls and meetings, enable or disable chat message notifications, turn @mentions notifications banners on or off, turn notifications for likes and […]