How to Stop Microsoft Teams from Launching at Startup

Microsoft Teams is a chat and video call app that opens by itself every time you turn on your PC, which slows down your Windows 11 boot time. Stopping this automatic startup takes less than one minute and keeps the app closed until you choose to open it yourself.
Open Settings Apps Startup and switch Microsoft Teams to Off. Teams will stay closed after you sign in, and no restart is needed to apply the change. For a tighter fix, go to Start, search for Microsoft Teams, right-click it, choose App settings, turn off Runs at login, and set Background apps permissions to Never.
How to stop Microsoft Teams from starting automatically
You can disable Microsoft Teams startup by opening the app settings in Windows and turning off the switch that lets it run when you sign in. You also change its background permission so it can’t start itself behind the scenes. This keeps the app closed until you open it yourself, which helps your computer start up faster and keeps your taskbar free of clutter.
Closing Teams does not delete your chats, meetings or account. Everything is there when you open the app again.
- Click the Start button on your taskbar . The Start menu opens with the search box at the top.
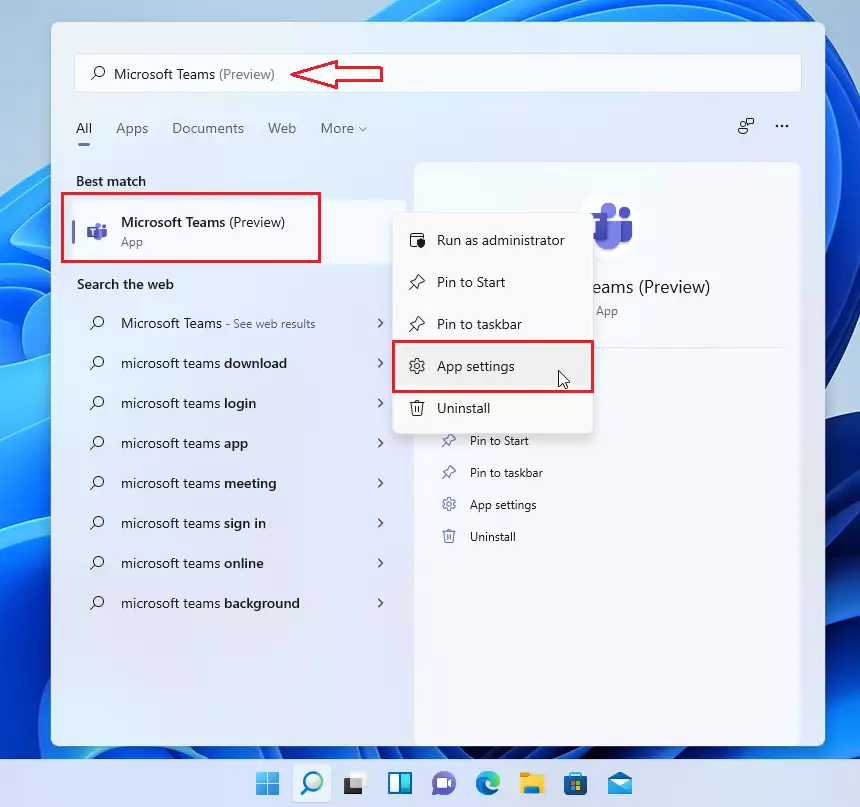
- Type “Microsoft Teams” in the search box. Microsoft Teams should appear as the top result.
- Right-click the Microsoft Teams app in the search results and select App settings. The Settings app opens on the page for Teams.
If you don’t see App settings in the right-click menu , make sure you right-clicked the Teams app itself and not a web result. The menu can also look slightly different depending on your Windows 11 build. The short version is: open the Start menu , search for Microsoft Teams, right-click the result, and select App settings.
You should now see the Teams settings page, with options for how the app behaves when you sign in and when it runs in the background.
If you are signed in with a standard account, Windows may ask for an administrator password. On a work or school PC, your IT department may control these settings, and the switch may be greyed out.
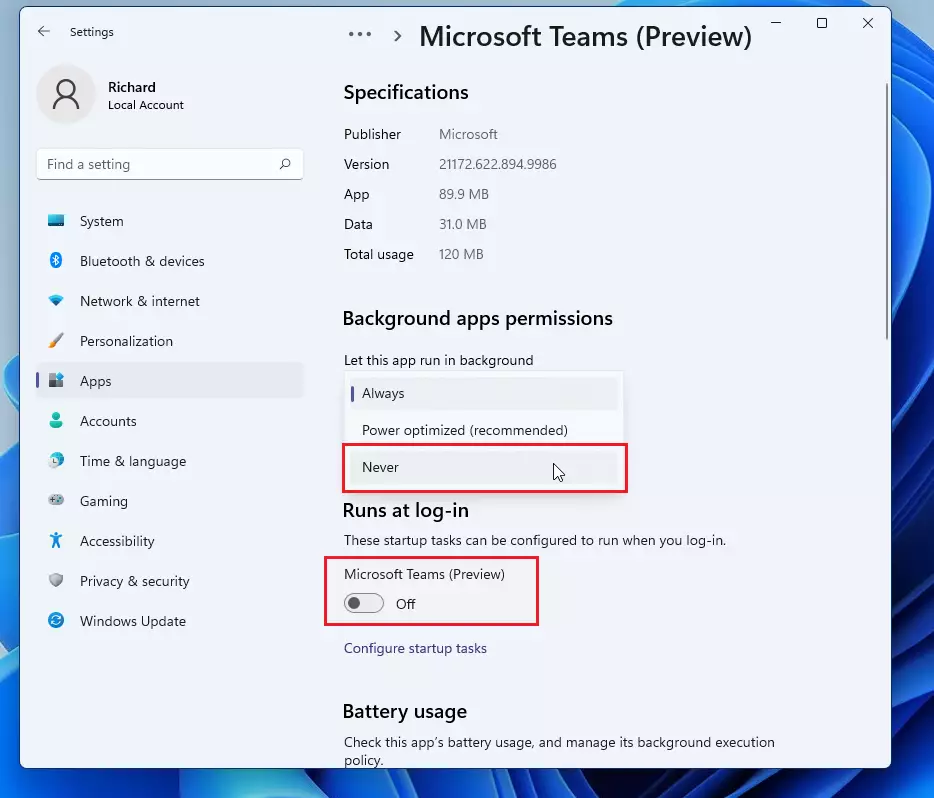
- Find the section labeled Runs at login. Click the toggle switch to set it to Off. The switch should now read Off.
- Next, look for Background apps permissions. Change the setting to Never. This prevents the app from running in the background when you aren't using it.
On some Windows 11 builds, Runs at login is on the General tab. The background setting may be under a Background apps entry in the left-hand menu instead. Either way, check that Teams is not allowed to run at login and that its background permission is set to Never.
Both settings save as soon as you change them, so there is no Apply or Save button to click.
Restart your computer to confirm the startup changes. Now, Microsoft Teams will only open when you click on the Teams icon, preventing the application from launching automatically when your computer starts.
If Teams still opens after the restart, check Settings Apps Startup and switch Microsoft Teams to Off there. You can also open Task Manager, go to the Startup apps page, right-click Microsoft Teams and choose Disable.
Summary
Microsoft Teams will now stay closed until you open it manually. To undo the change, return to the same App settings page, turn Runs at login back on, and set the background permission to a value other than Never.
Have a question about this guide?
Answered by AI from this guide. Good questions may be added to this page — please don't include personal details.
Did this guide fix your problem?

About the Author
Richard
Tech Writer, IT Professional
Richard is a writer at Geek Rewind who turns complex IT tasks into clear, step-by-step guides. He draws on years of hands-on experience in system administration and enterprise IT operations, focusing on Windows, Linux and WordPress: the problems people actually run into, and the fixes that work. His server and WordPress guides come from systems he runs himself. Richard builds and maintains the platform behind Geek Rewind, from its Ubuntu servers and Nginx configuration to its custom WordPress plugins. Many new tutorials start with readers' questions, and he's always glad to answer them in the comments.
You can just uninstall it, like the option is right there
[…] the camera and mic on or off on the lock screen, turn read receipts on or off, auto start Teams, disable Teams chat, sync contacts with Teams, connect to Google Calendar, link your mobile device, turning message […]
[…] the camera and mic on or off on the lock screen, turn read receipts on or off, auto start Teams, disable Teams chat, sync contacts with Teams, connect to Google Calendar, link your mobile device, turning message […]
[…] mic on or off on the lock screen, turn read receipts on or off, auto start Teams, disable Teams chat, sync contacts with Teams, connect to Google Calendar, and […]
[…] the camera and mic on or off on the lock screen, turn read receipts on or off, auto start Teams, disable Teams chat, sync contacts with Teams, connect to Google Calendar, link your mobile device, turning message […]
[…] mic on or off on the lock screen, turn read receipts on or off, auto start Teams, disable Teams chat, sync contacts with Teams, connect to Google Calendar, link your mobile […]
[…] the camera and mic on or off on the lock screen, turn read receipts on or off, auto start Teams, disable Teams chat, sync contacts with Teams, connect to Google Calendar, link your mobile device, turning message […]