How to Add or Remove Teams Taskbar Icon in Windows 11

The Microsoft Teams icon can show up in two places on the Windows 11 taskbar: in the system tray near the clock, and (on some builds) as a Chat icon among the main taskbar buttons. Either one gives you quick access to chats and calls. You can hide it to clear space, or stop Teams from opening every time you start your PC. This guide covers three ways to do that, from temporary to permanent.
To manage the Microsoft Teams icon on your Windows 11 taskbar, you can close the application to temporarily hide it. For permanent control, go to Settings Personalization Taskbar Taskbar corner overflow and toggle the switch for Microsoft Teams. You can also prevent it from starting automatically via Settings Apps Startup
Step 1Close Microsoft Teams to Temporarily Hide the Icon
Closing Teams completely removes its icon from the system tray until you open the app again. Use this when you want a quick, temporary fix. Nothing is changed in Settings, so it is easy to reverse.
- Look at the bottom-right corner of the taskbar , near the clock. The Teams icon is a purple square with a white “T”. If you don’t see it, click the small up arrow (hidden icons) next to the tray icons to show more.
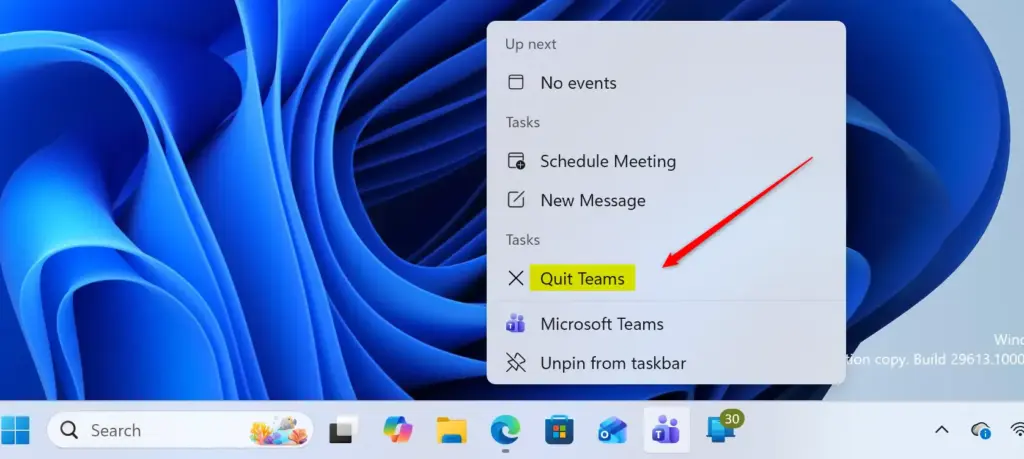
- Right-click the Microsoft Teams icon. A small menu appears.
- Click Quit. Some versions label this option Close. The icon disappears from the tray right away.
Closing the Teams window with the X button does not always quit the app. Teams can keep running in the background, so use Quit from the tray menu to be sure. The icon comes back as soon as you open Teams again, or the next time it starts with Windows.
Step 2Control the Microsoft Teams Icon in Taskbar Settings
For a longer-lasting change, use the Windows 11 Personalization settings. From the Taskbar page you can control which icons appear in the system tray corner. This works on both Windows 11 Home and Pro, and you don’t need to restart.
- Press Win+I to open Settings .
- Click Personalization in the left-hand menu. The Personalization page opens on the right.
- Click Taskbar on the right side of the page. The taskbar options appear.
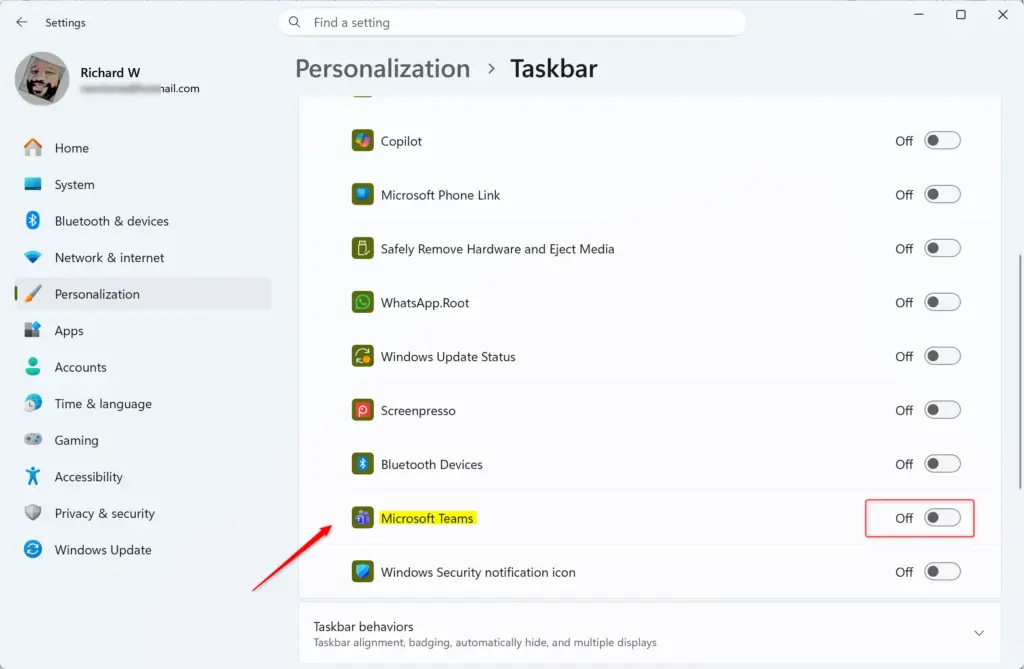
- Scroll down and click Taskbar corner overflow to expand it. On some Windows 11 updates this section is labeled Other system tray icons. You should now see a list of apps, each with a switch.
- Find Microsoft Teams in the list. To hide its icon from the taskbar corner, turn the switch Off. To show it, make sure the switch is On.
- Close the Settings window. The change applies immediately.
The list only shows apps that have already put an icon in the tray. If Teams is missing, open Teams once, then check the list again. To undo the change, go back to the same page and flip the switch back On. If you also see a Chat icon on the taskbar itself, check the other taskbar options on the same Taskbar page for a Chat switch. Its availability depends on your Windows 11 version.
Step 3Stop Microsoft Teams from Starting Automatically with Windows
If Teams opens every time you sign in, turn off its startup entry. This stops the app, and its tray icon, from launching with Windows. It also means Teams is no longer running in the background when you don’t need it.
- Press Win+I to open Settings .
- Click Apps in the left-hand menu.
- Click Startup on the right side of the Apps page. You’ll see a list of apps that can run at sign-in, each with a switch and a startup impact label.
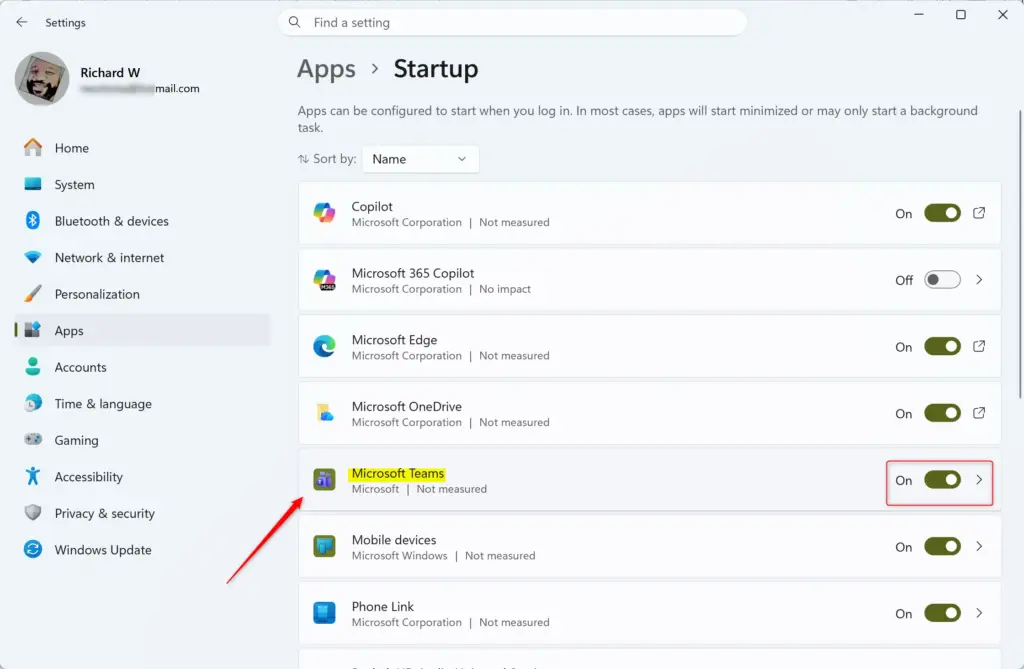
- Find Microsoft Teams in the list. It may appear simply as Teams, depending on the version you have installed. If the list is long, use the search box at the top or sort by name.
- Turn the switch Off to stop Teams starting automatically. If you want it to start with Windows again, turn it back On.
If the switch is greyed out, your organization may control it through policy. In that case, ask your IT administrator.
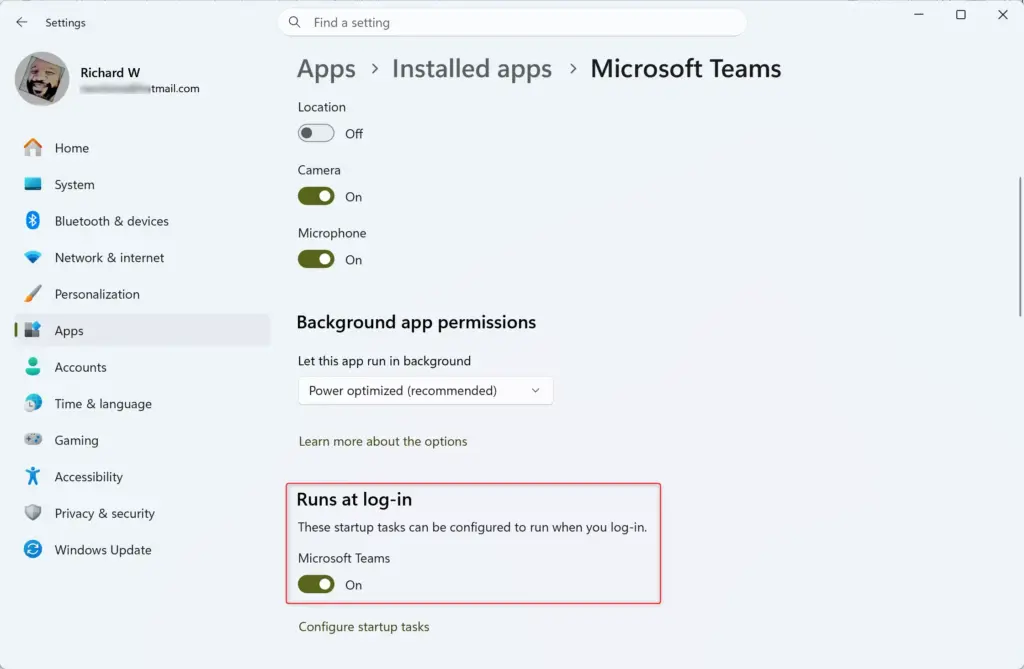
After your next restart, Teams will no longer open on its own. The Teams icon stays hidden from the taskbar corner until you open the app yourself.
From then on, you have to start Teams manually from the Start menu, or by searching for it, each time you want to use it. The trade-off is worth it for many people. Turning off Teams startup helps your PC start up faster and reduces the number of programs running in the background. If you miss calls or messages because Teams isn't running, turn the startup switch back on.
Summary
To manage the Microsoft Teams icon on your Windows 11 taskbar, you can quit the app to hide the icon temporarily, use the taskbar settings for persistent control, or disable its automatic startup with Windows.
Frequently asked questions
How to add Teams to taskbar?
To add Microsoft Teams to the taskbar, click Start and type Teams. Right-click Microsoft Teams in the results and select Pin to taskbar. The icon then appears with your other taskbar buttons. If Teams is already open, right-click its taskbar icon and choose Pin to taskbar instead.
How to pin Teams to taskbar?
Open Start, search for Teams, and right-click the app in the results. Choose Pin to taskbar. The icon stays on the taskbar after you close Teams and restart your PC. If Teams is running, you can also right-click its taskbar icon and select Pin to taskbar.
How do I pin Microsoft Teams to my taskbar?
Click Start, type Microsoft Teams, then right-click the app in the search results. Select Pin to taskbar. If Teams is open, right-click its icon on the taskbar and choose Pin to taskbar. The icon stays there until you unpin it.
How to pin Microsoft Teams to taskbar?
Search for Microsoft Teams from the Start menu and right-click it. Choose Pin to taskbar from the menu. Teams will appear as a button on the taskbar. To pin it while the app is running, right-click its taskbar icon and pick Pin to taskbar.
How to remove Microsoft from taskbar?
Right-click the Microsoft Teams icon on the taskbar and select Unpin from taskbar. The icon is removed, but Teams stays installed on your PC. To hide the icon from the system tray instead, right-click it there and choose Quit.
How to add Microsoft Teams to you hotbar?
Windows calls this area the taskbar, not a hotbar. To put Teams there, search for Teams from Start, right-click the app, and select Pin to taskbar. The Teams icon will stay on the taskbar until you remove it.
Still have a question?
Answered by AI from this guide. Good questions may be added to this page — please don't include personal details.
Did this guide fix your problem?

About the Author
Richard
Tech Writer, IT Professional
Richard is a writer at Geek Rewind who turns complex IT tasks into clear, step-by-step guides. He draws on years of hands-on experience in system administration and enterprise IT operations, focusing on Windows, Linux and WordPress: the problems people actually run into, and the fixes that work. His server and WordPress guides come from systems he runs himself. Richard builds and maintains the platform behind Geek Rewind, from its Ubuntu servers and Nginx configuration to its custom WordPress plugins. Many new tutorials start with readers' questions, and he's always glad to answer them in the comments.
No comments yet — be the first to share your thoughts!