How to Mute Chat Notifications in Microsoft Teams

Muting chat notifications in Microsoft Teams stops pop-up banners and alert sounds from interrupting your work. Microsoft Teams is a chat and video app used for daily work and school communication.
You can turn off these alerts for a single chat, an entire channel, or every message at once. Silencing them lets you focus on your tasks without constant distractions.
This tutorial covers one specific case: meeting chat notifications. The setting is in the main Teams settings, so it applies to your account and not to one meeting.
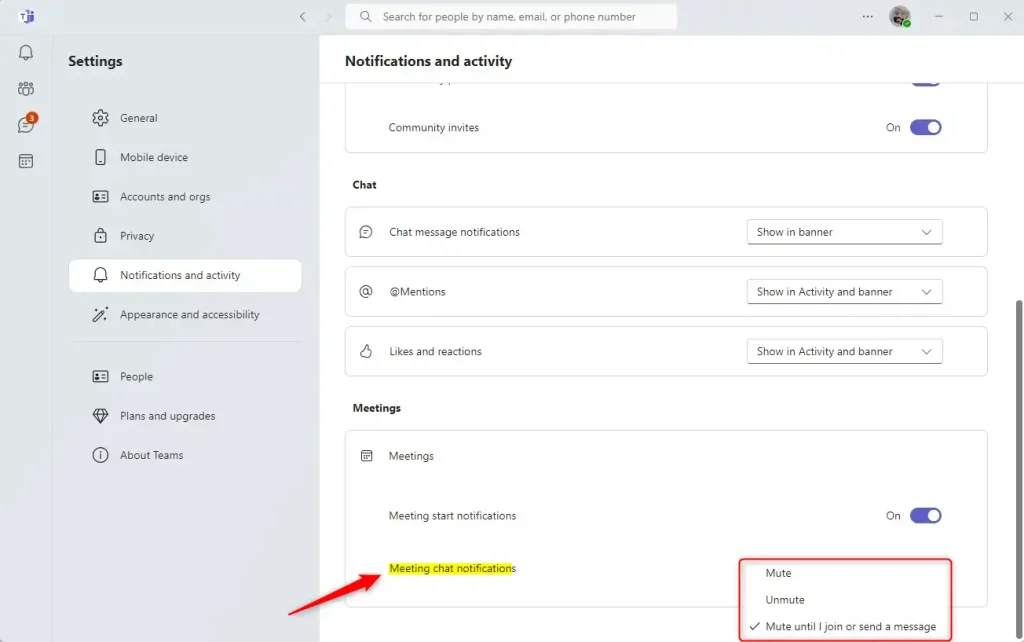
Click the three dots next to your profile picture, select Settings, then Notifications and activity. Under Meetings, choose “Mute until I join or send a message” or “Mute” to stop chat alerts during meetings.
Adjust meeting chat notifications in Teams
Adjusting meeting chat notifications lets you stop pop-up alerts and sound effects while you are on a call. Chat messages still arrive in the chat panel, but they don’t pop up on your screen and pull your attention away from the conversation.
Start by opening the app.
- Open the Start menu , type Teams, and select Microsoft Teams from the results.
The Teams window should open. If you are not signed in, sign in with your work, school, or personal account first.

You can also launch Teams from the Taskbar. If its icon isn't pinned there, check the Taskbar overflow (the small arrow near the clock). Teams often sits there when it is running in the background.

- Maximize the window if it opens in a compact view.
A larger window shows the full left sidebar and the top bar, which makes the next steps easier to follow.

- Click the Settings and more (...) button next to your profile picture.
- Select Settings from the menu.
The Settings window should now be open. If you don't see the three-dot button, make the Teams window wider.

- Click the Notifications and activity tab on the left sidebar of the Settings menu.
- Expand the Meetings section.
- Click the Meeting start notifications tile.
- Select a preference from the choices shown:
- Mute turns off the pop-up and sound for these notifications.
- Unmute turns them back on.
- Mute until I join or send a message keeps them quiet until you join the meeting or send a message in its chat.
Label wording and layout can differ slightly between Teams versions and between work, school, and personal accounts. If an option is missing or greyed out on a work or school account, your organization's admin may be controlling it through policy. Ask your IT team in that case.
Changes apply immediately. You don't need to save anything or restart Teams. To undo the change, return to the same tile and pick Unmute or another option.
Summary:
- In this article, we have guided you through adjusting meeting chat notifications in Microsoft Teams to minimize distractions and improve your meeting experience.
- Using the step-by-step instructions provided, you can mute, unmute, or temporarily mute meeting chat notifications.
- Customizing your meeting chat notifications can enhance productivity and reduce distractions during Microsoft Teams meetings.
- We hope this guide has helped you improve your Microsoft Teams usage. We welcome any feedback or additional questions in the comments section below.
Have a question about this guide?
Answered by AI from this guide. Good questions may be added to this page — please don't include personal details.
Did this guide fix your problem?

About the Author
Richard
Tech Writer, IT Professional
Richard is a writer at Geek Rewind who turns complex IT tasks into clear, step-by-step guides. He draws on years of hands-on experience in system administration and enterprise IT operations, focusing on Windows, Linux and WordPress: the problems people actually run into, and the fixes that work. His server and WordPress guides come from systems he runs himself. Richard builds and maintains the platform behind Geek Rewind, from its Ubuntu servers and Nginx configuration to its custom WordPress plugins. Many new tutorials start with readers' questions, and he's always glad to answer them in the comments.
[…] notifications for likes and reactions on or off, turn meeting start notifications on or off, mute or unmute meeting chat notifications, and […]