How to Clear Windows Backup Stored Settings from Your Microsoft Account

Clearing Windows Backup stored settings from your Microsoft account deletes your saved Wi-Fi passwords, app lists, and system preferences from Microsoft’s cloud servers. Windows Backup links up to 10 of your Windows 10 and 11 devices together. Old backup data often causes sync errors or pushes unwanted settings to a new PC.
Removing the stored data gives your account a fresh start and stops bad settings from coming back. You do this from your Microsoft account page in a web browser, not from the PC itself. It takes a few minutes, and you can do it from any computer.
Sign in to your Microsoft account at account.microsoft.com in a browser, scroll to find Cloud synced settings, and click Clear stored settings. Confirm the prompt. Your saved Wi-Fi passwords, app lists, and system preferences are permanently deleted from Microsoft’s servers.
How to Clear Your Stored Windows Settings
The settings Windows syncs between your devices are stored with your Microsoft account online. That is why the cleanup happens on the account website and not in the Settings app.
Your files and the settings on each PC stay as they are. It also cannot be undone, so decide first whether you might want any of the saved data, such as Wi-Fi passwords you no longer remember.
Step 1Go to Your Microsoft Account Devices Page
Start by signing in to your Microsoft account in a browser. Use the same account you sign in with on your Windows PC. If you have more than one Microsoft account, the wrong one will show you the wrong data, or nothing at all.
- Open your web browser.
- Go to the Microsoft account website. You can search for “Microsoft account” or go directly to account.microsoft.com.
- Click Sign in and enter the email address and password of the account you use on your Windows PC.
- Complete any security prompt, such as a code sent to your phone or the Microsoft Authenticator app. When you reach the account dashboard, you are signed in.
If you are not sure which account your PC uses, check on the PC under Settings Accounts Your info The email address is shown under your name.
Step 2Find the "Cloud synced settings" Section
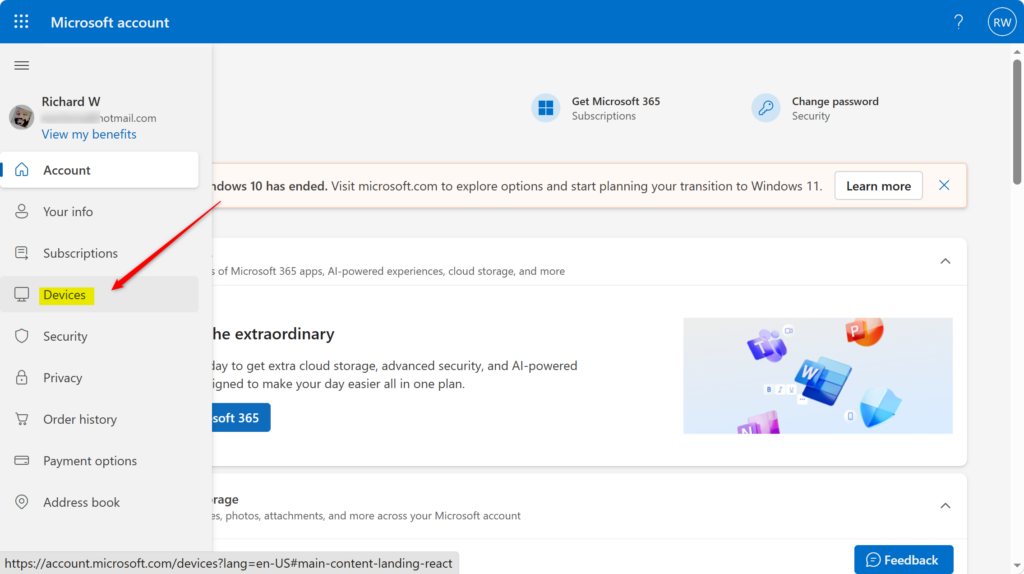
Next, find the Cloud synced settings section. It holds the backup data your PC sends to the cloud, including app lists, saved Wi-Fi passwords, and system settings. Microsoft moves things around on this site from time to time, so the exact location can differ from what I describe below.
- Scroll down the main page of your Microsoft account.
- Look for a section called Devices, or one that mentions syncing. Open it if it is a link.
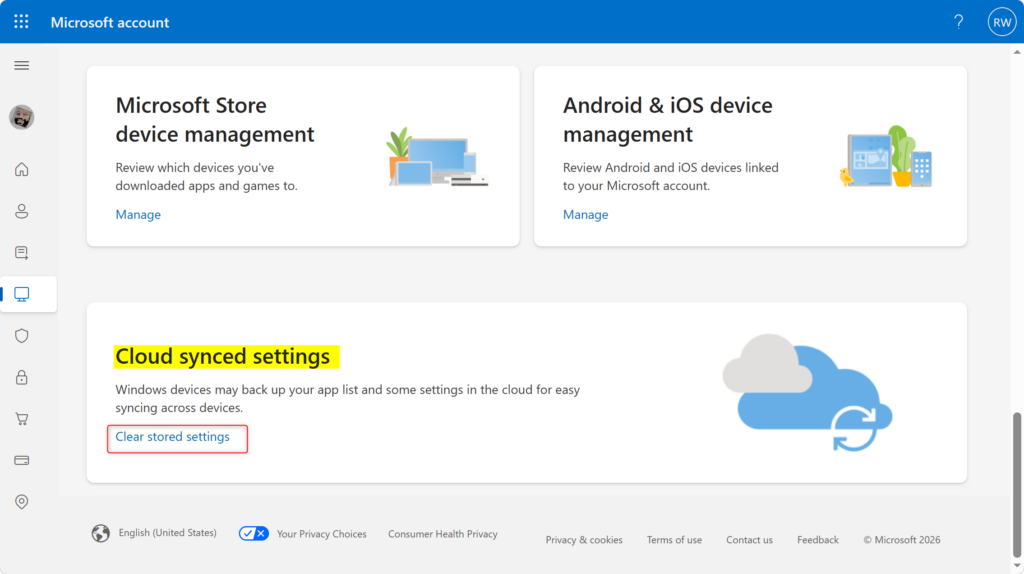
- Look inside that area for Cloud synced settings. This is where Windows keeps the setup information for your personalized settings that sync across devices. It may sit at the bottom of the page, or inside the Devices or Sync area.
If you cannot find it, use the search box on the account page, or check each section of the dashboard in turn. You should end up on a page that mentions stored settings and has a button to clear them.
Step 3Choose "Clear stored settings"
Now clear the data. Read the confirmation prompt carefully before you confirm, because this deletes your saved cloud data permanently.
- In the Cloud synced settings area, click Clear stored settings.
- A confirmation message appears. This is your last chance to back out. Read it carefully, because the action cannot be undone.
- Confirm that you want to clear the stored settings.
After you confirm, the page should tell you the settings were cleared. If you change your mind at the prompt, close it without confirming and nothing is deleted.
After you confirm, Microsoft's servers remove the settings data saved with your account. This does not delete files from your computer or OneDrive. Only the setup data Windows Backup uses to sync preferences across devices is removed.
The next time you sign in to Windows or sync settings, Windows creates new stored settings based on your current computer setup. If you do not want a PC to upload its settings again, you can turn off settings backup on it under Settings Accounts Windows backup. Do that before the PC next syncs.
Reference:
Summary
Clearing your stored Windows backup settings from your Microsoft account helps fix sync problems and removes old configuration data. If a new PC still picks up odd settings afterward, check which devices are still signed in to your account and still syncing.
Have a question about this guide?
Answered by AI from this guide. Good questions may be added to this page — please don't include personal details.
Did this guide fix your problem?

About the Author
Richard
Tech Writer, IT Professional
Richard is a writer at Geek Rewind who turns complex IT tasks into clear, step-by-step guides. He draws on years of hands-on experience in system administration and enterprise IT operations, focusing on Windows, Linux and WordPress: the problems people actually run into, and the fixes that work. His server and WordPress guides come from systems he runs himself. Richard builds and maintains the platform behind Geek Rewind, from its Ubuntu servers and Nginx configuration to its custom WordPress plugins. Many new tutorials start with readers' questions, and he's always glad to answer them in the comments.
No comments yet — be the first to share your thoughts!