How to Manage Your Microsoft Account Passkeys

Passkeys for a Microsoft account let you sign in with your fingerprint, your face, or a phone screen lock instead of a standard password. Each passkey is tied to a trusted device or password manager. Because there is no password to type, a phishing site has nothing to steal.
You can add, rename, delete, or check your saved passkeys at any time on the Advanced Security Options page in your Microsoft account settings. Clearing out old devices or switching to a new phone takes only a few clicks. You need to be signed in, and Microsoft may ask you to verify your identity first.
Go to account.live.com/proofs/manage and sign in to your Microsoft account. Scroll to your passkeys, click to expand them, then rename, delete, or add new passkeys as needed. Microsoft may ask you to verify your identity first.
For Your Personal Microsoft Account
You manage passkeys for a personal Microsoft account on the Advanced Security Options page. Open your web browser, go to account.live.com/proofs/manage, and sign in. Once you are in, you can view, add, or remove every passkey saved to the account.
Work or school accounts are managed by an organization, and the options may be different or restricted by your admin.
- Open the Advanced Security Options page. The fastest way is to go straight to this link:
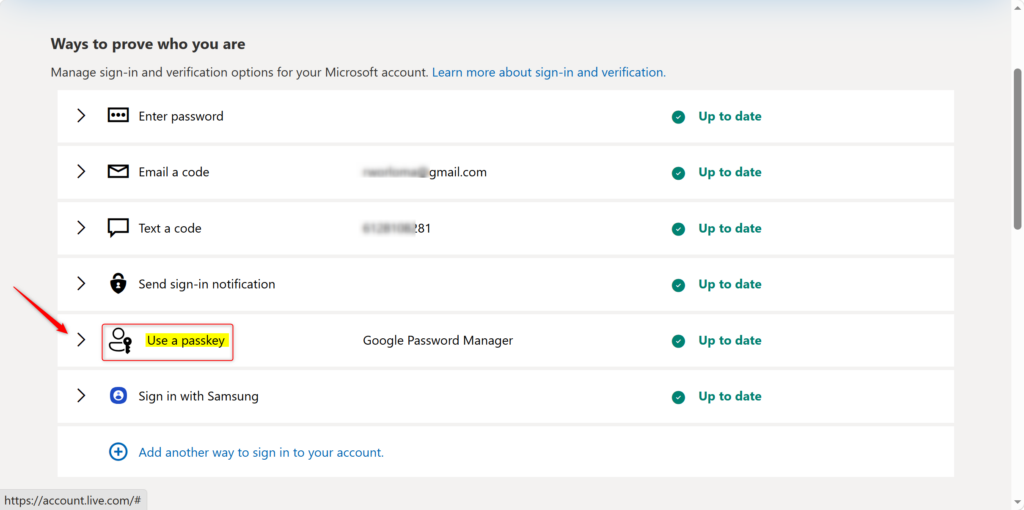
account.live.com/proofs/manage. Make sure you are signed in to the Microsoft account you want to manage. If Microsoft asks for a verification code or your password, complete that prompt. You should then see the page with your security options. - Find your passkeys. Scroll down the page to the list of ways to prove it’s you. Look for the passkey entries, which usually show a key-style icon. If you have saved passkeys, they appear in this list.
- Expand the passkey section. Click the passkey entry or the area where your passkeys are shown. It should open to show more detail about each passkey.
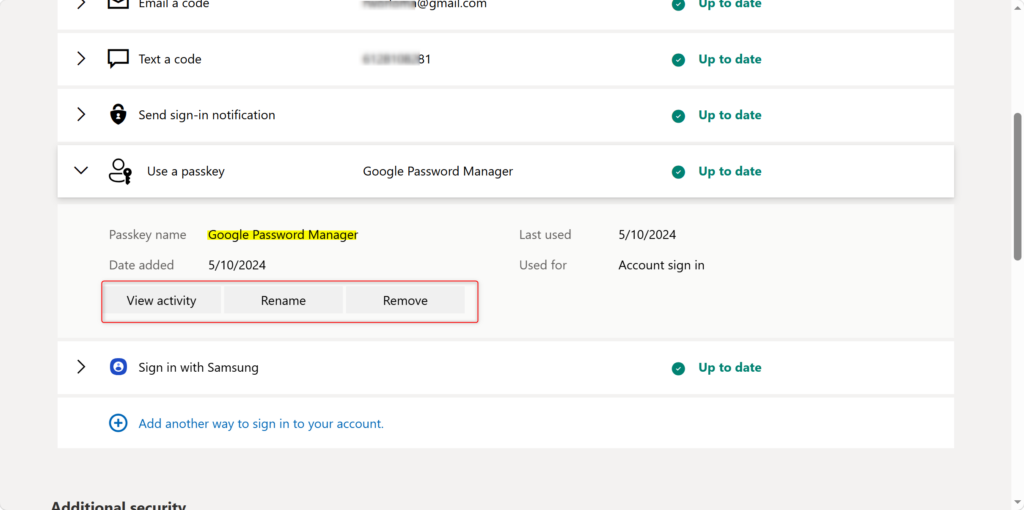
- Review the details. For each passkey you can see where it’s saved. That might be your phone, a specific device, or a password manager. You can also see when it was last used. A passkey tied to a device you no longer own, or one that hasn’t been used in a long time, is a good candidate for removal.
- Rename a passkey if you want to. If you see a Rename option, click it and type a new name. This helps when you have several passkeys for the same account or device and need to tell them apart. Renaming only changes the label shown here. It does not change how the passkey works. If you don’t see Rename, your account page may not offer it yet.
- Delete a passkey you don’t want. If you no longer use a device or method, or you’ve got a new phone, remove the old passkey. Click Remove next to the passkey you want to delete, then confirm if you are asked. The passkey should disappear from the list.
- Add a replacement if you need one. Before you remove your only passkey, make sure you can still sign in another way, such as your password or a verification app. If the page offers a way to add a new sign-in method, choose the passkey option and follow the prompts on your device. This is where you approve with your fingerprint, face, or screen lock.
It may not erase the copy stored on your phone, computer, or password manager. If you want it gone from there too, delete it in that device’s or app’s passkey settings.
Reference:
Summary
This guide shows you how to manage your Microsoft account passkeys, letting you view, rename, or remove them from the Advanced Security Options page.
Frequently asked questions
Where is my Microsoft passkey?
Your passkeys are on the Advanced Security Options page. Go to account.live.com/proofs/manage and sign in. The page lists every passkey saved to your personal Microsoft account, along with the device or password manager each one is tied to.
How to delete passkeys Microsoft passkeys of emails?
Open account.live.com/proofs/manage and sign in. Find the passkey you want to remove and select it. Choose the option to remove it, then confirm. Microsoft may ask you to verify your identity before it deletes anything.
How to change Microsoft account passkey?
Add a new passkey first, then delete the old one. Go to account.live.com/proofs/manage and sign in. Add a passkey on your current device, then remove the older passkey. Adding the new one first means you will not get locked out during the switch.
Where do I the passkey in Microsoft account?
Sign in at account.live.com/proofs/manage to find your passkeys. This is the Advanced Security Options page for a personal Microsoft account. Each saved passkey appears in the list with the device it is linked to, so you can check or manage it there.
How do I find my Microsoft passkey?
Go to account.live.com/proofs/manage and sign in. Your saved passkeys appear on the Advanced Security Options page, labeled by the device or password manager that holds them. Work and school accounts are managed by your organization, so their passkeys may not show here.
How do I remove teh need to use a passkey for my Microsoft account?
Delete your passkeys on the Advanced Security Options page at account.live.com/proofs/manage. Before you remove the last one, make sure you have another way to sign in, such as a password or verified contact details. Otherwise you could lose access to your account.
Still have a question?
Answered by AI from this guide. Good questions may be added to this page — please don't include personal details.
Did this guide fix your problem?

About the Author
Richard
Tech Writer, IT Professional
Richard is a writer at Geek Rewind who turns complex IT tasks into clear, step-by-step guides. He draws on years of hands-on experience in system administration and enterprise IT operations, focusing on Windows, Linux and WordPress: the problems people actually run into, and the fixes that work. His server and WordPress guides come from systems he runs himself. Richard builds and maintains the platform behind Geek Rewind, from its Ubuntu servers and Nginx configuration to its custom WordPress plugins. Many new tutorials start with readers' questions, and he's always glad to answer them in the comments.
No comments yet — be the first to share your thoughts!