How to Enable or Disable Sync Apps and Preferences for Microsoft Accounts in Windows 11

Syncing apps and preferences lets Windows save settings and app data to your Microsoft account and bring them to other computers you sign in to.
This makes setting up a new PC easier. Windows can reinstall your favorite apps and bring over preferences such as passwords, language settings and mouse speed. Windows 11 can also remember your theme colors and keyboard layout.
Managing sync is a privacy and control issue, especially if you use several PCs. It decides whether Windows 11 settings and app data, such as your desktop background and Microsoft Edge history, follow you to every device.
This guide shows how to turn app and preference syncing on or off for all Microsoft accounts on one computer. You can let settings copy to your other devices, or have a new PC start completely fresh.
Before you start:
- These settings apply only to personal Microsoft accounts, not work or school accounts.
- You need administrator rights to change them.
- The method below uses the Registry Editor, which is included in both Windows 11 Home and Pro.
Open Registry Editor (Windows key + R, type regedit), navigate to HKEY_LOCAL_MACHINE\SOFTWARE\Policies\Microsoft\Windows\SettingSync, then change the DisableSettingSync value to 0 to enable sync or 1 to disable it. Restart your PC for the change to take effect.
What Windows Syncs
When you sign in to Windows with a Microsoft account, Windows remembers parts of your setup, such as app settings and theme preferences. This feature is called Sync settings. It saves you work when you get a new computer or reinstall Windows, because the new install can pick up where the old one left off.
Sync is split into two parts, Remember my apps and Remember my preferences. The next two sections explain what each one covers.
Remember My Apps
The Remember my apps setting keeps a list of the apps you download from the Microsoft Store. On a new or reset PC signed in with the same account, Windows can use that list to bring those apps back.
This only works for apps obtained from the Microsoft Store. Applications you installed from other websites are not remembered, so they will not sync across devices. You will need to install those again by hand.
Remember My Preferences
The Remember my preferences setting saves your personal choices so they match across your Windows devices. Once you sign in with your Microsoft account, these details update automatically on every computer you use. It covers:
- Passwords: Your saved passwords for websites and apps.
- Language Settings: Your preferred language, keyboard layouts, and regional settings.
- Accessibility Settings: Things like text size, high contrast modes, or narrator settings.
- Other Windows Settings: This can include device settings (like printer setups or mouse speed), File Explorer choices (like how folders look), and your notification settings.
In short, it tries to make a new or reset computer feel like your old one, so you don't have to set everything up again. If you share a PC or don't want your passwords and settings stored with your account, turning this off is a reasonable choice.
How to Manage Sync Settings Using the Registry Editor
You can control sync for every account on the PC by changing a value in the Registry Editor. This is a policy-style setting, so it applies to the whole computer rather than one user.
A wrong edit can make Windows unstable or stop it from starting. Only use this method if you are an administrator and understand those risks.
In Registry Editor, you can use File Export to save a copy. Creating a restore point before you begin is also a good habit.
Step 1Open the Registry Editor
First, open the tool that lets you change registry settings.
- Press Windows key + R on your keyboard. The Run box opens.
- Type
regeditinto the box and press Enter, or click OK. - If User Account Control asks for permission, click Yes. This needs administrator privileges. If you are signed in as a standard user, Windows asks for an administrator password instead.
The Registry Editor window should now be open, with a tree of keys on the left.
Step 2Go to the Right Registry Location
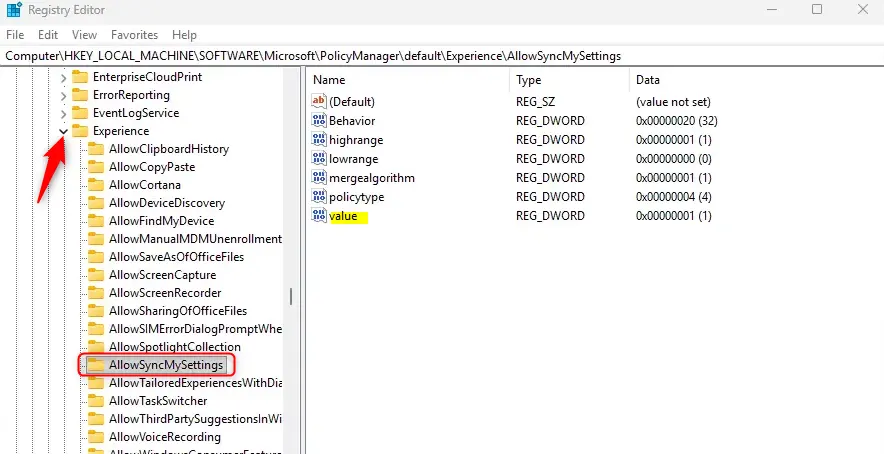
Next, go to the registry key that holds the sync policy. The key is under HKEY_LOCAL_MACHINE\SOFTWARE\Microsoft\PolicyManager\default\Experience.
- In the Registry Editor window, look at the left side. You can click through the folders (called keys) until you reach the path. The faster way is to copy the path below and paste it into the address bar at the top of the window, then press Enter:
HKEY_LOCAL_MACHINE\SOFTWARE\Microsoft\PolicyManager\default\Experience - Click the
Experiencefolder to select it.
The right side of the window now lists the values stored in that key.
Step 3Find or Create the 'AllowSyncMySettings' Value
Now look on the right side for a value named AllowSyncMySettings. It may not exist yet. If it doesn't, you create a new DWORD (32-bit) Value with exactly that name.
- If 'AllowSyncMySettings' is already there: Double-click it to open it and change its value.
- If 'AllowSyncMySettings' is NOT there: You need to create it.
- Right-click an empty spot on the right side.
- Choose New, then choose DWORD (32-bit) Value.
- Name the new item exactly
AllowSyncMySettingsand press Enter. A misspelled name will do nothing, so check the spelling and capital letters. - Double-click the new
AllowSyncMySettingsvalue you just made.
An Edit DWORD (32-bit) Value box should now appear, with fields for Value name, Value data and Base.
Step 4Set the Value
In the edit box, you set the value data to 1 to turn syncing on, or 0 to turn it off. Set Base to Hexadecimal before you save so Windows reads the number as intended. For 0 and 1 the result is the same in either base, but it is worth checking.
- To Allow Sync Apps and Preferences: In the Value data box, type
1. Make sure Base is set to Hexadecimal. Click OK. - To Stop Sync Apps and Preferences: In the Value data box, type
0. Make sure Base is set to Hexadecimal. Click OK.
What the numbers mean: In the registry, 1 usually means "On" or "Allowed," and 0 means "Off" or "Not Allowed."
After you click OK, the value appears in the right pane with your number next to it.
Step 5Close Registry Editor and Restart
You can now close the Registry Editor. Restart your computer so the change takes effect. After it restarts, your new sync settings will be active.
Since this is a computer-wide policy, the sync options in the Settings app may be locked or show a message that some settings are managed. That is expected. To undo the change, go back to the same value, set it to the opposite number, and restart again.
References:
Summary
To enable or disable sync apps and preferences in Windows 11, set the AllowSyncMySettings value in the Registry Editor to 1 (on) or 0 (off), then restart your computer. Back up the registry first, and use an administrator account.
Did this guide fix your problem?

About the Author
Richard
Tech Writer, IT Professional
Richard is a writer at Geek Rewind who turns complex IT tasks into clear, step-by-step guides. He draws on years of hands-on experience in system administration and enterprise IT operations, focusing on Windows, Linux and WordPress: the problems people actually run into, and the fixes that work. His server and WordPress guides come from systems he runs himself. Richard builds and maintains the platform behind Geek Rewind, from its Ubuntu servers and Nginx configuration to its custom WordPress plugins. Many new tutorials start with readers' questions, and he's always glad to answer them in the comments.
No comments yet — be the first to share your thoughts!