How to Manage Windows Backup Preferences in Windows 11 Accounts Settings

Windows Backup preferences in Windows 11 control how your personal files, app settings, Wi-Fi profiles, and passwords are saved to your Microsoft cloud account. Set them up before you need them. If you switch to a new PC or reinstall Windows, your personal items can then be restored without much manual work. You manage all of these tools in the Accounts section of Settings.
Windows Backup is tied to a Microsoft account. It is not a full disk image. It saves folders, settings, and a list of apps, not every installed program and its data. You should still keep a separate backup of anything you cannot afford to lose. The feature is available in both Home and Pro editions.
Open Settings Accounts Windows backup. Toggle on Remember my apps to save your installed programs, Remember my preferences to sync settings like passwords and accessibility features, and manage OneDrive folder backup by clicking Manage sync settings to choose which folders back up to your Microsoft account.
Where to Find Backup Preferences in 🪟 Windows 11 Accounts Settings
The backup preferences live in the Accounts section of Settings. This is where your Microsoft account saves your desktop layout, passwords, and app list to the cloud so you can restore them later on another device.
- Open the Start menu and select Settings (the gear icon).

Windows 11 Start menu with Settings gear icon highlighted. - Click Accounts in the left-hand navigation pane. You should now see the account options on the right.
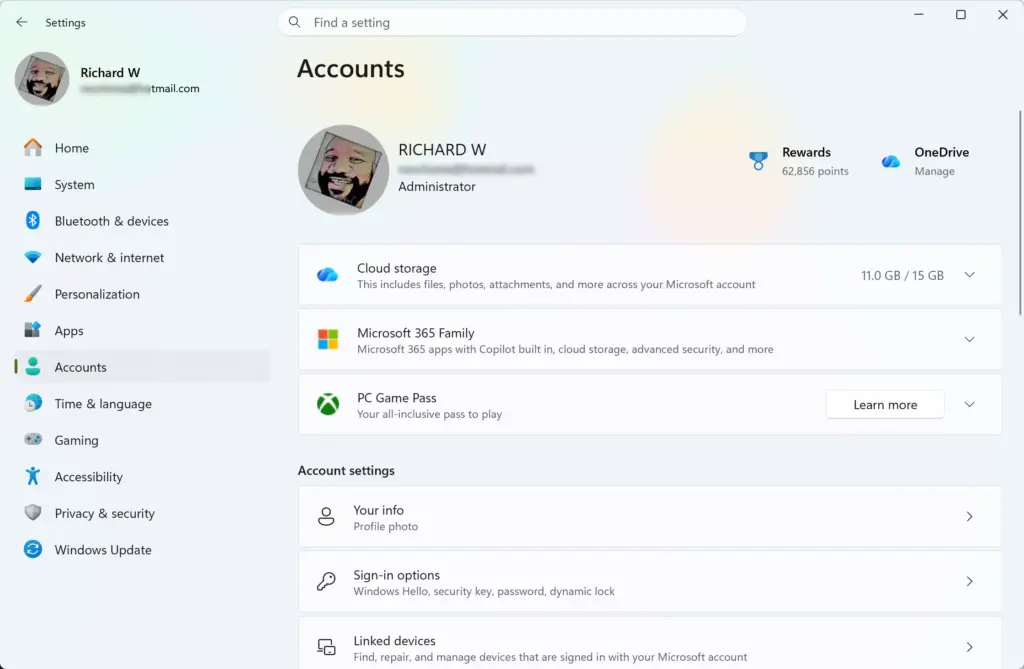
Settings › Accounts - Scroll down the right-hand side of the screen and click Windows backup. The backup page opens with its sections stacked in one list.
If you sign in with a local account, the backup controls will not work until you sign in with a Microsoft account. The same applies if the page looks empty or the toggles are greyed out. The troubleshooting section below covers this.
Understanding Your Backup and Sync Options
The Windows backup screen divides your data protection controls into categories. Each category governs one type of information associated with your Microsoft account. Look at the whole page once before you change anything, so you know which settings are already on.
Remember my apps
To let Windows keep track of the apps you install so you can restore them later, use the toggle under Remember my apps. When it is on, Windows records your Microsoft Store apps and your traditional desktop programs. On a new device, it restores them and pins them to your taskbar or Start menu .
- On the Windows backup page, find Remember my apps.
- Switch the toggle to On. The toggle should now show as active.
To undo this, switch the toggle back to Off. Windows then stops updating your saved app list. Desktop programs are not reinstalled from the saved list on their own, so expect to download some of them again.
Remember my preferences
To sync your accessibility features, passwords, language preferences, and other Windows settings across your devices, use the toggle under Remember my preferences. When it is on, Windows applies your customizations automatically when you sign in to a new Windows 11 computer with your Microsoft account.
- On the Windows backup page, find Remember my preferences.
- Switch the toggle to On.
- Expand the section if it offers a list of categories, such as Accessibility, Passwords, Language preferences, and Other Windows settings. Choose which of them to sync.
The exact list of categories can differ slightly between Windows 11 versions. If you share the PC or do not want passwords stored in the cloud, turn off only the Passwords category and leave the others on.
Managing OneDrive Folder Backup Integration
OneDrive folder backup saves your Desktop, Documents, and Pictures folders to the cloud automatically. You choose which folders sync to your Microsoft account.
- Open Settings and go to Accounts.
- Select Windows backup.
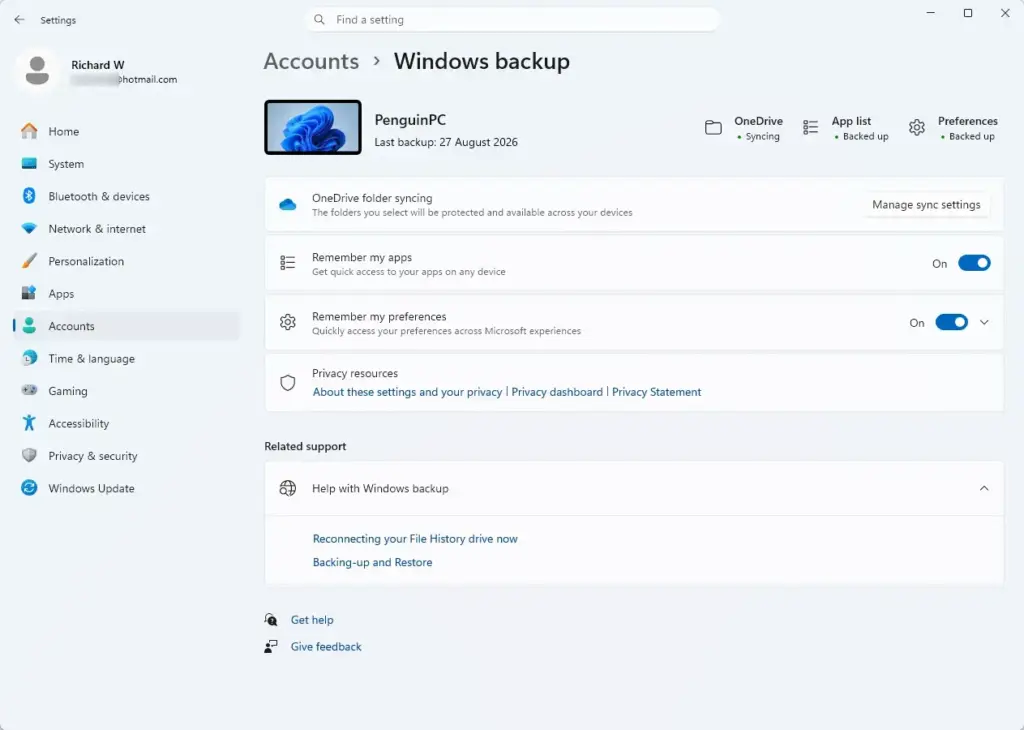
Settings › Accounts › Windows backup - Under the OneDrive folder syncing section, click the Manage sync settings button. A window opens with your folders listed.
- Switch the toggles for Desktop, Documents, and Pictures on or off to choose which folders back up to your cloud storage.
- Click Start backup or Save changes to confirm your selections. OneDrive then starts uploading the chosen folders.
Free accounts have limited space, and large Pictures or Documents folders can fill it quickly. If you later stop backing up a folder, the files you already uploaded stay in OneDrive. Check the folder contents before you delete anything.
Restoring Files and Settings on a New Device
Restoring files and settings on a new device happens during the initial Windows 11 setup when you sign in with your Microsoft account. The system pulls your saved preferences, pinned apps, and backed-up folders from your cloud profile, so the new computer looks familiar from the start. The device needs an internet connection during setup.
- Turn on your new computer and follow the initial setup screens until you reach the prompt to sign in with your Microsoft account.
- Enter your account credentials and complete the sign-in process. If you use two-step verification, approve the sign-in on your other device or enter the code.
- On the Restore your PC screen, select the previous device backup you want to restore.
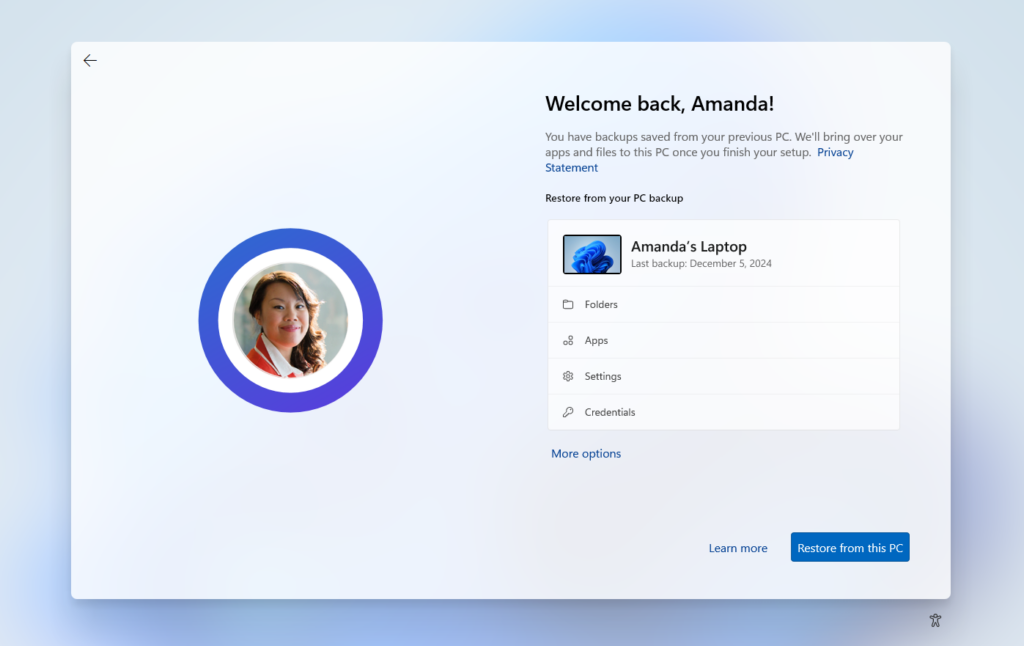
Windows 11 backup restore screen showing options to restore files and settings. - Click Next. Windows downloads your apps, Wi-Fi profiles, and preferences while you finish the setup process.
This restore option appears only during setup. If you skip it, you would have to reset or reinstall Windows to see it again.
Troubleshooting Common Windows Backup Sync Issues
Most Windows backup sync problems come from the Microsoft account verification state. When your computer loses its connection to your cloud profile, refreshing your credentials or signing in again fixes most saving and sync failures.
- Open Settings and select Accounts.
- Click Your info at the top of the menu.
- Check whether a prompt asks you to Verify your identity. If you are using a local account, look for Sign in with a Microsoft account instead.
- Complete the authentication steps with your security code or password to re-establish the connection with your cloud profile.
- Return to Windows backup and check whether the toggles respond again.
If the toggles are still unresponsive, restart the PC and check the date, time, and internet connection. A wrong clock or a lost connection can also stop syncing. If your OneDrive icon in the taskbar shows an error, fix that too, because folder backup depends on it.
Advanced Management via Registry Editor
Power users and administrators can configure backup preferences through registry keys rather than the graphical menu. This suits managing settings across several machines. Follow the paths exactly, because a wrong change can cause system errors.
To change synchronization settings manually, use the Registry Editor, a tool for viewing and changing system configuration data. Before you start, export the key you plan to edit. In Registry Editor, right-click the key, choose Export, and save the file. Double-clicking that file later restores the old values.
- Press Windows Key + R, type
regedit, and press Enter to open Registry Editor. This action requires administrator privileges, so approve the User Account Control prompt if it appears. - Navigate to the following path in the left sidebar:
HKEY_CURRENT_USER\Software\Microsoft\Windows\CurrentVersion\CloudStore\Store\Cache\DefaultAccount - Locate the subkeys that correspond to your preference settings, such as app sync and password persistence.
- Right-click the target value, select Modify, and change the Value data of the DWORD according to your organizational requirements. Click OK to save it.
Sign out and back in, or restart the PC, so the change is picked up. Then check the Windows backup page to confirm the setting. To undo the change, set the value back to what it was or import the file you exported earlier.
Was this guide helpful?

About the Author
Richard
Tech Writer, IT Professional
Richard is a writer at Geek Rewind who turns complex IT tasks into clear, step-by-step guides. He draws on years of hands-on experience in system administration and enterprise IT operations, focusing on Windows, Linux and WordPress: the problems people actually run into, and the fixes that work. His server and WordPress guides come from systems he runs himself. Richard builds and maintains the platform behind Geek Rewind, from its Ubuntu servers and Nginx configuration to its custom WordPress plugins. Many new tutorials start with readers' questions, and he's always glad to answer them in the comments.




No comments yet — be the first to share your thoughts!