How to Switch from a Local Account to a Microsoft Account in Windows 11

Switching from a local account to a Microsoft account in Windows 11 links your PC to cloud services like OneDrive and Outlook. A local account exists only on that one PC. A Microsoft account syncs your passwords, desktop settings, and apps across all your Windows devices.
A Microsoft account also makes it easier to download apps from the Microsoft Store and to recover files if your PC fails. You keep all your current files and programs during the switch, and you can go back to a local account later if you change your mind.
Before you start, check three things. First, the PC needs a working internet connection. Second, you need an existing Microsoft account (an Outlook.com, Hotmail, or other Microsoft address) and its password. Third, you should know your current local password, because Windows may ask for it during the switch. The steps are the same on Windows 11 Home and Pro.
Open Settings Accounts Your info and click Sign in with a Microsoft account instead. Enter your Microsoft account email and password, verify your identity if prompted, and Windows converts your local account while keeping all files and programs.
Step 1Open Account Settings
Everything in this guide starts in the Settings app. There are two quick ways to open it.
- Press the
Windows key + Ikey on your keyboard, or click the Start button. - Select the gear icon in the Start menu to open Settings .
The Settings window opens, with a list of categories on the left side.

Step 2Find Your User Information
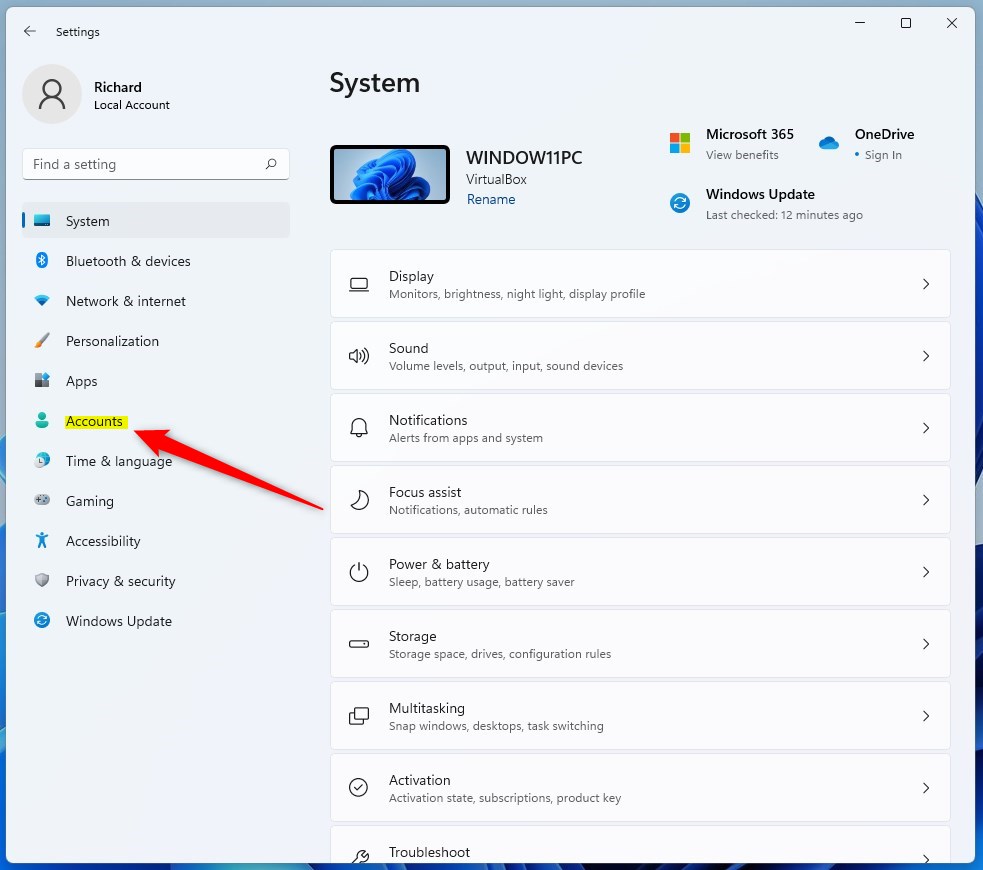
Your sign-in settings live under Accounts. This is where Windows shows your profile details and lets you change how you sign in.
- In the Settings sidebar, click Accounts.
The Accounts page opens. It manages everything related to your user profile and sign-in methods.
The Your info page shows which kind of account you are using right now. It is also where the switch begins.
- On the Accounts page, click Your info.
Check the text under your name. If it says Local account, you are in the right place.
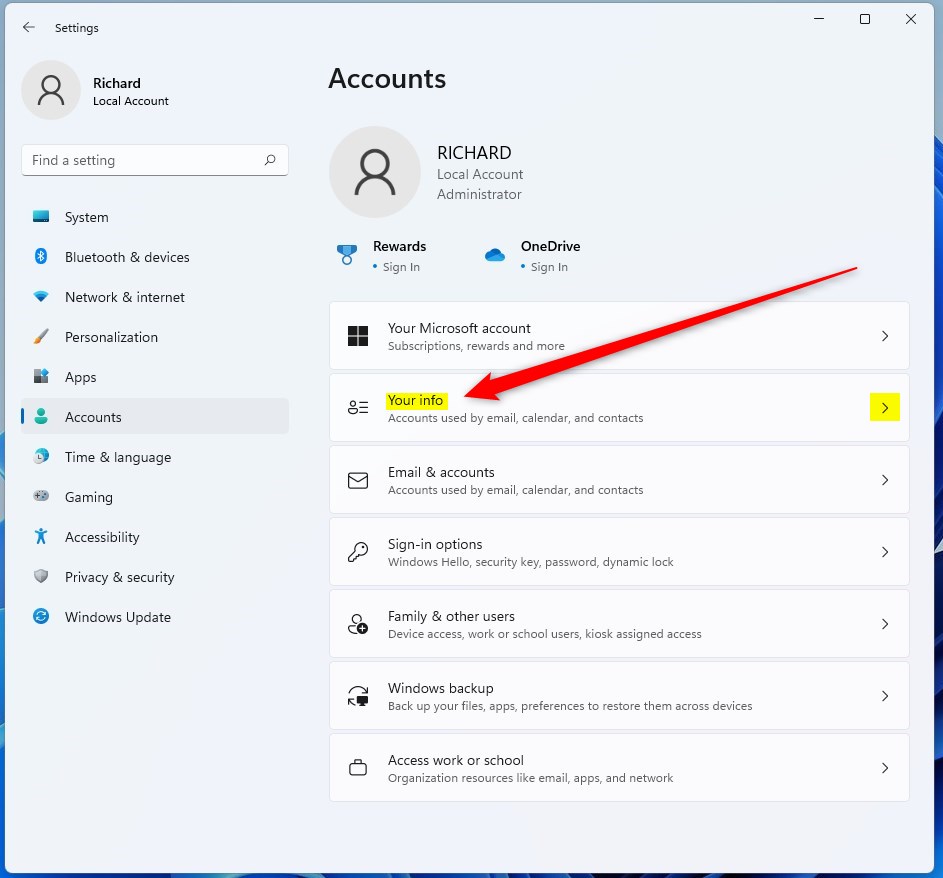
The Your info page displays details about your current account: your name, your picture, and whether you use a local account or a Microsoft account. If you already see a Microsoft email address here, your PC is already linked and you do not need to do anything else.
Step 3Start the Switch
Now start the conversion. The link you need appears only while a local account is active.
- Look in the Account settings area of the Your info page.
- Click Sign in with a Microsoft account instead.
A Microsoft sign-in window opens. This begins the process of converting your offline profile into a connected Microsoft profile.
If you cannot find the link, there are a few likely reasons. You may already be using a Microsoft account, in which case the link reads Sign in with a local account instead. The PC may be managed by an employer or school, which can hide the option. Or you may be signed in with a work or school account rather than a local one.
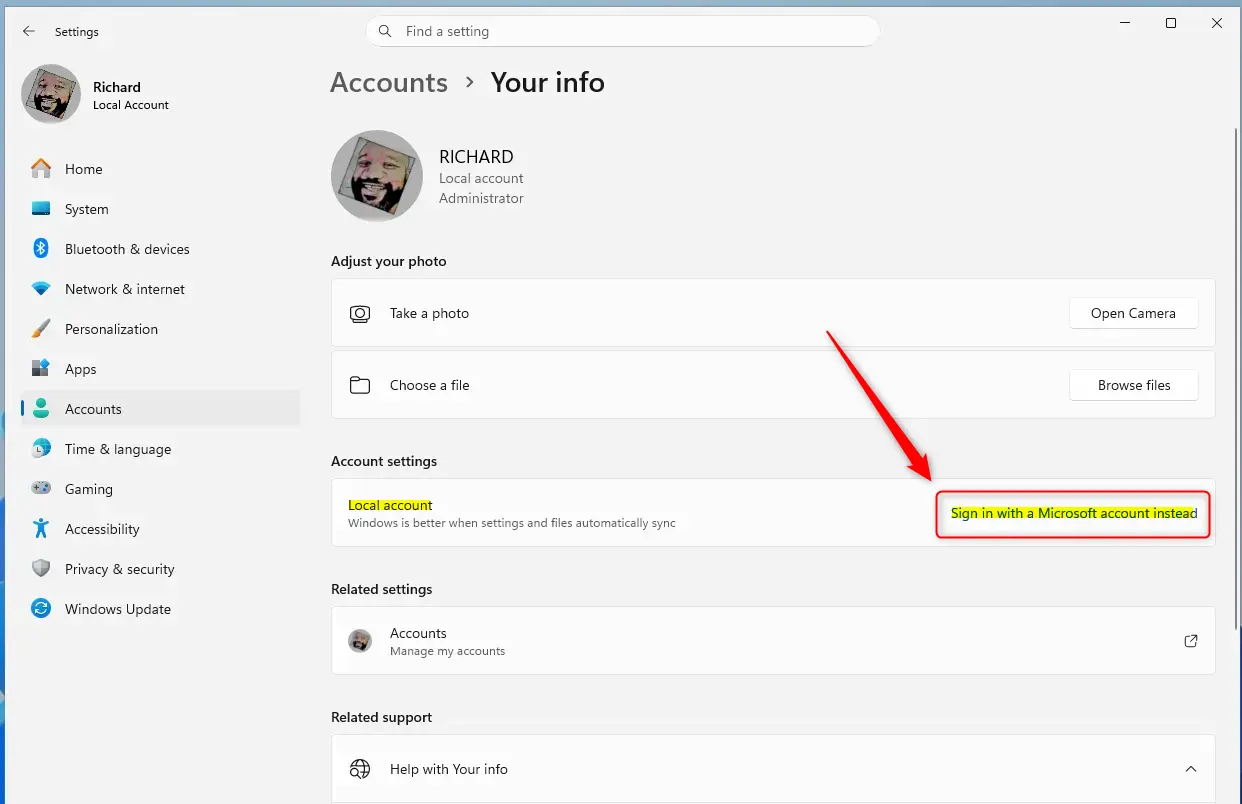
Windows highlights this option while a local account remains active. The link usually sits under your username. Selecting it is how you connect the computer to a Microsoft identity.
Step 4Enter Your Microsoft Account Details
Next, tell Windows which Microsoft account to link.
- Type the email address for your Microsoft account, such as an Outlook.com or Hotmail address.
- Click Next.
- Type your password and continue.
If you cannot remember the password, click Forgot password? and follow the recovery steps before you go on. Windows may also ask for your current local password to confirm that you own this profile. If it does, enter it and continue.
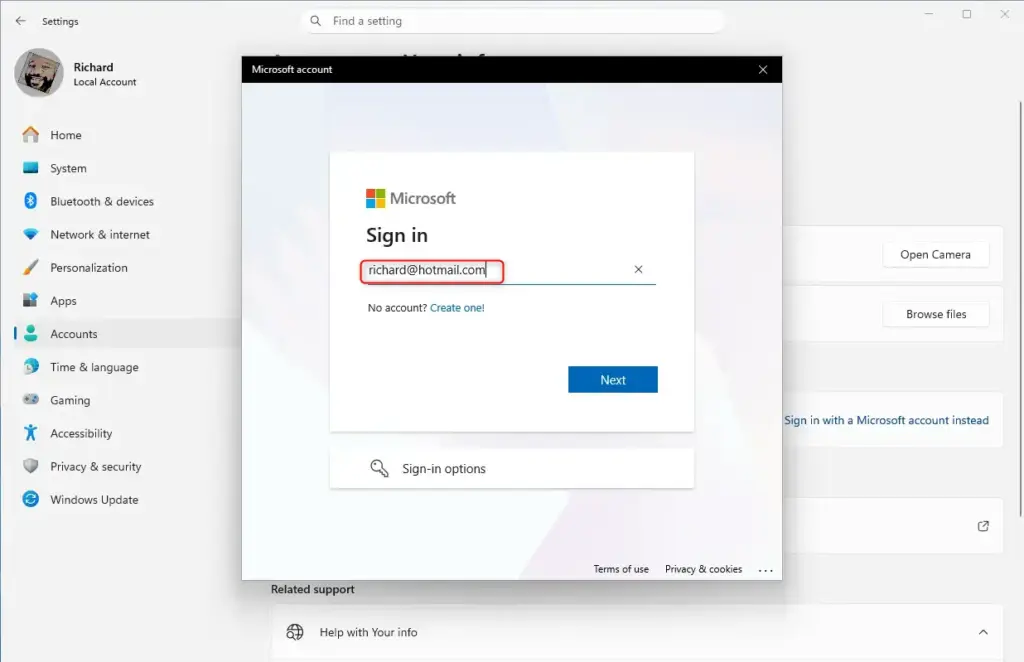
The sign-in screen asks for your Microsoft account credentials. Once Windows accepts them, your existing computer setup is tied to your online Microsoft profile.
Step 5Verify and Set Up Security
Microsoft may want to confirm it is really you. This depends on the security settings on your account.
- Check your phone or alternate email address for a verification code.
- Type the code into the box on the screen.
- Continue to the next screen.
Depending on your account, you might get a code by text or email, or you might be asked to answer a security question instead. This is a normal security step that protects the account. It is not a sign that anything is wrong.
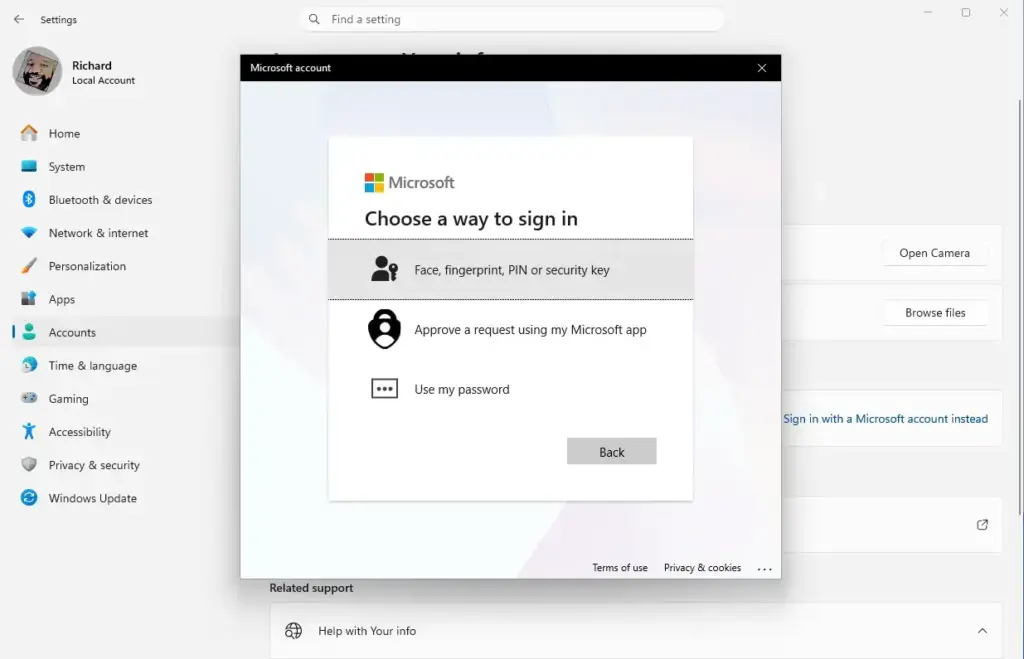
After verification, Windows asks you to set up a PIN for signing in to this computer. It is optional, but worth doing. A PIN (Personal Identification Number) is quicker to type than a full password, and it is tied to this specific PC. Someone who learns your PIN cannot use it to sign in to your account on another device.
- When the PIN screen appears, follow the prompts to create a PIN.
- Enter the PIN twice to confirm it.
You can change or remove the PIN later in Settings Accounts Sign-in options
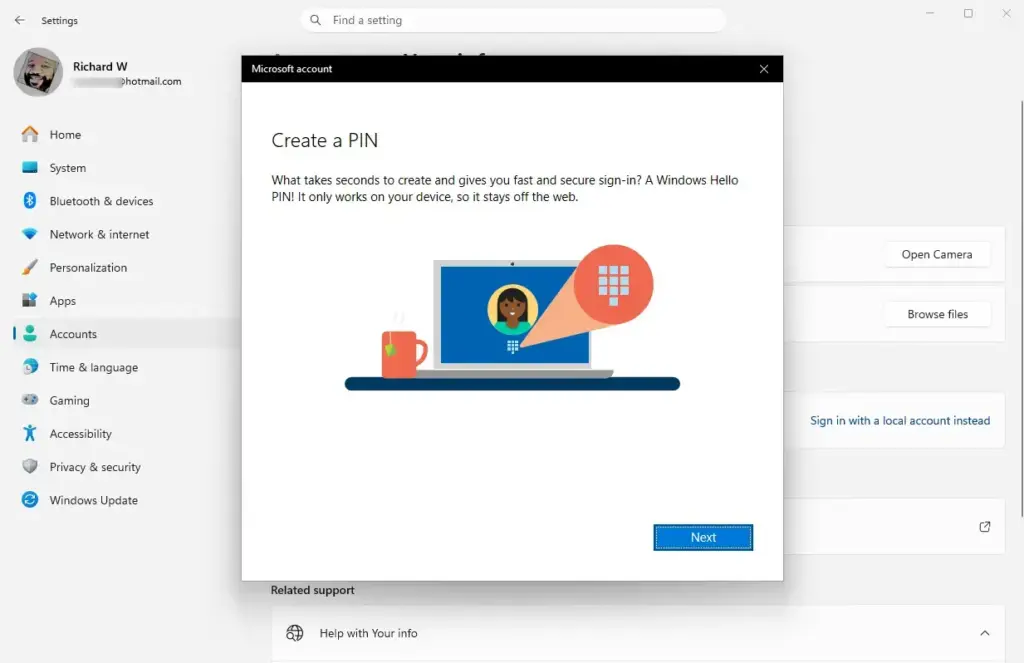
Once your Microsoft account is verified, Windows requests the PIN so it can use it for sign-ins on this PC. If you set one up, you will use it on the sign-in screen from now on, although your Microsoft account password still works.
Step 6Finish the Switch
You are almost done. One last confirmation saves the change.
- Click the final confirmation button. Depending on the screen, it is labeled Next or Sign out and finish.
This saves your changes and turns your local login into a full Microsoft user profile.
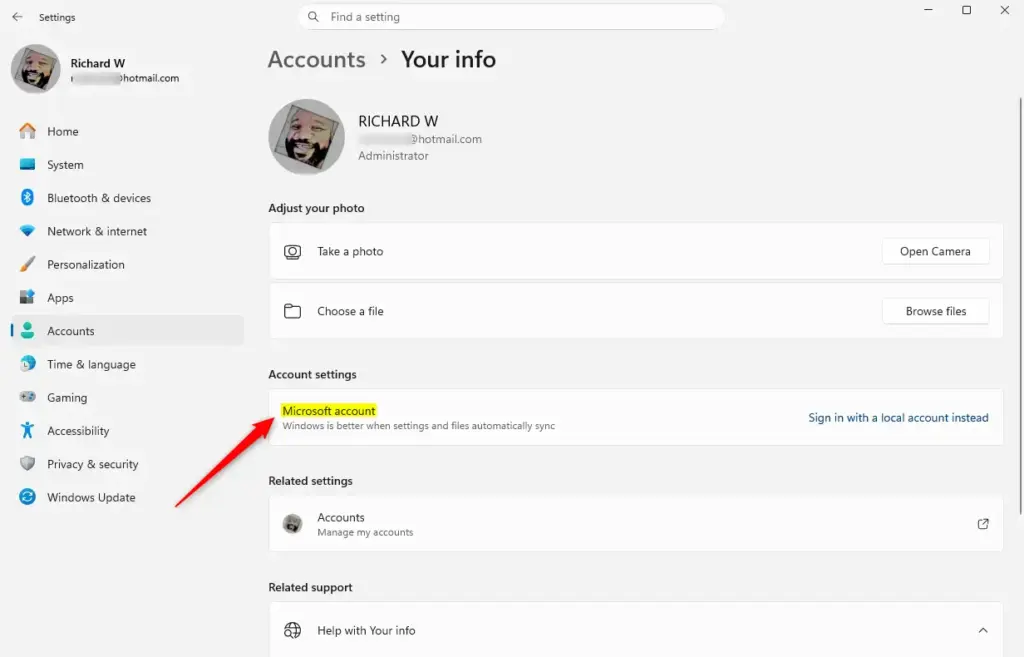
Selecting Next or Sign out and finish completes the move from a local account to a Microsoft account. Save any open work first in case Windows signs you out right away.
- Wait while Windows signs you out. This happens automatically to apply the changes.
- On the sign-in screen, sign in with your Microsoft account email address and password, or with the new PIN.
You should land on your usual desktop with your files, apps, and settings as you left them. The computer is now connected to your Microsoft account. OneDrive may offer to back up your folders the first time you sign in. You can accept or decline that.
To undo the switch later, go to Settings Accounts Your info and click Sign in with a local account instead. Windows walks you through creating a local sign-in.
Reference:
Summary
With a Microsoft account, you get cloud sync for passwords, wallpapers, and other settings. You also get built-in apps like OneDrive and the Microsoft Store. Signing out and back in is what finishes connecting your computer to these online services.
The switch signs you out of the current profile and requires you to sign back in with your Microsoft account credentials. After that, data syncs automatically across your devices, and you have access to Microsoft services like OneDrive and the Microsoft Store.
Have a question about this guide?
Answered by AI from this guide. Good questions may be added to this page — please don't include personal details.
Did this guide fix your problem?

About the Author
Richard
Tech Writer, IT Professional
Richard is a writer at Geek Rewind who turns complex IT tasks into clear, step-by-step guides. He draws on years of hands-on experience in system administration and enterprise IT operations, focusing on Windows, Linux and WordPress: the problems people actually run into, and the fixes that work. His server and WordPress guides come from systems he runs himself. Richard builds and maintains the platform behind Geek Rewind, from its Ubuntu servers and Nginx configuration to its custom WordPress plugins. Many new tutorials start with readers' questions, and he's always glad to answer them in the comments.
No comments yet — be the first to share your thoughts!