How to Manage Keyboard Filter Keys in Windows 11 Accessibility Settings

Filter Keys is an accessibility feature in Windows 11 that tells your keyboard to ignore brief or repeated keystrokes, so you can type without accidental errors. It changes how Windows processes physical key input by adding delay rules for when you press and hold keys.
Turn it on from the Accessibility settings when your normal typing produces repeated characters or typos. It addresses two common problems, usually caused by shaky hands or accidental double-presses:
- Bounce Keys: Ignores rapid, accidental repeat presses of the same key that happen within a fraction of a second.
- Slow Keys: Requires you to hold a key down for a set time before Windows accepts the input.
Filter Keys cuts down on double-typing and the corrections that come with it. It works at the software level, so it applies to any internal, USB, or Bluetooth keyboard connected to your PC. It is available in both Windows 11 Home and Pro, and it needs no restart.
Open Settings , go to Accessibility Keyboard, find Filter Keys, and click its toggle to turn it On. Expand the menu with the arrow icon to adjust Bounce Keys and Slow Keys sensitivity. Changes apply immediately with no restart required.
How to Access Accessibility Settings in 🪟 Windows 11
All accessibility controls live in the Settings app, so start there. These steps are the same on Home and Pro.
- Open the Start menu and click Settings (the gear icon), or press the Win+I. The Settings window opens.

Windows 11 Start menu with Settings gear icon highlighted. - In the left-hand sidebar, click Accessibility. The accessibility categories appear in the main panel.
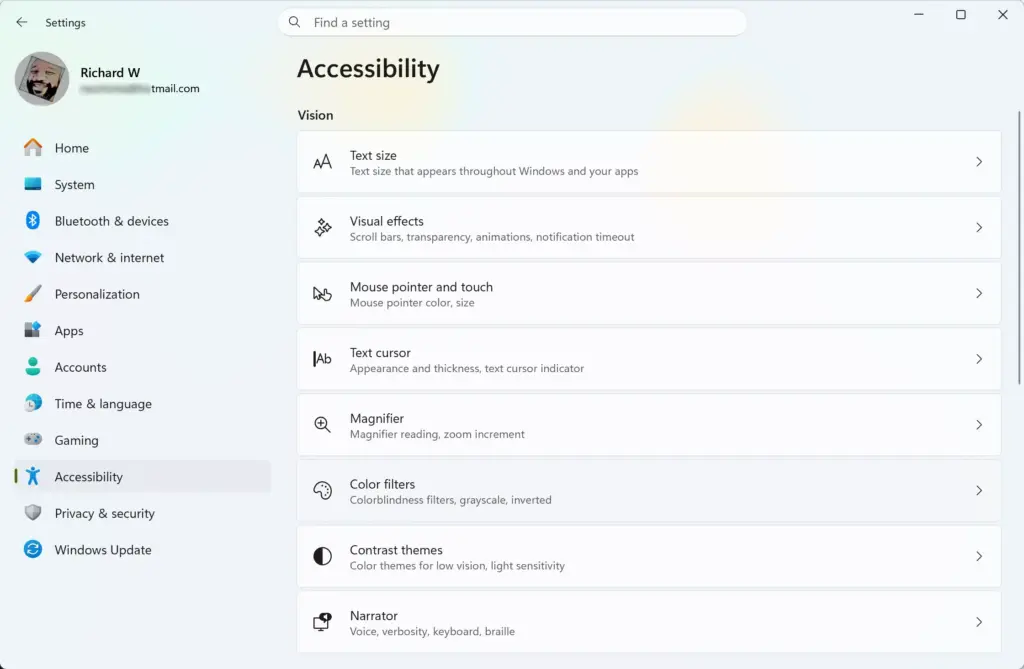
Settings › Accessibility - Scroll down the main panel until you reach the Interaction section.
- Click Keyboard. The keyboard accessibility panel opens.
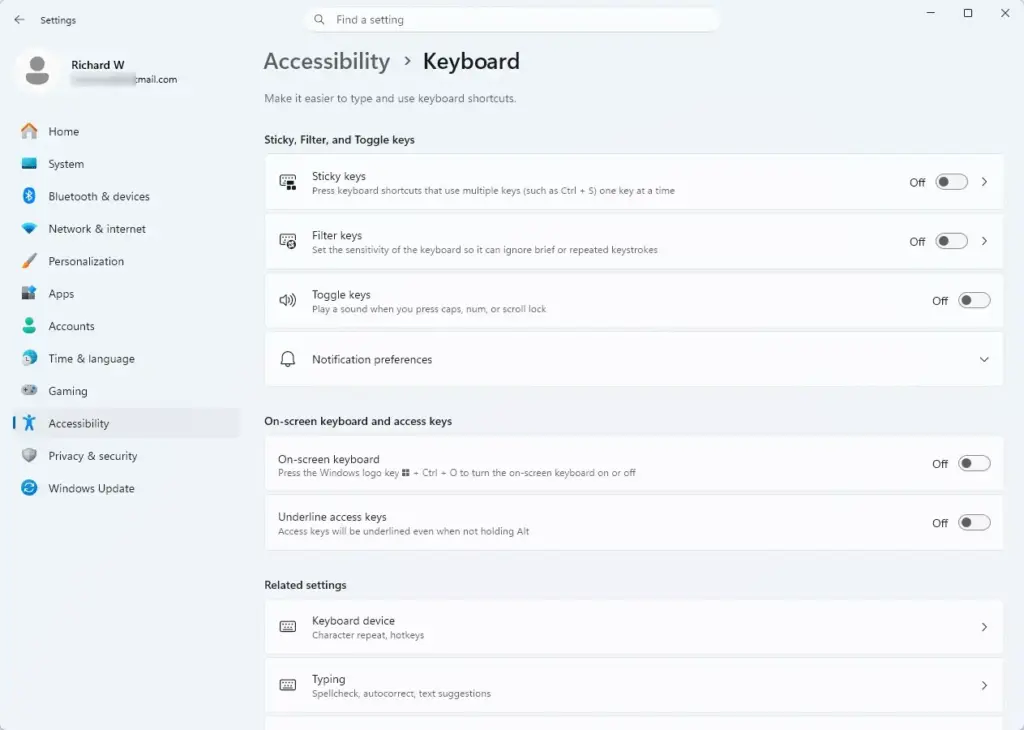
Settings › Accessibility › Keyboard
This panel controls three features. Sticky Keys lets you press modifier keys one at a time when entering shortcuts. Toggle Keys plays a sound when you press Caps⇩, Num Lock, or Scroll Lock. The third is Filter Keys, which is what we are setting up here.
Enabling Filter Keys Through the Settings App
You can turn on Filter Keys straight from Settings, with no shortcut keys or older menus involved.
- Open Settings and go to Accessibility Keyboard.
- Find the Filter keys entry in the list.
Settings › Accessibility › Keyboard - Click the toggle switch next to Filter keys to change it from Off to On. The toggle should now read On.
- Click the arrow icon next to the Filter keys toggle to expand it. The sub-settings and customization options appear below it.
If the defaults don't suit your typing speed or physical needs, adjust them as described below. To undo the change, return to this screen and set the toggle back to Off.
Configuring Filter Key Sensitivity and Response Options
With the Filter keys menu expanded, you can tune how Windows handles each keystroke. The aim is a keyboard that still feels responsive but ignores accidental presses. Change one setting at a time and test after each change, so you know which one helped.
Label wording can differ slightly between Windows 11 builds, so if a name below isn't an exact match, look for the closest one.
Adjusting Bounce Keys (Ignore Brief Keystrokes)
If your fingers tend to bounce on keys, so that one press registers twice, set up Bounce Keys.
- In the expanded Filter keys menu, find Ignore brief or repeated keystrokes (Bounce Keys) and make sure its toggle is On.
- Click the drop-down menu beneath the Bounce Keys setting and choose a time duration, such as 0.5 seconds, 1.0 seconds, or 2.0 seconds. This is how long Windows ignores a repeat press of the same key.
- Open Notepad and type a few lines, including words with double letters. Check that accidental doubles no longer appear and that deliberate ones still work.
Long values make deliberate double letters, such as the "ll" in "hello", harder to type.
Adjusting Slow Keys (Set Acceptance Delay)
If you brush against keys while moving your hands across the keyboard, set the acceptance delay with Slow Keys.
- Find Ignore quick keystrokes and slow down the repeat rate (Slow Keys) and switch it On.
- Select your preferred delay from the drop-down menu. This sets how long you must hold a key before Windows registers it.
- Type a short test in Notepad. Brief touches should now be ignored, while a firm press registers after the delay.
Slow Keys makes everything you type feel slower, so use the shortest delay that stops the accidental presses.
Enabling or Disabling Repeat Keys
When Slow Keys is active, you can also choose whether holding a key down keeps repeating the character.
- Find the setting Ignore repeated keystrokes.
- Switch it on if you want to disable key repetition completely when you hold a key down.
With this on, holding a key gives you a single character. That helps if your hand rests on a key, but you will no longer get repeated characters or auto-repeating Backspace or arrow keys from holding them down.
Using the Keyboard Shortcut to Turn Filter Keys On or Off
Windows 11 has a keyboard shortcut that turns Filter Keys on and off without opening Settings. It is handy if you only need the feature some of the time.
- Press and hold the right Shift key for about eight seconds.
- Listen for an ascending chime and watch for a confirmation dialog box on screen.
- Click Yes in the dialog box to turn Filter Keys on. To turn it off again, hold the right Shift key for eight seconds once more.
If the shortcut fires unexpectedly while you type or play games, you can disable it and keep Filter Keys itself enabled.
- Open Settings and go to Accessibility Keyboard.
- Click Filter keys to expand the options.
- Uncheck the box labeled Keyboard shortcut for filter keys, which reads "Allow the shortcut key to start or stop filter keys". Holding right Shift will no longer do anything.
Customizing Notification and Sound Preferences
Windows plays tones when you use accessibility features, which helps confirm whether a feature is active. You can change these notifications to suit you.
- Open Settings and go to Accessibility Keyboard.
- Click Filter keys to expand it.
- Find the toggle Show the Filter Keys icon on the taskbar and turn it On if you want a visual indicator whenever the feature is running.
Settings › Accessibility › Keyboard - Find Beep when keys are pressed or accepted and switch it Off if the audio feedback distracts you while typing.
If you turn the beep off, the taskbar icon is a good way to see at a glance that Filter Keys is still active.
Managing Filter Keys via the Control Panel
The classic Control Panel is another route to the same settings, if you prefer the older interface.
- Press Windows Key + R to open the Run dialog box.
- Type
control accessibilityand press Enter. The Ease of Access Center opens. - Click Make the keyboard easier to type.
- Under the "Make it easier to type" section, check the box next to Turn on Filter Keys.
- Click the blue Set up Filter Keys link to open the advanced configuration properties.
- Set your repeat and acceptance options, then click Apply followed by OK.
This Control Panel page and the Settings app control the same feature, so a change made in one should show up in the other. The wording of the links may vary a little between builds.
Advanced Troubleshooting: Filter Keys Resetting Automatically
A common complaint is that Filter Keys turns itself off, or loses its configuration, after a reboot or sign-in. This usually comes down to the accidental shortcut trigger or to conflicting third-party software.
To stop the settings from reverting:
- Open Settings and go to Accessibility Keyboard.
- Expand Filter keys and make sure the shortcut option is turned off, so you can't accidentally switch the feature with the right Shift key.
- Check whether third-party gaming software or keyboard utilities, such as Logitech G HUB or Razer Synapse, are running in the background and overriding Windows accessibility profiles. Close those applications and see whether the resetting stops.
- If closing one fixes it, look in that program's settings for a profile or option that controls keyboard behavior. Change it there rather than leaving the program closed all the time.
Expert Tips for Optimizing Keyboard Filter Settings
The standard options suit most people, but some typing situations, such as fast data entry or gaming, need fine-tuning to avoid input lag. In those cases, think about how the acceptance delay affects your words per minute.
If fast typing leads to dropped letters, your Bounce Keys or Slow Keys duration is probably set too high. Reduce the time threshold to the lowest setting (such as 0.3 seconds) and test your typing again. Balancing the filtering of accidental presses against a natural typing rhythm takes small adjustments over several days. Make one change at a time and give each a day or so before changing it again.
Was this guide helpful?

About the Author
Richard
Tech Writer, IT Professional
Richard is a writer at Geek Rewind who turns complex IT tasks into clear, step-by-step guides. He draws on years of hands-on experience in system administration and enterprise IT operations, focusing on Windows, Linux and WordPress: the problems people actually run into, and the fixes that work. His server and WordPress guides come from systems he runs himself. Richard builds and maintains the platform behind Geek Rewind, from its Ubuntu servers and Nginx configuration to its custom WordPress plugins. Many new tutorials start with readers' questions, and he's always glad to answer them in the comments.

No comments yet — be the first to share your thoughts!