How to Enable or Disable Sticky Keys in Windows 11


Sticky Keys in Windows 11 lets you press keyboard shortcuts one key at a time instead of holding down 2 or 3 keys at once. It is a built-in accessibility setting. With it on, you can type combinations like CTRL plus C one key after another, without straining your hands.
You can turn Sticky Keys on or off in under 10 seconds from the Settings app . You can also tap the Shift key 5 times in a row to switch it on. That shortcut is also the usual cause of accidental activation, and this guide shows how to turn it off. The feature is available in every edition of Windows 11, Home included.
To enable or disable Sticky Keys, go to Settings Accessibility Keyboard and toggle the Sticky keys switch. You can also prevent accidental activation by unchecking the “Keyboard shortcut for Sticky keys” option in the same menu.
How to change Sticky Keys settings
The main Settings app is the easiest place to manage Sticky Keys. Open the Accessibility section and choose the keyboard options. There you can turn the feature on or off, adjust how the shortcut keys behave, and control whether Windows plays a sound when you press a modifier key such as Shift, Ctrl, Alt or the Win.
The change applies immediately. You don’t need to restart the PC, and you can reverse it at any time by flipping the same switch.
- Open the Settings app. Press the Win+I on your keyboard, or search for “Settings” in the taskbar and select it. The Settings window opens with a list of categories on the left.
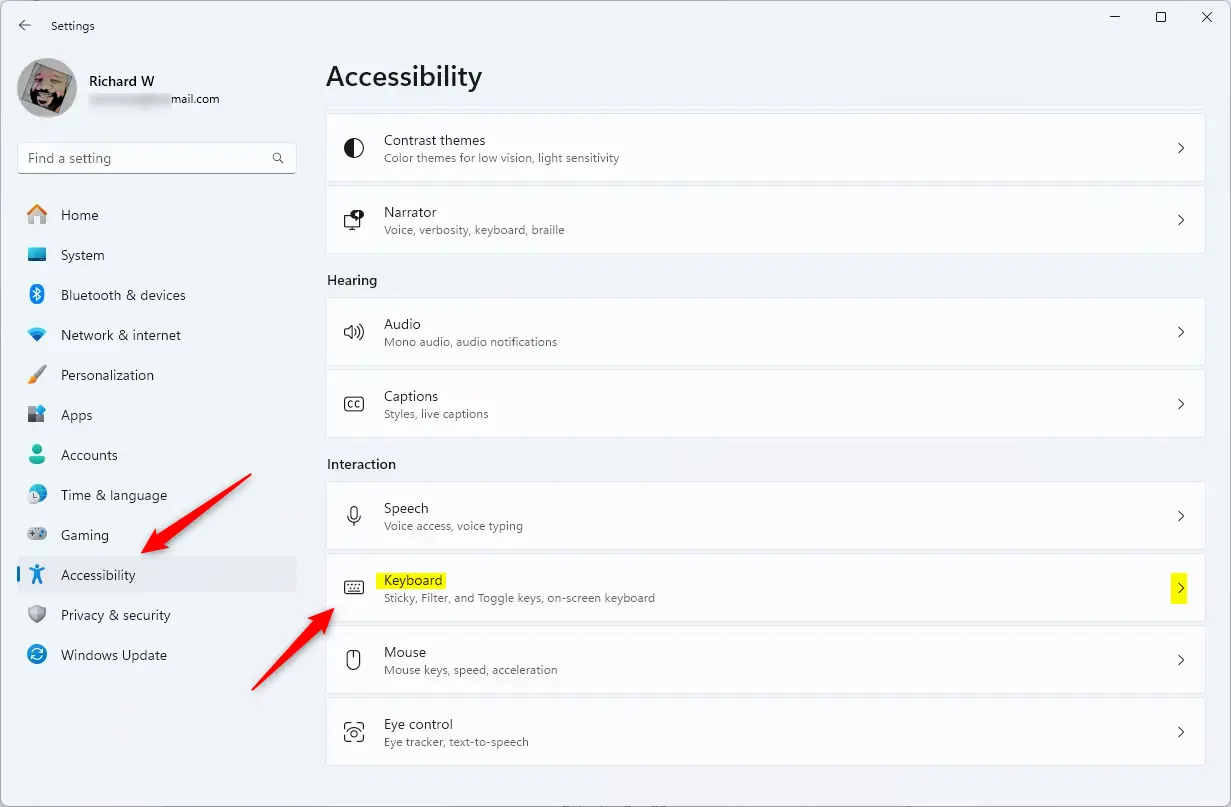
- In the Settings menu, click Accessibility in the left sidebar. The Accessibility page opens on the right, with sections such as Vision, Hearing and Interaction.
- Scroll down to the Interaction group and select Keyboard on the right side of your screen. The keyboard accessibility options appear, with Sticky keys at the top of the list.
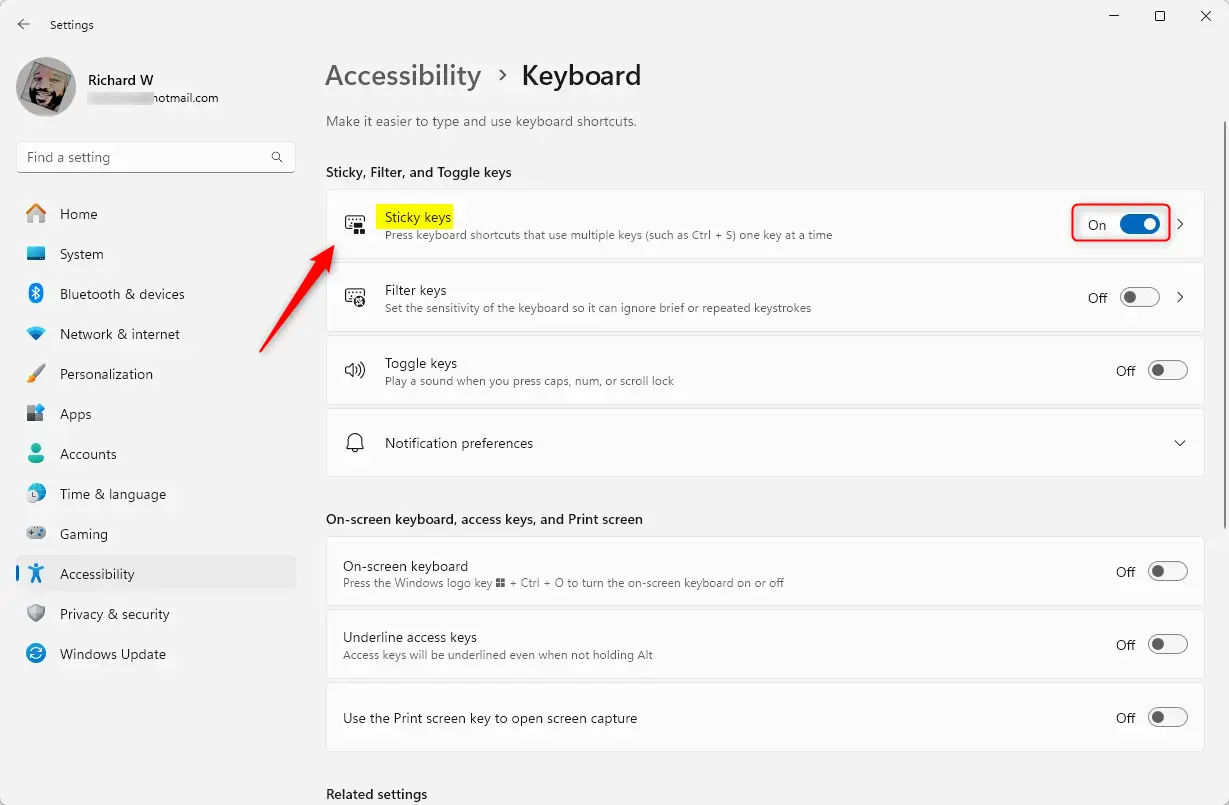
- Find the Sticky keys option. Set the switch to On to enable it, or Off to disable it. The switch label changes to show the new state. When Sticky Keys is on, pressing a modifier key such as Shift or Ctrl keeps it active until you press the next key in the shortcut.

How to disable the Shift key shortcut
By default, pressing the Shift key 5 times in a row opens a prompt asking whether you want to turn on Sticky Keys. You can disable this shortcut in the Windows 11 Accessibility settings. Turning it off stops the prompt from appearing by accident while you type quickly or play games. It does not stop you from turning Sticky Keys on or off yourself in Settings.
If you only want to stop the pop-up, this is the setting to change. You don’t have to turn Sticky Keys itself off.
- Go to Settings Accessibility Keyboard The page lists Sticky keys, Filter keys and Toggle keys.
- Click the Sticky keys text, not the toggle switch, to expand more options. Clicking the switch would turn the feature on or off instead. A list of extra settings drops down.
- Clear the Keyboard shortcut for Sticky keys option. Depending on your Windows 11 build, this appears as a checkbox or a toggle. Once it is cleared, pressing Shift 5 times no longer opens the prompt. To bring the shortcut back, select the option again.
Advanced Configuration: Registry Edits
The Registry Editor is a built-in database viewer for system settings. You can use it to turn off Sticky Keys and its shortcut by changing one value. You open it from the Run box, go to the StickyKeys key under Accessibility, and edit the Flags value. This method works on every edition, including Windows 11 Home, and it is useful when you want to set the value without opening Settings.
The key sits under 🗝️HKEY_CURRENT_USER, so the change only affects the account you are signed in to. A mistake in the registry can cause problems, so before you start, consider exporting the key. In the Registry Editor, right-click the key and choose Export. Double-clicking the saved file later restores it.
To disable Sticky Keys via the registry, follow these steps:
- Press Win+R, type regedit, and press Enter. If User Account Control asks for permission, click Yes. The Registry Editor window opens.
- Navigate to the following path: 🗝️HKEY_CURRENT_USER\
Control Panel \ . You can expand the folders in the left pane, or paste the path into the address bar at the top of the window and press Enter. The values for the key appear in the right pane.Accessibility\ StickyKeys - Double-click the Flags entry and change the value to 506. Click OK. This turns off the Shift-five-times shortcut and leaves Sticky Keys off. The default value is often 510, so write down what you see before you change it if you want to restore it later. Sign out and back in, or restart the PC, so Windows reads the new value.
To disable the feature from Command Prompt, run the command below. Sign out and back in afterwards so the change takes effect.
Sticky Keys often reappears, even after you turn it off or restart your PC, because the shortcut that turns it on is still active. One accidental run of 5 Shift presses is enough to bring the prompt back. To stop this, clear Keyboard shortcut for Sticky keys as described above, or set the Flags value to 506. If it still comes back after that, check that you changed the setting in the same user account that is having the problem. The registry value belongs to each user separately.
Summary
Sticky Keys in Windows 11 is an accessibility feature that lets you press keyboard shortcuts one key at a time instead of holding the keys down together. You can turn it on or off in the Windows Settings app, and you can disable the Shift key shortcut that switches it on by accident.
Everything lives in one place: Settings Accessibility Keyboard The main switch turns the feature on or off, and the expanded options control the shortcut and the other behaviors. This section sums up how Sticky Keys works and where to find its settings.
- Sticky Keys helps you perform keyboard shortcuts without holding down several keys at once.
- You can switch the feature on or off in Settings Accessibility Keyboard. No restart is needed.
- Turning off the Shift key shortcut is the best way to prevent accidental activation. Click the Sticky keys text to find the option.
- Advanced users can use the Registry Editor or Command Prompt to manage these settings. This works on Windows 11 Home as well as Pro.
Have a question about this guide?
Answered by AI from this guide. Good questions may be added to this page — please don't include personal details.
Did this guide fix your problem?

About the Author
Richard
Tech Writer, IT Professional
Richard is a writer at Geek Rewind who turns complex IT tasks into clear, step-by-step guides. He draws on years of hands-on experience in system administration and enterprise IT operations, focusing on Windows, Linux and WordPress: the problems people actually run into, and the fixes that work. His server and WordPress guides come from systems he runs himself. Richard builds and maintains the platform behind Geek Rewind, from its Ubuntu servers and Nginx configuration to its custom WordPress plugins. Many new tutorials start with readers' questions, and he's always glad to answer them in the comments.
[…] What are Sticky Keys and how to turn them off/on […]
[…] Sticky Keys: Press keyboard shortcuts one key at a time instead of all at once. […]
[…] Sticky Keys – helps you press keyboard shortcuts one key at a time. […]