How to Test Your Laptop Display in Windows 11

Testing your laptop display in Windows 11 takes about 15 minutes and needs no extra software or special permissions. Windows has built-in tools that let you check screen settings, run color calibration, and fill your display with solid colors to spot dead pixels and uneven brightness.
This matters because display problems can come from Windows settings , an outdated driver, or a hardware fault—and each needs a different fix. Running these tests first helps you figure out which one you’re dealing with before you contact support or replace anything.
None of the steps require administrator rights, except one driver-related test near the end, which I’ll flag when you get there.
Open Settings System Display and check that the resolution shows (Recommended) next to it. Turn off Night light and automatic brightness in the Display settings, then fill your screen with solid colors using the color calibration tool to spot dead pixels and backlight issues.
Prepare Your Laptop Display for Testing
They can make a healthy laptop display look faulty, or hide a real fault. Switch them off or plug in first so you test the panel, not the settings .
Plug in the charger and clean the screen
Battery saver and power plans can lower brightness when the laptop runs on battery. Connect the charger before you test. Wipe the screen with a dry microfiber cloth. Smudges and dust look like stuck pixels on a white or black background.
Turn off Night light and automatic brightness
Automatic brightness changes the backlight as the picture changes, which looks like flicker or a failing panel.
- Open Settings System Display
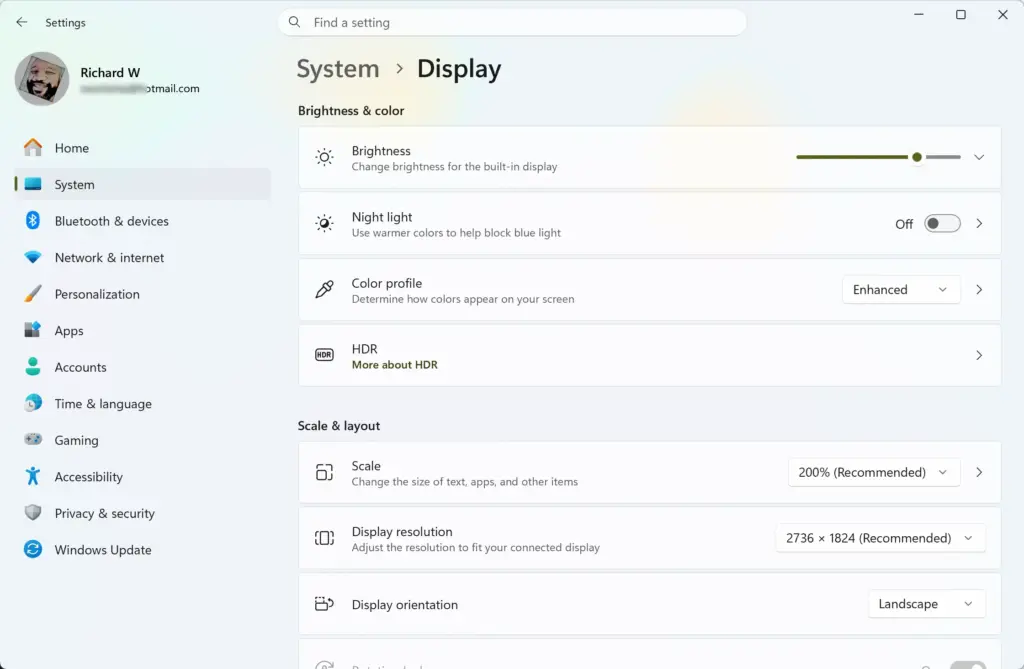
Settings › System › Display - Select Night light. If the page shows a Turn off now button, select it. You should see the screen shift to cooler, whiter colors.
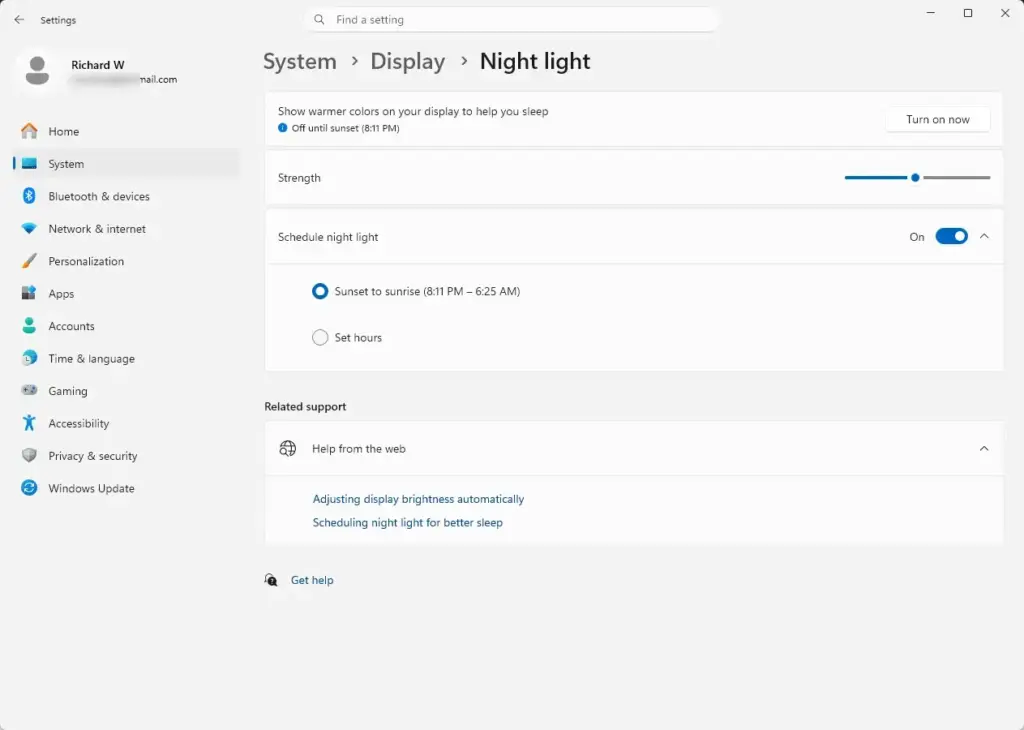
Settings › System › Display › Night light - Go back to the Display page and expand Brightness.
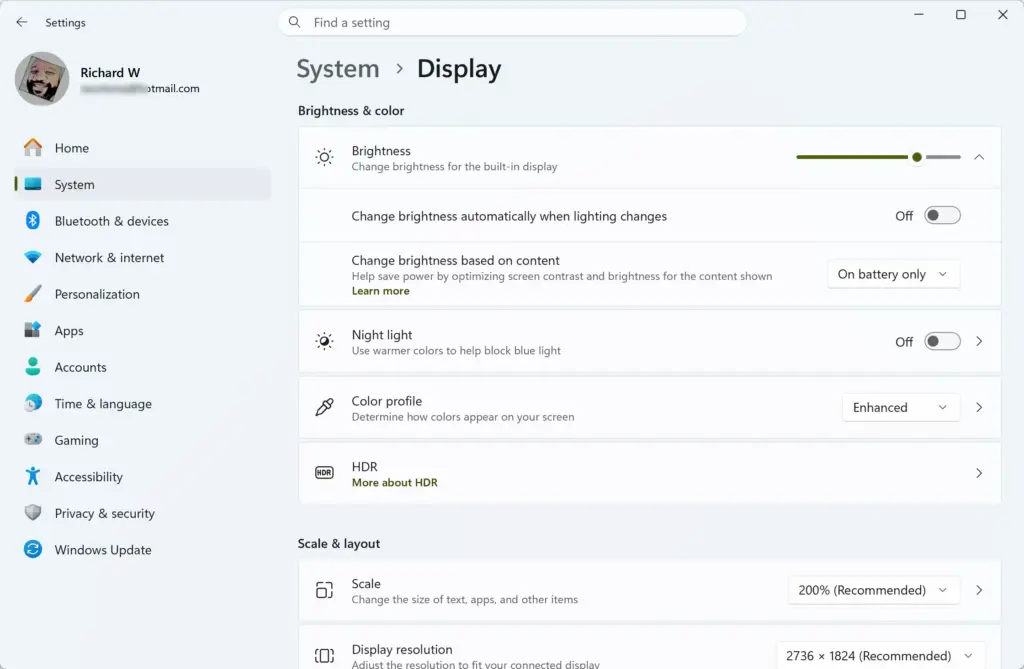
- Clear the Change brightness automatically when lighting changes checkbox if it is there. Only laptops with an ambient light sensor show it.
- Set the content-based brightness option to Off if your laptop shows it. The label is something like Help improve battery by optimizing the content shown and brightness. It differs between Windows 11 builds and between laptop makers, and some laptops do not have it. If you do not see it, move on.
- Move the Brightness slider to about 75 percent. Raise it to 100 percent later for the backlight tests.
If the Brightness slider is missing, three things can cause it. First, you may have selected an external monitor at the top of the Display page. Select the laptop's built-in display instead. Second, the laptop may be using the Microsoft Basic Display Adapter, a generic driver, and needs its real graphics driver (see the driver section below). Third, an entry under Monitors in Device Manager may be disabled, which needs administrator rights to re-enable.
Turn off HDR for the first pass
HDR (high dynamic range, a mode that allows brighter highlights and deeper contrast) changes how ordinary content looks on supported screens. If your laptop display supports it, test with it off first.
- Open Settings System Display
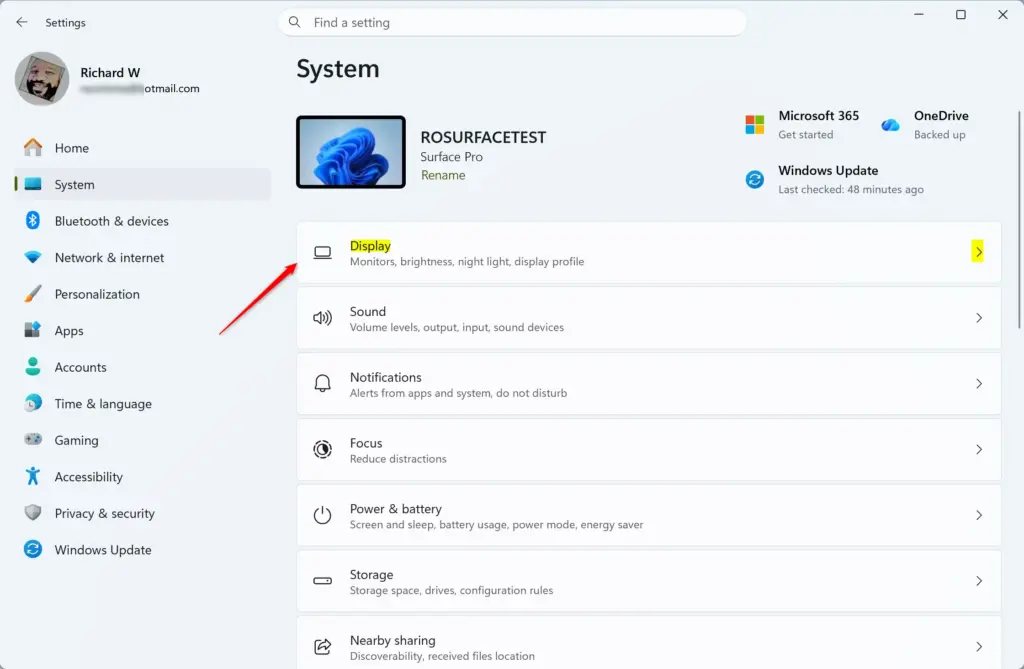
- Select HDR. This option only appears if your display supports HDR.
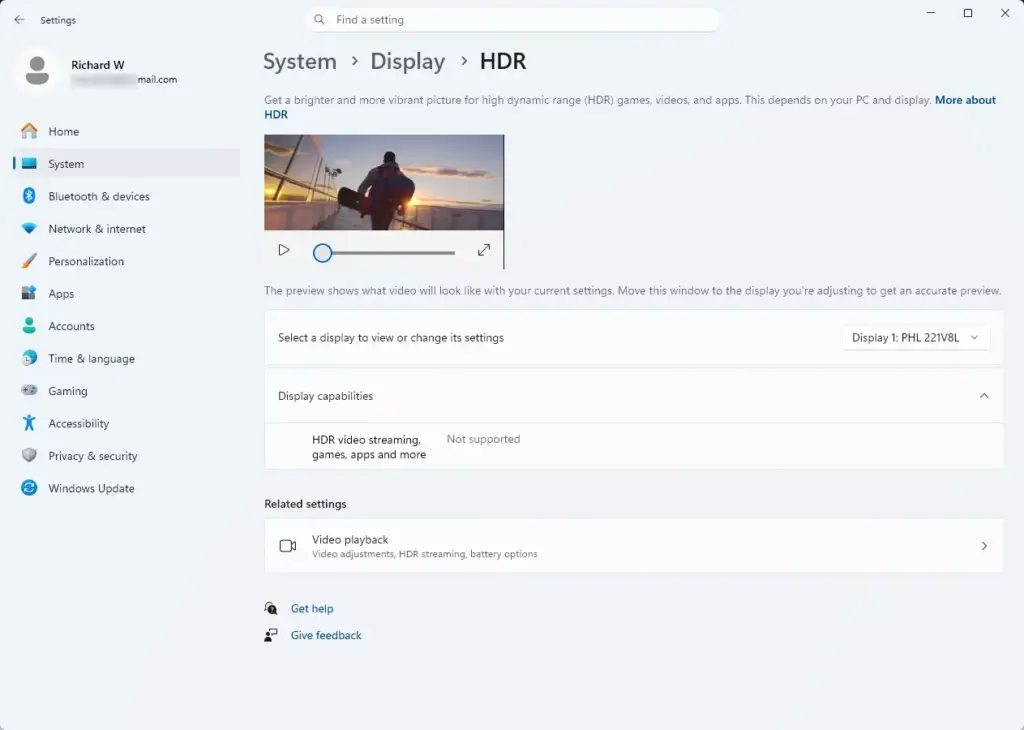
Settings › System › Display › HDR - Turn Use HDR off.
You can test HDR later by turning it back on and playing an HDR video in an app that supports it.
Check Resolution, Scale and Refresh Rate
Blurry or sluggish displays often run at the wrong resolution or refresh rate. Check both before you look for hardware faults.
Confirm the native resolution
Native resolution is the pixel count the panel was built for. Any other setting makes text and images look soft, because Windows has to stretch them.
- Open Settings System Display
- Scroll to Display resolution.
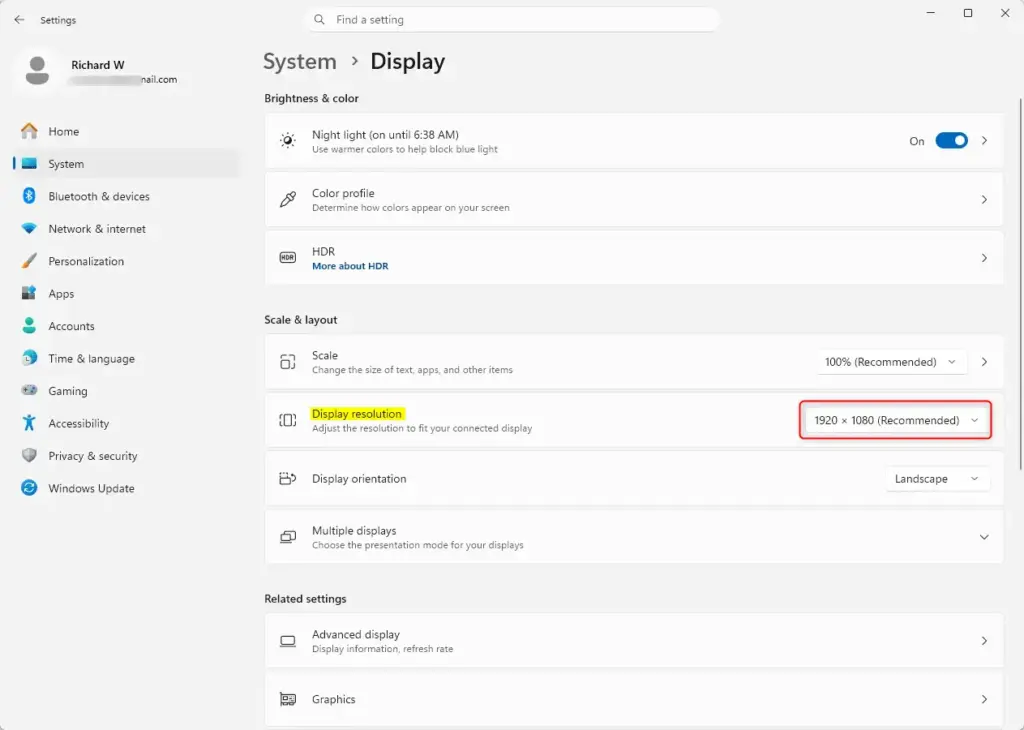
Settings › System › Display › Display resolution - Check that the selected option has (Recommended) next to it. If it does not, open the drop-down list and select the option that does.
- Select Keep changes when Windows asks. If you do nothing, Windows reverts the change after a few seconds.
You should see text become sharper. If (Recommended) is not on any option, or the list has only one or two choices, Windows is probably using the Microsoft Basic Display Adapter. Update the graphics driver using the steps further down.
Leave Scale alone for now. Scale makes items larger or smaller but does not change how sharp the panel is.
Check the refresh rate
The refresh rate is how many times per second the screen redraws. Many laptop displays support two or more rates, and Windows often settles on the lower one to save battery.
- Open Settings System Display Advanced display
- If you use more than one screen, select the laptop display from the drop-down at the top.
- Find Choose a refresh rate. The current rate is shown in the box.
- Open the box and pick the highest rate listed for normal use.
Some laptops offer Dynamic refresh rate. Windows then switches between a low and a high rate on its own, which saves battery. Choose a fixed rate for testing so the screen does not change under you.
This same Advanced display page lists the display's name, resolution, bit depth and color format. Note the display name. If you need to contact the manufacturer, they may ask for it.
Run the Built-In Display Calibration Wizard
Windows 11 includes a wizard that walks through gamma, brightness, contrast and color balance. It does not need a measuring device. It gives you a quick way to spot a washed-out or tinted screen by eye.
Use Calibrate display color
- Select Start and type
Calibrate display color. Select the matching result. You can also press Windows key + R, typedccwand press Enter. - Select Next through the introduction. The wizard opens on your primary display. If you have an external monitor attached, move the wizard window to the laptop display first.
- Follow the Gamma screen. Gamma controls how mid-tones look. Move the slider until the small dots in the circles are as hard to see as possible.
- Follow the Brightness and contrast screens. On many laptops these steps tell you to use keyboard or monitor buttons. If the wizard offers a Skip brightness and contrast adjustment option, use it. Windows cannot control these settings on every panel.
- Follow the Color balance screen. Move the red, green and blue sliders until the gray bars look neutral, with no color cast.
- Select Previous calibration and then Current calibration on the last screen to compare. Select Finish to keep the new settings, or Cancel to go back to the previous ones.
If you cannot get the gray bars neutral even with the sliders at their extremes, the panel has a strong color cast. Run the same wizard on an external monitor to compare, as described in the hardware section below.
To undo a calibration later, run the wizard again and select Cancel at the end, or select Previous calibration before you finish.
Tune text sharpness with ClearType
ClearType is Windows' text-smoothing feature. Its tuner shows sample paragraphs and asks you to pick the clearest one. It does not diagnose a fault, but it helps if text looks fuzzy on a correctly set resolution.
- Select Start and type
Adjust ClearType text. Select the matching result. - Make sure Turn on ClearType is checked, then select Next.
- Choose the clearest sample on each of the next screens and select Next each time.
- Select Finish.
Test for Dead Pixels, Stuck Pixels and Backlight Bleed
Solid full-screen colors expose pixel faults. A dead pixel stays black because it receives no light. A stuck pixel stays on one color (usually red, green, blue, or white) because its circuitry is always active. Backlight bleed is light leaking around the edges of a dark screen.
Windows 11 has no dedicated pixel-test tool. You can still do this test with Windows alone by setting a solid-color desktop background and clearing the desktop of icons and the taskbar.
Fill the screen with a solid color
- Open Settings Personalization Background
- Next to Personalize your background, choose Solid color.
- Under the color choices, select a color. If the palette does not have the exact color you need, select View colors, then More, and enter the RGB (red, green, blue) values. For example, red is 255, 0, 0. White is 255, 255, 255. Black is 0, 0, 0.
- Right-click an empty part of the desktop, select View, then clear Show desktop icons.
- Open Settings Personalization Taskbar Taskbar behaviors and select Automatically hide the taskbar.
- Press Windows key + D to show the desktop. You should see a clean field of one color. If the taskbar appears, move the pointer away from the bottom edge.
Repeat steps 2 and 3 for each color. Test black, white, red, green and blue, in that order.
You can also open a browser-based display test page and press F11 to make it full screen. That is faster if you are online, because the page cycles through the colors for you. Use a site you trust and avoid any that ask you to install software.
To restore your normal desktop, go back to Settings Personalization Background, set Personalize your background to Picture and choose your picture again. Turn Show desktop icons back on from the same right-click menu. Clear Automatically hide the taskbar in Settings Personalization Taskbar Taskbar behaviors
What to look for on each color
- White: Look for dark dots (dead pixels), yellow or pink patches, and uneven brightness from one side to the other.
- Black: Turn the brightness to 100 percent and dim the room. Look for bright dots (stuck pixels) and glowing edges or corners (backlight bleed). A little glow at the edges is common on LCD laptop panels. Bright patches that are visible in normal room lighting are a defect. OLED screens produce their own light per pixel, so they do not have backlight bleed.
- Red, green and blue: Look for dots that stay a different color from the rest. A pixel that shows up on red but disappears on blue is stuck on one subpixel.
Also tilt the screen forward and backward while it shows white or gray. Colors that darken or invert at small angles point to a poor viewing-angle panel. Colors that change when you press lightly on the bezel can point to a loose display cable, which needs repair.
Mark any fault location so you can describe it to the manufacturer. A stuck pixel can sometimes clear on its own. A dead pixel usually does not.
Test Motion, Ghosting and Touch
These tests matter if your laptop display is a high refresh rate panel, or has a touchscreen.
Check motion and ghosting
Ghosting is when a faint trail follows moving objects across the screen. Open a browser-based motion test page and let a moving object cross the screen at your chosen refresh rate. Compare it with the same test at a lower rate from the Advanced display page. If trails appear at every rate, that is a panel response-time limit and not a Windows fault.
Test a touchscreen
Windows 11 has no dedicated touch test screen. Open Paint and draw across the whole canvas with your finger. Cover each corner and edge. Look for gaps in the line, lines that jump away from your finger, or areas that do not respond. A touch fault that appears only in one area usually points to hardware. A touch problem across the whole screen is often fixed by a restart or driver update.
Tell Whether the Problem Is Hardware or Software
If you found a fault, determine where it comes from. This tells you whether you need a driver fix or a repair.
Compare with an external monitor
Connect an external monitor with an HDMI or USB-C cable. Press Windows key + P and choose Duplicate so both screens show the same picture.
- If the external monitor looks fine and only the laptop display shows the fault, the problem is the panel or its internal cable.
- If both screens show the same fault, the cause is in Windows or the graphics driver.
Choose PC screen only from the same menu when you finish.
Check outside Windows
Windows is not involved on the firmware setup screen (BIOS or UEFI), so it shows whether the panel itself is faulty. Restart the laptop and press the setup key as it starts. The key depends on the manufacturer and is commonly F2, Del or F10. Many laptops also offer a built-in hardware diagnostic from the startup menu, such as HP PC Hardware Diagnostics UEFI on HP laptops. Check your manufacturer's support page for the exact key.
Changing firmware settings can stop the laptop from starting normally. Look at the screen only, and exit without saving changes.
- If the fault also appears on the firmware screen, it is hardware.
- If the screen looks fine there but not in Windows, the cause is the driver or a Windows setting.
Restart the graphics driver
This resets the display driver without restarting the laptop. Press Windows key + Ctrl + Shift + B. The screen flashes or goes black for a second, and you may hear a beep. Open windows should stay as they were. This clears many glitches such as flicker, stripes or a frozen picture.
Update or roll back the graphics driver (administrator required)
Changing a driver can alter how the display behaves, and you may need to restart afterward. You need an administrator account for these steps.
- Open Settings Windows Update Advanced options Optional updates
- Select Driver updates if it is listed, tick any entry for your display or graphics adapter, and select Download & install.
- If no driver update appears, get the latest graphics driver from your laptop manufacturer's support page. Use the manufacturer's page over the chip maker's, because laptop makers often customize drivers for the panel.
To undo a driver update that made things worse:
- Right-click Start and select Device Manager.
- Expand Display adapters, right-click your graphics adapter and select Properties.
- Open the Driver tab and select Roll Back Driver. If the button is greyed out, Windows has no earlier driver stored, and you need to install an older one from the manufacturer.
What to Do Next
If the external monitor test or the firmware screen showed the same fault, contact the laptop manufacturer. Photograph the fault on a solid color and have the display name from Advanced display ready, because pixel-defect policies and warranty terms differ by maker. If the screen passed, turn Night light and your preferred brightness options back on. A graphics driver reinstall or a Windows feature update can reset color, HDR and brightness options, so run through the Display settings again afterward.
Was this guide helpful?

About the Author
Richard
Tech Writer, IT Professional
Richard is a writer at Geek Rewind who turns complex IT tasks into clear, step-by-step guides. He draws on years of hands-on experience in system administration and enterprise IT operations, focusing on Windows, Linux and WordPress: the problems people actually run into, and the fixes that work. His server and WordPress guides come from systems he runs himself. Richard builds and maintains the platform behind Geek Rewind, from its Ubuntu servers and Nginx configuration to its custom WordPress plugins. Many new tutorials start with readers' questions, and he's always glad to answer them in the comments.
No comments yet — be the first to share your thoughts!