How to Change Text Scaling Independently of Display Resolution in Windows 11

Text scaling in Windows 11 makes letters and words larger without changing your display resolution. Resolution is the total number of pixels (tiny dots) your monitor shows. Higher resolutions give you a sharper picture, but they often make text too small to read comfortably.
Scaling tells Windows to draw text, and in some cases whole windows, using more pixels. Words get bigger while the picture stays at the monitor’s native resolution, so photos, video and games stay sharp. This tutorial covers four tools: the text-only slider, the full display scale, Magnifier and the ClearType tuner. Each one works independently of resolution, and you can combine them.
Open Settings Accessibility Text size and drag the slider to the right, then click Apply. This enlarges text in menus and title bars while keeping icons, pictures and resolution unchanged. For everything on screen, use Settings System Display Scale & layout instead.
How to Change Text Size Only in 🪟 Windows 11
To change text size only, open Settings Accessibility Text size and drag the slider to the right. Then click Apply. Menus, title bars and most apps that use system text get bigger. Icons, pictures and the overall layout stay the same size. This is the best choice when your screen is fine except for small text.
Follow these steps to change your text size:
- Click the Start button on your taskbar and select the Settings app. You can also press the Win and I together to open Settings directly. The Settings window opens with a list of categories on the left.

- In the left-hand menu, click Accessibility.
- On the right side, click Text size. The Text size page opens.
- Find the Text size slider at the top of the page. It starts at 100%, the default.
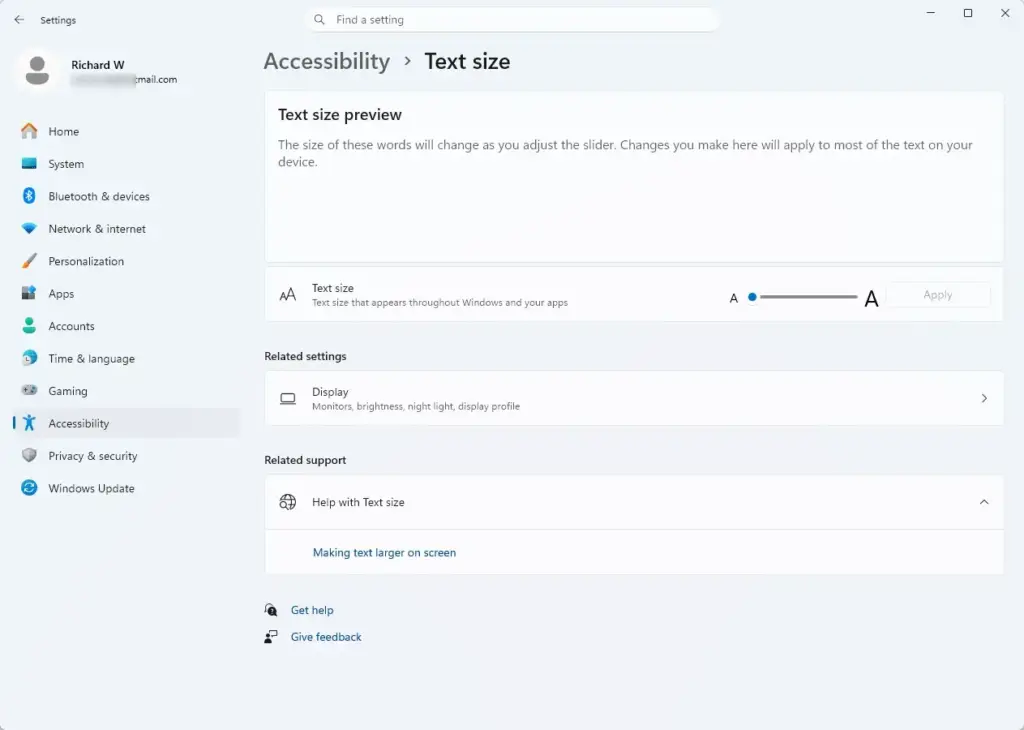
- Click and drag the slider to the right to make text larger. A preview box below the slider shows how the new size will look, so you can judge it before you commit.
- If the preview is too big, or you want to go back, drag the slider to the left. Setting it back to 100% restores the default size.
- Click the Apply button to save the new size. The screen may flash or show a short “Please wait” message while Windows updates the text. You do not need to restart. Some older apps only pick up the change after you close and reopen them.
Not every program follows this setting. Apps that draw their own text, such as some older desktop programs, may stay the same size. If one of them still looks too small, try the Scale setting in the next section.
How to Change Scale and Layout for Everything
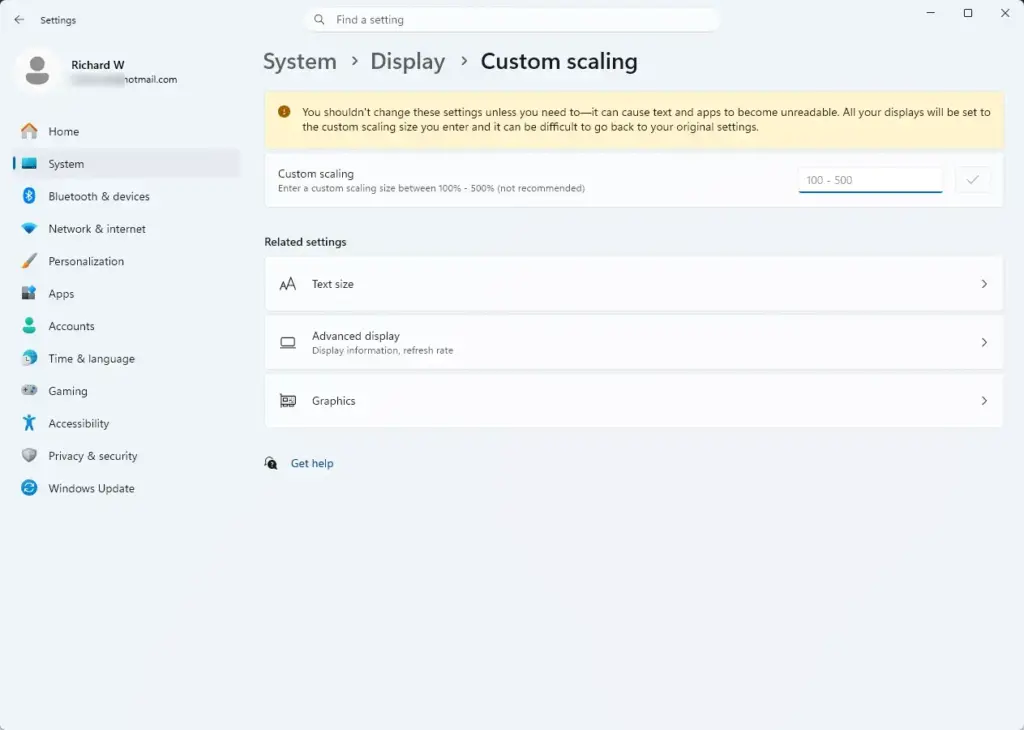
To change scale and layout, open Settings System Display and pick a percentage from the Scale drop-down menu. Unlike the text slider, this setting enlarges text, apps and other items on the screen all at once. Use it when everything looks small, not just the words.
If you use more than one display, select the monitor you want to change at the top of the Display page first.
Follow these steps to change the scale and layout:
- Press the Windows key and I together to open the Settings app.

- Click System in the left-hand menu.
- Click Display on the right side. The page shows your monitor and its settings.
- Scroll down to the Scale & layout section.
- Find the Scale setting with a drop-down menu next to it.
- Click the drop-down menu and choose a percentage, such as 125% or 150%. Windows marks the best option for your screen with the word (Recommended). That is a good starting point.
- Watch the screen. Windows applies the new scale right away, and the screen may go blank or flicker for a few seconds. That is normal. If a Keep changes prompt appears, click it to confirm. If you do nothing, or you cannot see the screen clearly, Windows reverts to your old settings after a few seconds. On some builds the new scale applies without a prompt. In that case, just choose your old percentage from the same menu to undo it.
Some apps do not resize fully until you close and reopen them. If things still look wrong, sign out of Windows and sign back in. Very high scales can crowd the screen, because bigger items leave less room for windows. If the layout feels cramped, go down one step.
A 150% scale plus a large text size can be too much. If everything looks oversized, lower one of them.
How to Change Display Resolution Separately
You can change display resolution in Windows 11 by opening Settings, selecting System, and clicking on Display. Pick a new option from the display resolution drop-down menu to adjust the pixel count and clarity of everything on your monitor independently.
Follow these steps to change your display resolution:
- Open the Settings app by pressing the Windows key and the I key together.
- Click on System in the left-hand menu.
- Click on Display on the right side.
- Scroll down to the Scale & layout section.
- Look for the setting labeled Display resolution with a drop-down menu next to it.
- Click the drop-down menu and select a new resolution from the list. The best choice is almost always marked as (Recommended) because it matches the physical pixel layout of your monitor.
- A confirmation box will appear on your screen asking if you want to keep the new display settings. Click Keep changes if it looks good, or click Revert if the screen looks blurry or distorted.
Unique Expert Tips for Better Readability
Most basic guides tell you how to use the standard sliders and stop there. However, advanced users know a few extra tricks to make reading on Windows 11 even more comfortable. Try these unique methods if standard text scaling is not enough for your needs.
Using Magnifier for Specific Areas
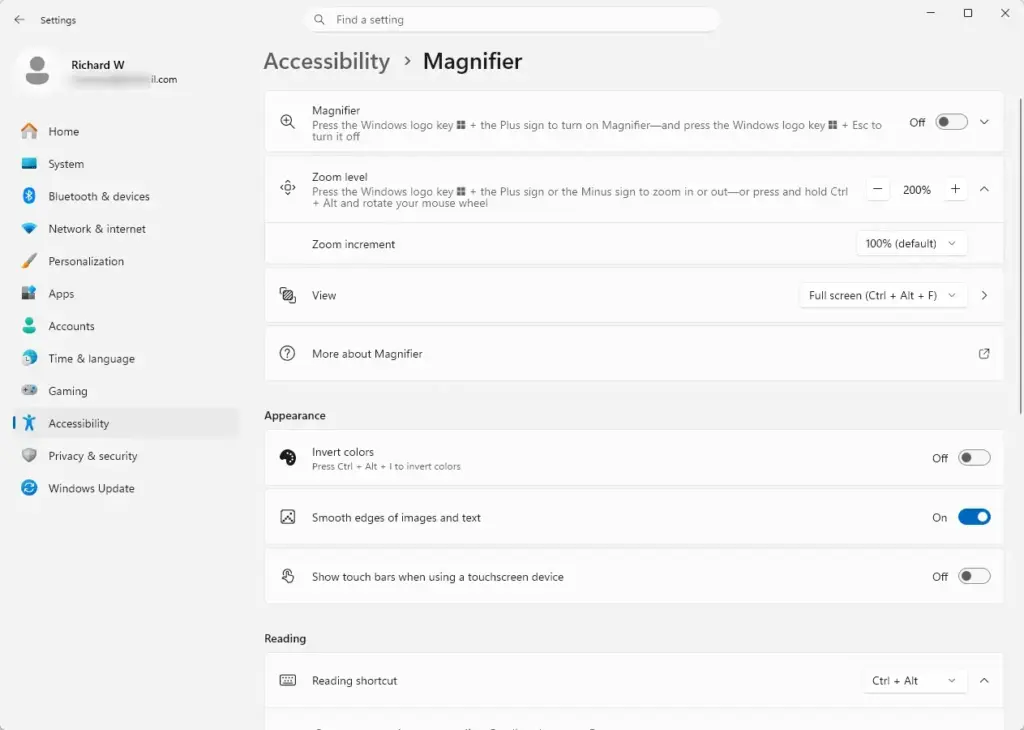
Magnifier zooms in on part of your screen without changing any display settings. Press the Windows key and the plus sign (+) together to turn it on. It is handy for a small block of text, a chart or a hard-to-read dialog box. It does not change your layout or resolution.
- Press the Windows key and the plus sign (+) key to turn on Magnifier. The screen zooms in right away.
- Look at the view. Depending on your settings, you either see a magnifying glass box that enlarges whatever is inside it, or the whole screen is zoomed. In both views, everything you are pointing at gets much larger.
- Move your mouse to bring other parts of the screen into view. In lens view, the magnifying glass box follows the pointer.
- Press the Windows key and the plus sign again to zoom in further. Press the Windows key and the minus sign (-) to zoom out.
- Press the Windows key and the Escape (Esc) key to turn Magnifier off when you are finished reading. The screen returns to normal.
You can also change the zoom level and the view in Settings Accessibility Magnifier That page also has an option to start Magnifier automatically when you sign in.
Adjusting ClearType Text Tuner
The ClearType text tuner makes on-screen words look sharper. Search for ClearType in the Start menu, open the tuner, and pick the text samples that look best on your monitor. It changes how letters are drawn, not how big they are, so it works well after you have set your text size or scale. It is most helpful on flat-panel monitors where text looks fuzzy or has colored edges.
- Click the Start button, type ClearType into the search box, and click Adjust ClearType text in the results. The ClearType Text Tuner window opens.
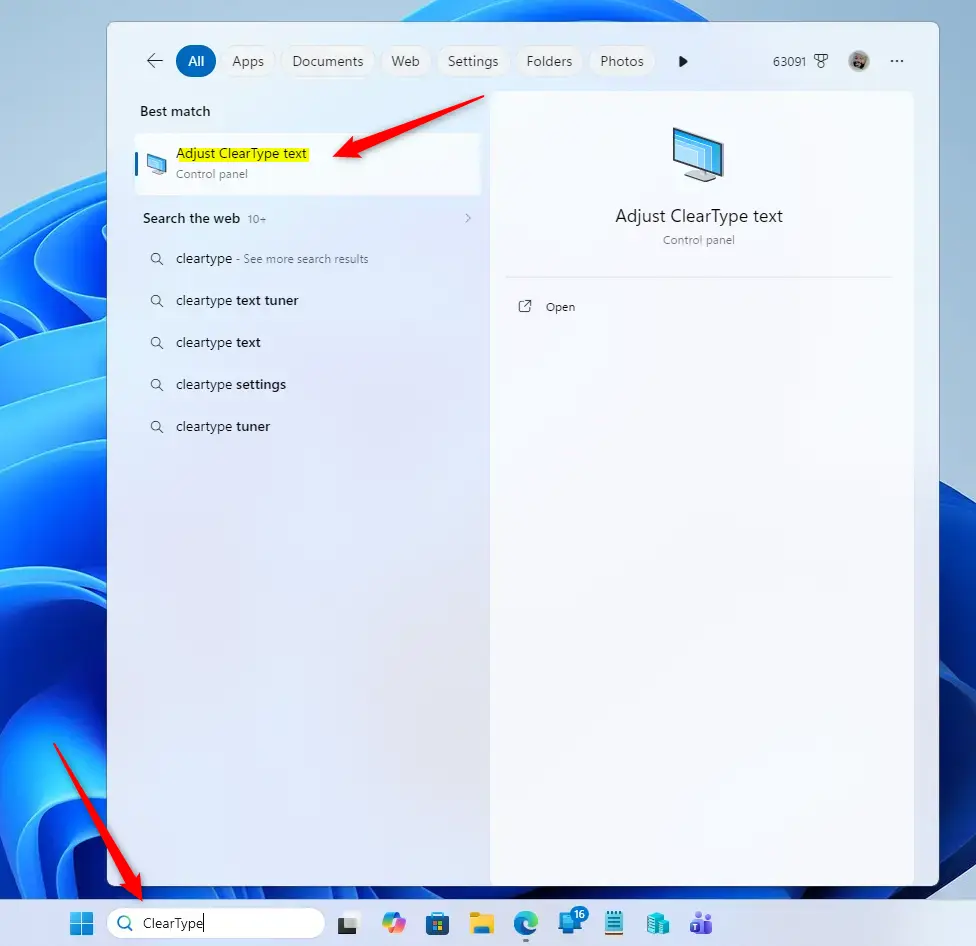
- Check the box labeled Turn on ClearType, then click Next. ClearType is usually on already, so the box may be checked. If you have more than one monitor, the tuner may ask whether to tune all of them or just one. Choose one and click Next.
- Wait while Windows checks that your monitor is running at its native resolution. If it is, you will see a message saying so. Click Next. If it is not, set the monitor to its recommended resolution in Settings System Display first
- Look at the text samples on each screen and click the one that looks clearest and easiest to read. Click Next after each choice. There are several screens of samples.
- When you have gone through all the samples, click Finish to apply your settings. The change takes effect right away and needs no restart.
To undo your changes, run the tuner again and choose different samples. You can also uncheck Turn on ClearType on the first screen to switch the feature off, though most people leave it on.
Summary
Windows 11 lets you change text size and display scale independently of your screen resolution, so you can read comfortably and keep the picture sharp. Use the Text size slider when only the words are too small. Use the Scale setting when everything is too small. Use Magnifier for occasional close-ups, and run the ClearType tuner if text looks fuzzy. If you combine settings and the screen feels crowded, lower one of them and check again.
Have a question about this guide?
Answered by AI from this guide. Good questions may be added to this page — please don't include personal details.
Did this guide fix your problem?

About the Author
Richard
Tech Writer, IT Professional
Richard is a writer at Geek Rewind who turns complex IT tasks into clear, step-by-step guides. He draws on years of hands-on experience in system administration and enterprise IT operations, focusing on Windows, Linux and WordPress: the problems people actually run into, and the fixes that work. His server and WordPress guides come from systems he runs himself. Richard builds and maintains the platform behind Geek Rewind, from its Ubuntu servers and Nginx configuration to its custom WordPress plugins. Many new tutorials start with readers' questions, and he's always glad to answer them in the comments.
No comments yet — be the first to share your thoughts!