How to Record Mouse Cursor in Windows 11 Games

- 2 ways to do it
- Needs administrator rights
Recording the mouse cursor in Windows 11 games lets viewers track your clicks and menu choices during gameplay captures. This setting controls whether your pointer appears in video clips saved by the built-in recording tools. It matters most for tutorials, bug reports and walkthroughs of strategy or simulation games, where the viewer needs to see what you are clicking.
You can turn cursor capture on or off in the Windows 11 Settings app, or by changing the Captures settings that Xbox Game Bar uses. Game Bar is the built-in app for recording game clips and screenshots. Press Win+G to open it, or Win+Alt+R to start and stop a recording. This guide covers two methods: the Settings app, which is the easy and safe one, and the Registry Editor, which is a fallback.
To record the mouse cursor in Windows 11 games, open Settings with Win+I, go to Gaming Captures, and switch on “Capture mouse cursor when recording a game.” The change applies immediately, with no restart needed. Clips you already recorded won’t change.
Method 1Changing the Setting in the Windows Settings App
The Settings app is the fastest way to control cursor visibility during recordings. It works the same way on Windows 11 Home and Pro, and you don’t need administrator rights for it.
Open Windows Settings
- Press Win+I on your keyboard.
- Check that the Settings window opens, with a list of categories down the left side.

Go to Gaming Settings
- Click Gaming in the left sidebar. The right side now lists the gaming options.
- Select Captures. The page that opens holds the recording options, including the cursor setting.
If you don’t see Gaming, scroll down the left sidebar. On a small window the list can be longer than the screen.
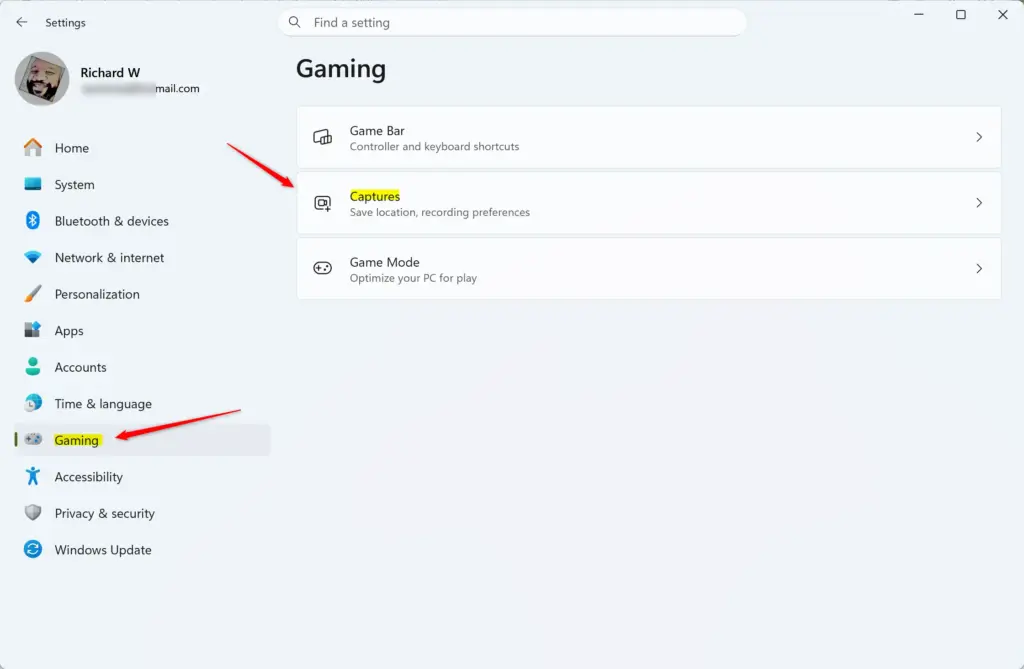
Choose How to Capture Your Mouse Cursor
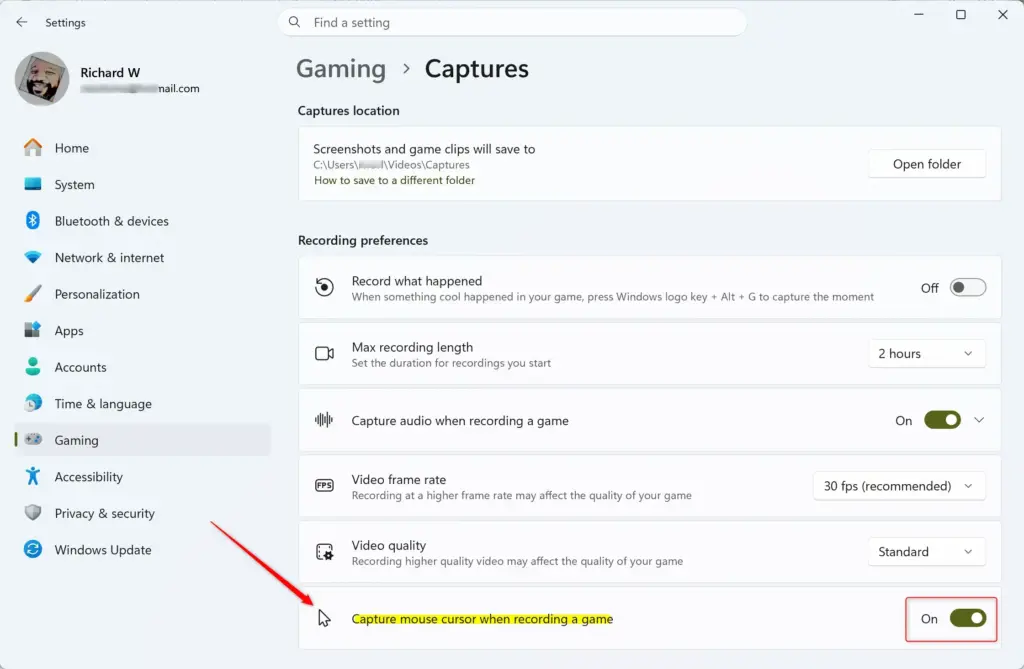
Xbox Game Bar records clips using the options on this page. Find the option labeled ‘Capture mouse cursor when recording a game’. Its switch decides whether your pointer shows up in your clips. This option is on by default on most Windows 11 computers.
- To show the cursor, set the switch to On. Your mouse pointer will be visible in all future gameplay videos you record.
- To hide the cursor, set the switch to Off.
- Check the label next to the switch. It should read On or Off to match your choice.
If the option is missing or greyed out, install the latest Windows updates and open the Captures page again. Wording and layout can differ slightly between Windows 11 versions.
Close Settings
The choice applies immediately. You can close the Settings window now, and your choice takes effect the next time you record gameplay in Windows 11. A clip you have already recorded won’t change.
To undo it, come back to Settings Gaming Captures and flip the switch the other way. No restart is needed.
Method 2Using the Windows Registry Editor
Registry Editor is a database that stores low-level settings for Windows and apps. It is an advanced way to control your capture options, useful when the Settings app doesn’t work for you. Use it carefully, because a wrong edit in the registry can cause system problems. The tool is available on both Home and Pro editions.
Back up the registry before you change any values, so you can restore your computer if anything goes wrong. In Registry Editor you can use File Export to save a copy of the branch you’re about to edit. Creating a restore point first is also a good idea.
Turning On Mouse Cursor Capture Using the Registry
This method turns on mouse cursor recording by editing a value in your user registry. You open Registry Editor, go to 🗝️HKEY_CURRENT_USER\
Open the Registry Editor
- Press Win+R to open the Run box.
- Type regedit and press Enter.
- Click Yes if the User Account Control (UAC) prompt appears. If you are on a standard account, you will need an administrator’s password.
- Check that the Registry Editor window opens, with a folder tree on the left.
Go to the GameDVR Key
Now go to the right location. Click the address bar at the top of Registry Editor, then carefully type or paste this path and press Enter:
HKEY_CURRENT_USER\Software\Microsoft\Windows\CurrentVersion\GameDVR
The left pane should jump to that key. If the GameDVR folder doesn’t exist within CurrentVersion, you’ll need to create it. Right-click CurrentVersion, select New, then Key, and name it GameDVR.
Create or Change the CursorCaptureEnabled Value
Select the GameDVR key on the left, then look at the right side. You need to create or change a value named CursorCaptureEnabled. If it is already listed, skip to step 4.
- Right-click in the empty space on the right side.
- Select New, then DWORD (32-bit) Value.
- Name the new value exactly
CursorCaptureEnabled. Spelling and capitalization matter. - Double-click the new
CursorCaptureEnabledvalue to change it. An edit window opens. - In the “Value data” box, type
1. - Make sure “Base” is set to Hexadecimal.
- Click OK. The value now shows your data in the right pane.
Setting the CursorCaptureEnabled value to 1 tells Windows to capture your mouse cursor during game recordings.
Close the Registry Editor
You can now close the Registry Editor. The change usually takes effect immediately, but restarting your PC can help ensure all programs recognize the new setting.
To re-enable the capture mouse cursor setting later, change its value to '1'. If the capture mouse cursor setting was already on, this action confirms its current state without altering it. If something looks wrong afterwards, you can import the .reg file you exported earlier, or use the Settings app to set the switch directly.
Turning Off Mouse Cursor Capture Using the Registry
You can also use Registry Editor to hide your pointer from video files by setting the capture value to zero. You open the same Captures key under 🗝️HKEY_CURRENT_USER\
Open the Registry Editor
As before, press Win+R, type regedit, and press Enter. Grant permission if the UAC prompt appears.
Go to the GameDVR Key
Click the Registry Editor address bar and go to this path:
HKEY_CURRENT_USER\Software\Microsoft\Windows\CurrentVersion\GameDVR
Again, confirm the GameDVR key is present. If not, create it by right-clicking CurrentVersion, selecting New, then Key, and naming it GameDVR.
Change the CursorCaptureEnabled Value
In the right pane of the Registry Editor, locate the CursorCaptureEnabled value. If it's missing, create it as a DWORD (32-bit) Value, just as you did when enabling it.
- Double-click the
CursorCaptureEnabledvalue. The edit window opens. - In the "Value data" box, type
0. - Make sure "Base" is set to Hexadecimal.
- Click OK. The value in the right pane should now show your new data.
Setting the CursorCaptureEnabled value to 0 tells Windows not to capture your mouse cursor during game recordings.
CursorCaptureEnabled value, it may revert to its default state (usually ON).To ensure it's off, verify that the value is set to 0.
Close the Registry Editor
Close Registry Editor to finish the change. It applies immediately, but restarting your computer makes sure every app picks up the new setting. To check the result, record a short test clip with Windows key + Alt + R and play it back.
Summary
Windows 11 gives you two reliable ways to control whether the mouse cursor appears in gameplay videos. The Settings app is the easiest and safest way to turn the feature on or off. The Registry Editor is an advanced alternative for power users who want direct control over their recording preferences.
For most people, the Settings app is the recommended option. Use the Registry Editor only when you are confident in what you are changing and have a backup in place.
Have a question about this guide?
Answered by AI from this guide. Good questions may be added to this page — please don't include personal details.
Did this guide fix your problem?

About the Author
Richard
Tech Writer, IT Professional
Richard is a writer at Geek Rewind who turns complex IT tasks into clear, step-by-step guides. He draws on years of hands-on experience in system administration and enterprise IT operations, focusing on Windows, Linux and WordPress: the problems people actually run into, and the fixes that work. His server and WordPress guides come from systems he runs himself. Richard builds and maintains the platform behind Geek Rewind, from its Ubuntu servers and Nginx configuration to its custom WordPress plugins. Many new tutorials start with readers' questions, and he's always glad to answer them in the comments.
No comments yet — be the first to share your thoughts!