How to Enable Read Receipts in Microsoft Teams

Read receipts in Microsoft Teams are small checkmark icons that appear next to your chat messages to show the exact time someone reads them. The feature works both ways across all Windows versions of the app. Other people can see when you read their messages, and you can see when they read yours.
Turning on read receipts stops you from wondering whether coworkers missed your notes, especially when you handle 10 or more active chats at once. You can switch the setting on in a few clicks in the Teams app settings. This guide covers the desktop app on Windows and the mobile app. It also explains why the option can be missing.
To enable read receipts in Microsoft Teams on desktop, open Settings from the “Settings and more (…)” button next to your profile picture, select the Privacy tab, and switch on Read receipts. The change applies immediately, with no restart needed. On mobile, tap your profile picture, choose Settings, then Messaging. Read receipts only cover one-on-one and group chats, not channels.
What Counts as ‘Read’?
In Microsoft Teams, a message is marked as ‘read’ when you open the chat window where the message was sent. In the desktop app, the message must also be visible on your screen. Simply having the app open in the background does not trigger a read receipt.
So if you see a notification banner but don’t open the chat, the sender is not told you read it. The receipt is sent once you open the conversation and the message is in view.
How to Enable or Disable Read Receipts on Desktop
You can change the read receipts setting on your desktop by opening your profile menu, clicking Settings, and changing your privacy options. The setting controls whether other people see a small checkmark when you read their chat messages. Turning it on shows people that you saw their message. Turning it off lets you read chats in private without anyone knowing.
- Open the Start menu and launch Microsoft Teams. The Teams window opens and shows your chats and teams.

Turn on or off automatically starting Microsoft Teams - If the app is minimized, click the expansion button on the menu bar. The Teams window returns to full size so you can reach the controls at the top.

Turn on or off automatically starting Microsoft Teams - Click the Settings and more (…) button near your profile picture and select Settings. The Settings window opens with a list of categories on the left.

Turn on or off automatically starting Microsoft Teams - Click the Privacy tab on the left side of the screen. The privacy options for your account appear on the right.

Turn on or off automatically starting Microsoft Teams - Find the Read receipts section and toggle the switch to On or Off. The change applies straight away. You do not need to restart Teams or sign out. To undo it, come back here and flip the switch the other way.
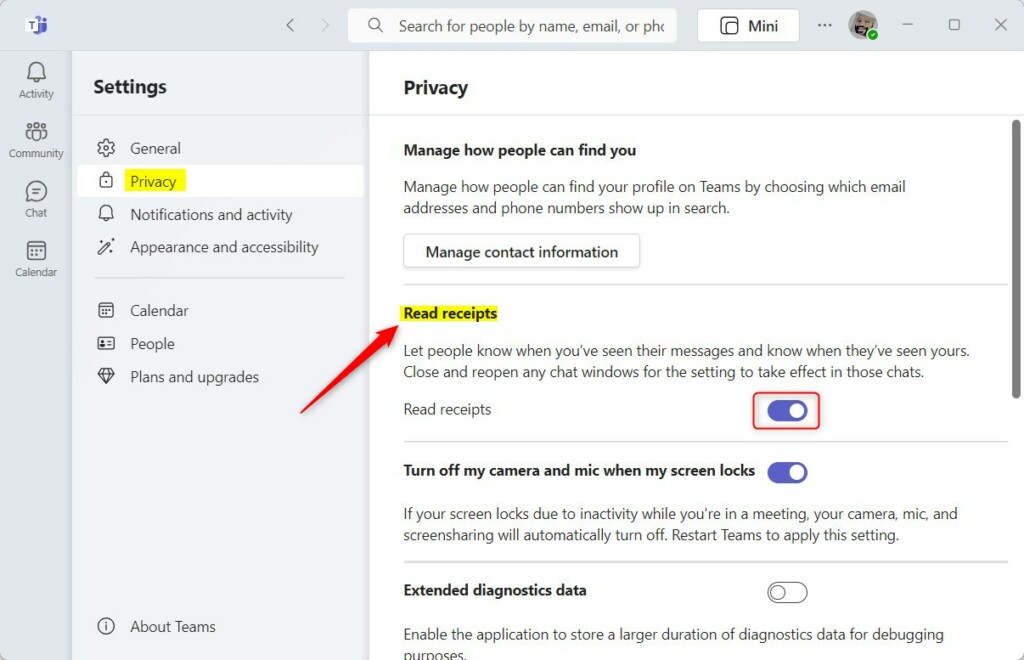
Turn read receipts on or off for Microsoft Teams
How to Enable Read Receipts on Mobile (iOS/Android)
You can also manage your Teams chat settings on the go using the mobile app. The setting is saved to your account, so you can change it from either device. Menu names can vary a little between app versions and between iPhone and Android.
- Open the Microsoft Teams app on your phone.
- Tap your profile picture or the More menu in the top-left corner. A menu slides in from the side.
- Tap Settings. The list of settings categories opens.
- Select Messaging. The chat-related options appear.
- Toggle the Read receipts switch to your preferred setting. If you don’t see the switch, your organization may control it (see below).
Functional Limitations and Privacy
Read receipts in Teams only work for one-on-one chats and group chats, not in regular team channels. If you post in a channel, you won’t see a checkmark showing who has read the message, and nobody sees one for your reading either.
Admin-Level Policy Settings
Sometimes an IT administrator restricts these settings. If you cannot find the read receipts option, or you can’t change it, your organization may have enforced a global policy. Admins manage this in the Microsoft Teams admin center by adjusting the Messaging policy. The policy can leave the choice to each user, or it can force read receipts on or off for everyone. This keeps privacy standards consistent across the company.
If the option is missing or locked, ask your IT team which setting is applied to your account. Policy changes can also take some time to reach users, so a new setting may not show up right away.
Summary
You can manage your read receipts in Teams easily through the Privacy settings on the desktop, or Messaging on mobile, choosing whether to keep your message status private or visible. Remember that the setting works both ways, and that your admin may have the final say.
Have a question about this guide?
Answered by AI from this guide. Good questions may be added to this page — please don't include personal details.
Did this guide fix your problem?

About the Author
Richard
Tech Writer, IT Professional
Richard is a writer at Geek Rewind who turns complex IT tasks into clear, step-by-step guides. He draws on years of hands-on experience in system administration and enterprise IT operations, focusing on Windows, Linux and WordPress: the problems people actually run into, and the fixes that work. His server and WordPress guides come from systems he runs himself. Richard builds and maintains the platform behind Geek Rewind, from its Ubuntu servers and Nginx configuration to its custom WordPress plugins. Many new tutorials start with readers' questions, and he's always glad to answer them in the comments.
[…] app. You can connect your Google calendar, turn the camera and mic on or off on the lock screen, turn read receipts on or off, auto start Teams, disable Teams chat, sync contacts with Teams, connect to Google […]
[…] app. You can connect your Google calendar, turn the camera and mic on or off on the lock screen, turn read receipts on or off, auto start Teams, disable Teams chat, and […]
[…] connect your Google calendar, turn the camera and mic on or off on the lock screen, turn read receipts on or off, auto start Teams, disable Teams chat, sync contacts with Teams, connect to […]
[…] connect your Google calendar, turn the camera and mic on or off on the lock screen, turn read receipts on or off, auto start Teams, disable Teams chat, sync contacts with Teams, connect to […]
[…] app. You can connect your Google calendar, turn the camera and mic on or off on the lock screen, turn read receipts on or off, auto start Teams, disable Teams chat, sync contacts with Teams, connect to Google […]
[…] app. You can connect your Google calendar, turn the camera and mic on or off on the lock screen, turn read receipts on or off, auto start Teams, disable Teams chat, sync contacts with Teams, connect to Google Calendar, and […]
[…] can connect your Google calendar, turn the camera and mic on or off on the lock screen, turn read receipts on or off, auto start Teams, disable Teams chat, sync contacts with Teams, connect to Google Calendar, and […]
[…] app. You can connect your Google calendar, turn the camera and mic on or off on the lock screen, turn read receipts on or off, auto start Teams, disable Teams chat, sync contacts with Teams, connect to Google […]
[…] app. You can connect your Google calendar, turn the camera and mic on or off on the lock screen, turn read receipts on or off, auto start Teams, disable Teams chat, sync contacts with Teams, connect to Google […]