Switch Power Plans in Windows 11 for Battery Life

Windows 11 power mode is a setting that trades speed for battery life. Pick Best power efficiency in Settings System Power & battery to make your laptop last longer on a charge. The change takes effect right away, and you do not need to restart.
Windows 11 also has a separate power plan, found in the older Control Panel . The power mode and the power plan look alike, but they are different controls. This article shows how to change both. It also shows how to set one plan for when the laptop runs on battery and another for when it is plugged in.
If you cannot find an option, or it is greyed out, the last part of this article explains why and what to try.
To save battery in Windows 11, open Settings System Power & battery and set Power mode to Best power efficiency. The change applies immediately with no restart. To use a different battery setting only when unplugged, set the battery dropdown under Power mode separately. To select Power saver instead, open Control Panel Power Options
Power mode vs power plan: what each one controls
A power plan is a saved group of settings that controls how Windows uses power. It covers screen timeout, sleep timeout, processor behaviour and more. Windows 11 includes Balanced, Power saver and High performance, though your PC may not show all three.
A power mode is a simpler setting in the Settings app. It tilts the active plan toward saving energy or toward speed. The choices are Best power efficiency, Balanced and Best performance.
For most laptop users, the power mode is the quickest way to get a battery-friendly setup. Use the power plan in Control Panel when you want a plan you have named and tuned yourself, or when your PC offers a Power saver plan.
Both settings are available in Windows 11 Home and Pro. The steps in this article are the same on both editions.
Switch the power mode in Settings
Use this method when you want the quickest change. It rebalances speed against power use and leaves the individual plan settings alone.
- Press Windows key + I to open Settings.

Windows 11 Start menu with Settings gear icon highlighted. - Select System in the left pane.
- Select Power & battery. You see a battery graph at the top, then sections for Power and Battery. On a desktop PC without a battery, you see only the power settings.
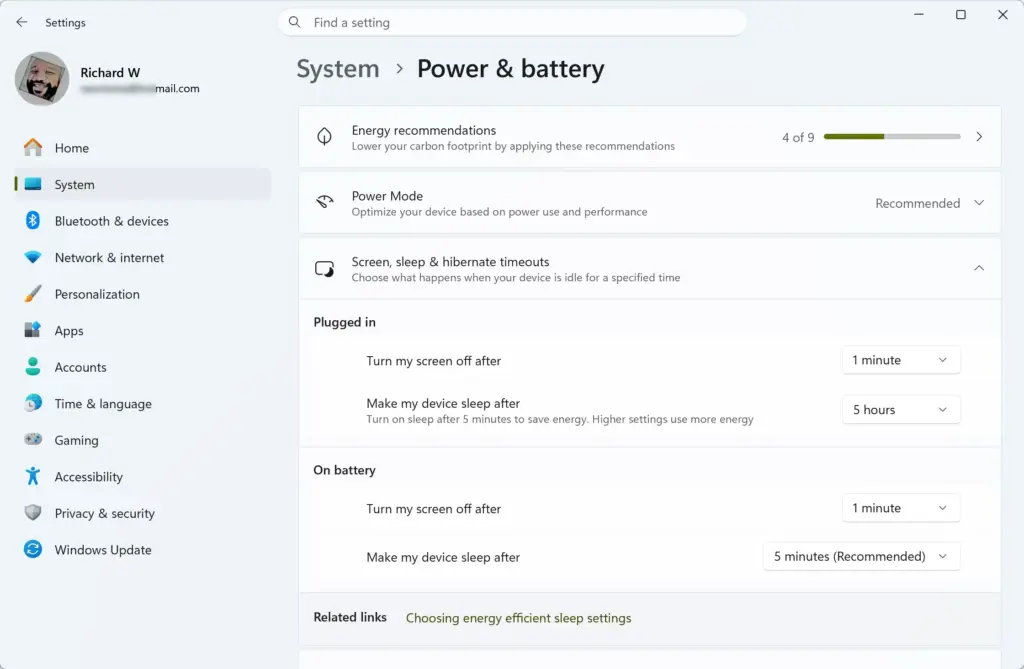
- Find Power mode in the Power section.
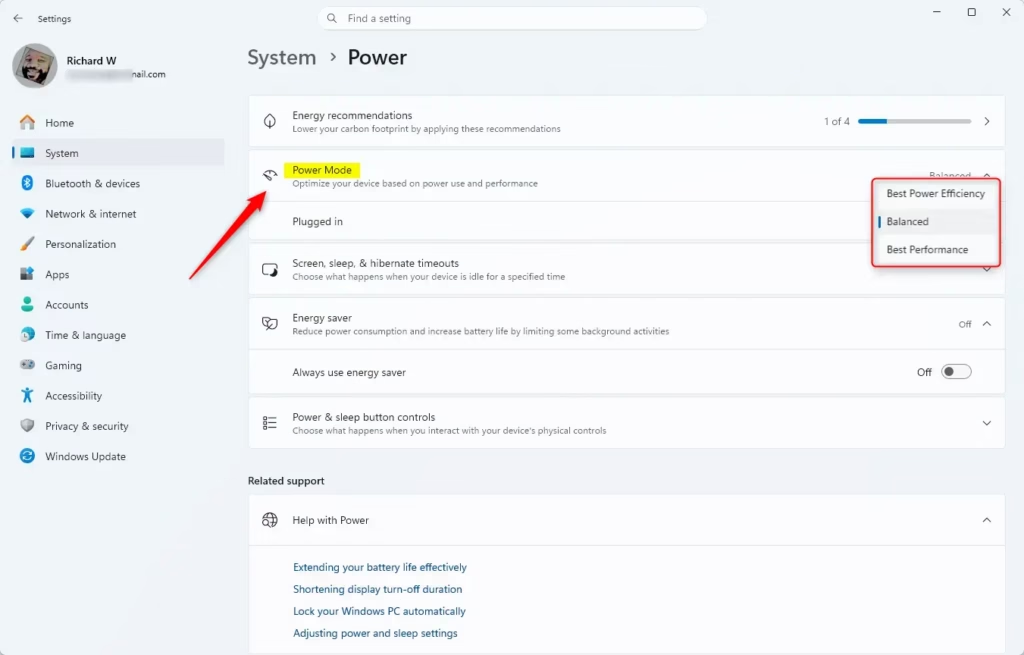
Windows 11 power mode options for optimizing for best performance - Open the dropdown next to it and select Best power efficiency. The dropdown closes and the new mode shows next to Power mode. The change is immediate.
Best power efficiency lowers performance to save energy, so heavy apps such as video editors and games run slower. Switch back to Balanced when you plug in and need full speed.
Set different power modes for plugged in and on battery
Current builds of Windows 11 let you pick one mode for when the laptop is plugged in and another for when it runs on battery. This means you do not have to switch by hand every time you unplug.
- Open Settings System Power & battery
- Under Power mode, look for two dropdowns, one for when the PC is plugged in and one for when it is on battery.
- Set the battery dropdown to Best power efficiency.
Windows 11 power mode options for optimizing for best performance - Set the plugged-in dropdown to Balanced or Best performance, depending on how you use the PC at a desk.
If you see only one dropdown, your version of Windows 11 uses a single power mode for both situations. Windows 11 version 21H2 works this way. Run Windows Update to get the split option, or set the mode manually each time you unplug.
Switch the power plan in Control Panel
Use this method to select a named plan, such as Power saver, or one you created. Power Options is still in Control Panel and has not moved into the Settings app.
- Press the Windows key, type Control Panel and press Enter.
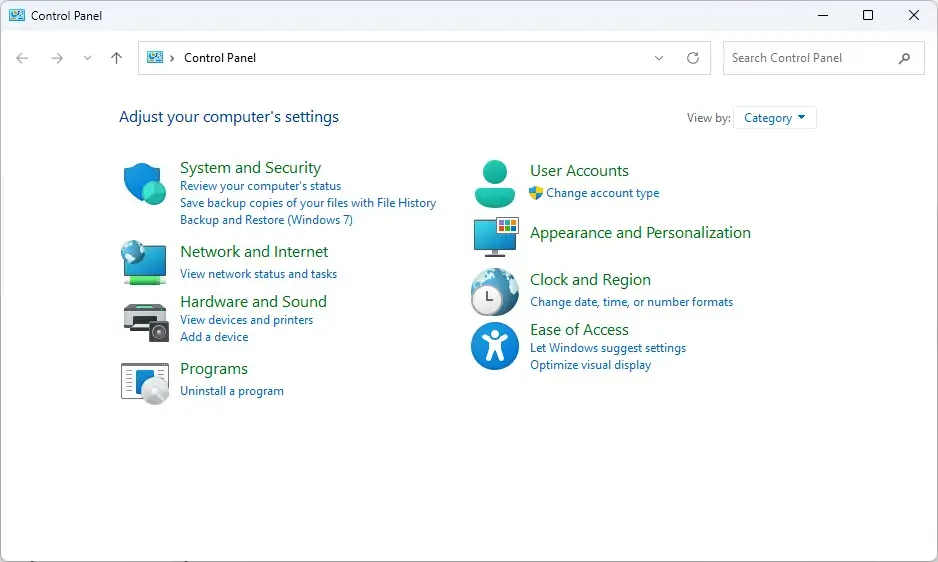
Windows 11 Control Panel dashboard showing power options. - Set View by in the top-right corner to Large icons or Small icons.
- Select Power Options. You see the available plans with a radio button beside each one. If you stay in the Category view instead, the route is Control Panel Hardware and Sound Power Options
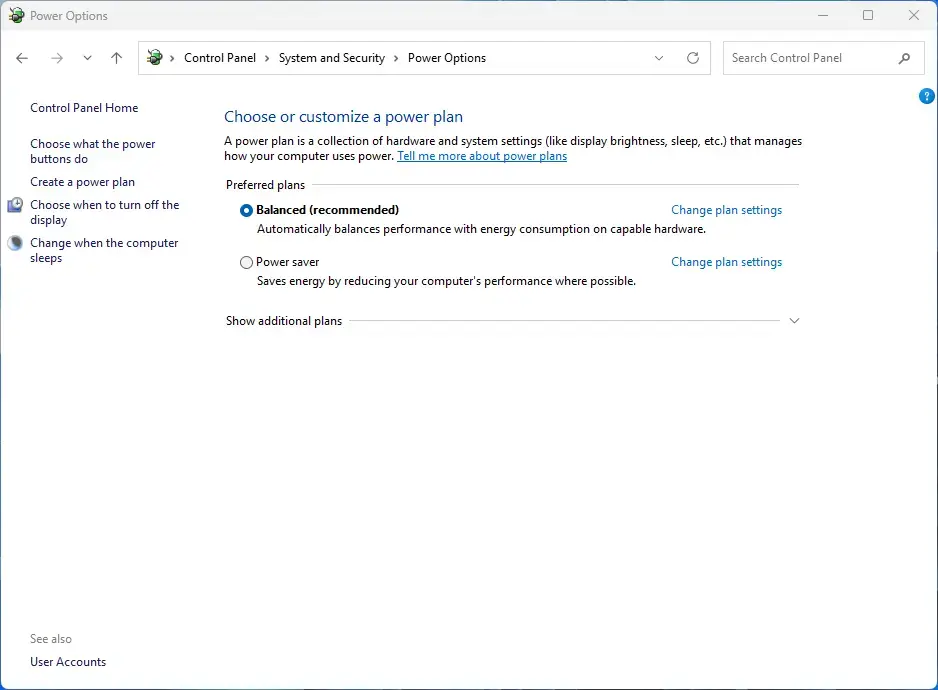
Control Panel › System and Security › Power Options - Select the radio button next to Power saver. The selected plan is now active and applies immediately.
Power saver lowers screen brightness, shortens the time before the screen turns off and limits processor speed. It is the plan Windows ships for the longest battery life.
If you do not see Power saver, go to the next section. If you only want a shortcut to the same page, press Windows key + R, type powercfg.cpl and press Enter.
If the Power saver plan doesn't appear
Many newer laptops show only Balanced. Some of them use Modern Standby (a sleep mode that keeps the PC lightly connected, similar to a phone). The manufacturer's drivers can also hide plans. Try these checks in order.
- On the Power Options page, look for an arrow or link labelled Show additional plans and select it. Hidden plans appear below Balanced.
- If nothing appears, select Create a power plan in the left pane.
- Select Power saver as the base for the new plan, if it is offered. If only Balanced is listed, use that as the base and lower the settings yourself in the next section.
- Type a name in Plan name, such as Battery plan, and select Next.
- Set the On battery times for turning off the display and putting the computer to sleep. Shorter times save more power.
- Select Create. Windows makes the new plan active and lists it on the Power Options page.
A custom battery plan is a good fit if the built-in plans are hidden. You choose the settings, so you get the same effect as Power saver.
Check which plan is active from the command line
The command line shows the exact plans on your PC, including hidden ones. It also lets you switch plans without opening Control Panel.
- Right-click the Start button and select Terminal. On some PCs the entry is Windows PowerShell.
- Run
powercfg /list. The output lists each plan with a GUID (a long identifier made of letters and numbers) and its name. An asterisk marks the active plan. - Copy the GUID of the plan you want.
- Run
powercfg /setactive GUID, replacingGUIDwith the identifier you copied. The command prints nothing when it works. - Run
powercfg /getactiveschemeto confirm. The output shows the plan you just set.
You do not need administrator rights for these commands. If powercfg /list shows only one plan, the others are not installed on your system or the manufacturer has removed them. Create a plan as described above.
Tune the battery plan: screen and sleep timeouts
The screen is one of the biggest sources of battery drain on a laptop. Shorter timeouts on battery are the most useful change you can make after picking a mode or plan.
- Open Settings System Power & battery
- Select Screen, sleep, & hibernate timeouts to expand it.
- Set On battery power, turn off my screen after to a short time, such as 2 or 3 minutes.
- Set On battery power, put my device to sleep after to a short time, such as 5 or 10 minutes.
The When plugged in options are separate. Changing the battery values does not change how the laptop behaves when it is plugged into the wall.
To change these through Control Panel instead, open Power Options and select Change plan settings next to the active plan. Each setting has an On battery column and a Plugged in column. Select Save changes when you finish.
Change advanced settings for a plan
Advanced settings control items such as processor behaviour and what happens when you close the lid. Wrong changes can make the PC slow or stop it sleeping. Change one setting at a time, and write down the original value first.
- Open Control Panel Hardware and Sound Power Options
- Select Change plan settings next to the plan you want to edit.
- Select Change advanced power settings. The Power Options dialog opens with a tree of settings.
- Expand a category, change the On battery value and select OK.
If you get lost, select Restore plan defaults on the same dialog to return that one plan to its original settings. This does not affect your other plans.
Turn on battery saver (Energy saver)
Battery saver is a separate feature from the power plan. It reduces background activity and dims the screen when the battery is low. In newer versions of Windows 11 it is named Energy saver. The setting sits in the same place in either case.
- Open Settings System Power & battery
- Select Battery saver (or Energy saver) to expand it.
- Select Turn on now to enable it immediately. When battery saver is on, a battery icon with a leaf or plus symbol appears on the taskbar.
- Open the dropdown for turning it on automatically and choose a battery percentage, such as 30%. Windows turns it on by itself once the battery falls to that level.
The feature also has an option to lower screen brightness while it is on. Leave it enabled for maximum savings.
You can also toggle the feature from Quick Settings. Click the network, volume and battery icons on the right of the taskbar, then select the Battery saver or Energy saver tile. If the tile is missing, select the pencil icon in Quick Settings, choose Add and pick it from the list.
Check that the change is helping
A new setting only matters if battery life improves. Windows has two tools that help you check.
Look at battery usage in Settings
Open Settings System Power & battery and select Battery usage. Windows lists which apps used the most power over the last 24 hours or 7 days. If one app dominates, closing it or limiting its background activity can save more than any power plan.
Generate a battery report
The battery report is a web page file (saved in HTML, a format browsers open) that shows capacity, charge cycles and recent usage. It tells you whether a short battery life comes from settings or from an ageing battery.
- Right-click the Start button and select Terminal.
- Run
powercfg /batteryreport. Windows prints the location where it saved battery-report.html. - Open the file in your browser. Compare Design capacity with Full charge capacity in the Installed batteries section. A large gap means the battery has worn down and no power plan will fully fix it.
If the Power mode setting is greyed out or missing
These are the causes that come up most often, with what to do about each.
- A plan other than Balanced is active. On many PCs, the Power mode dropdown is unavailable or hidden while a custom or non-Balanced plan is selected. Open Control Panel Hardware and Sound Power Options, select Balanced, then return to Settings System Power & battery
- The PC is a desktop. Desktops have no battery, so the battery options do not appear. Power mode may still show.
- Your organisation manages the PC. On a work or school PC, an administrator can lock the power settings so you cannot change them. Settings shows the message Some settings are managed by your organization. Ask your IT department to change them.
- The manufacturer's software overrides Windows. Some laptop makers include their own power utility. Check that app if the Windows setting reverts after you change it.
- A missing driver. Old drivers for the chipset (the controller that connects the main parts of the computer) or the graphics card can hide power options. Run Windows Update, then check the laptop maker's support page for chipset and power-management drivers.
Remove a custom plan or reset all plans
To remove a plan you created, make sure it is not the active plan first. Select another plan in Power Options, then select Change plan settings next to the one you want to remove and select Delete this plan. Windows asks you to confirm.
This next step cannot be undone. It deletes every custom plan and returns all plans to their defaults. Back up any custom plan settings you want to keep first. This step requires administrator privileges.
- Right-click the Start button and select Terminal (Admin). Select Yes at the User Account Control prompt.
- Run
powercfg /restoredefaultschemes. The command prints nothing when it works. - Open Control Panel Hardware and Sound Power Options to check the plan list. Only the default plans for your PC remain.
If this didn't work
Feature updates and manufacturer power software can change the active plan or power mode, so check Settings System Power & battery after a major update. If the battery still drains fast on Best power efficiency, check Battery usage for a single app causing the drain, and run the battery report to see whether the battery itself has lost capacity. To go back to normal performance at any time, set Power mode to Balanced or select the Balanced plan in Power Options.
Have a question about this guide?
Answered by AI from this guide. Good questions may be added to this page — please don't include personal details.
Did this guide fix your problem?

About the Author
Richard
Tech Writer, IT Professional
Richard is a writer at Geek Rewind who turns complex IT tasks into clear, step-by-step guides. He draws on years of hands-on experience in system administration and enterprise IT operations, focusing on Windows, Linux and WordPress: the problems people actually run into, and the fixes that work. His server and WordPress guides come from systems he runs himself. Richard builds and maintains the platform behind Geek Rewind, from its Ubuntu servers and Nginx configuration to its custom WordPress plugins. Many new tutorials start with readers' questions, and he's always glad to answer them in the comments.
No comments yet — be the first to share your thoughts!