How to Mount a Folder as a Drive in Windows 11

Mounting a folder as a drive in Windows 11 turns any regular folder into a virtual drive with its own drive letter, such as Z: or V:. The folder shows up next to your C: drive in File Explorer , so you can open it with one click instead of digging through layers of subfolders.
You set it up from a command-line window (a text-based window where you type commands), so you don’t need to install any extra software. The result behaves like a plugged-in USB flash drive, except the “drive” points at a folder already on your PC. Your files stay where they are. The new drive letter is only a shortcut to them.
Open Windows Terminal, type `subst X: 📁C:\
What You Will Need
- A Windows 11 computer (Home and Pro both work)
- Access to Windows Terminal, PowerShell, or Command Prompt
- The folder you want to mount, and its full path (for example, the path you get by right-clicking the folder in File Explorer and choosing Copy as path)
- A drive letter that no other drive is using
Steps to Mount a Folder as a Drive
You can mount a folder as a drive with a built-in command-line tool. It assigns a standard drive letter to any regular folder, so the folder acts like a separate drive or USB stick in File Explorer . Nothing is copied or moved.
First, open a terminal. Windows Terminal combines PowerShell, Command Prompt, and other shells in one window, and any of them will do for this task.
- Click the Start button.
- Type Windows Terminal into the search box.
- Click Windows Terminal in the results. A terminal window opens with a prompt where you can type commands.
If Windows Terminal isn’t in the results, search for Command Prompt or PowerShell instead. The steps below are the same in all three.
Step 2: Check Existing Mounted Drives
Before you pick a letter, check what is already in use. This avoids clashing with an existing drive.
- In the terminal, type `mountvol` and press Enter.
- Read the list that appears. It shows the volumes and folder mappings Windows currently knows about, along with the drive letters attached to them.
- Note which letters are taken. You can also open File Explorer and look under This PC to see the letters in use.
substStep 3: Mount Your Folder as a Drive
- Type the command below in the terminal.
- Press Enter. If the command works, you usually get no message at all, and you are returned to the prompt.
subst X: C:\PathToYourFolderMake sure that letter is free before you run the command. A letter that is already taken will cause an error.
Replace C:\PathToYourFolder with the full path to the folder you want to mount. If the path contains spaces, put the whole path in quotation marks. Here is an example showing the correct syntax:
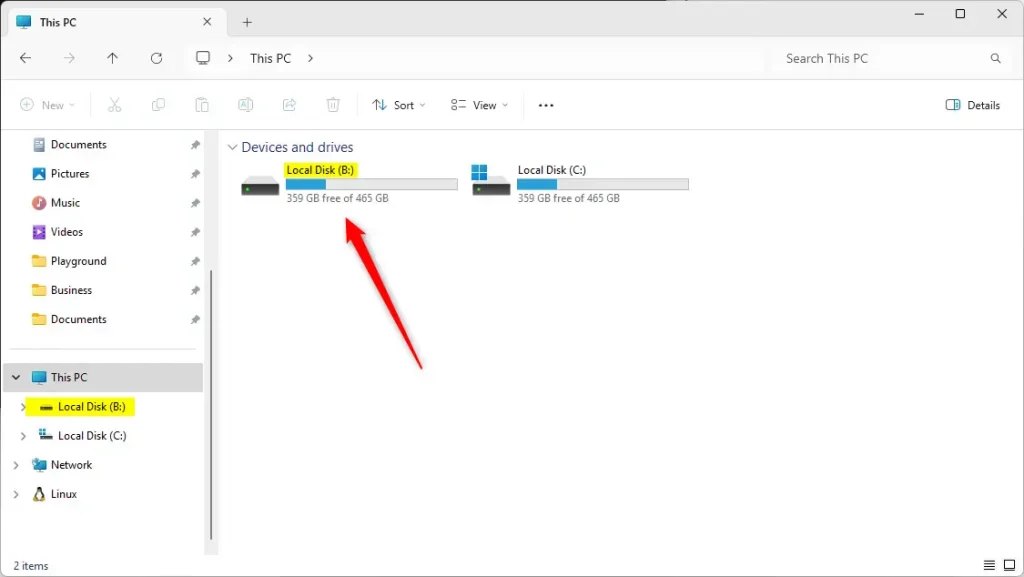
subst B: "C:\Users\UserName\Documents\Business"Step 4: Access Your New Drive
- Open File Explorer.
- Click This PC in the left pane.
- Look for the drive letter you assigned. It appears in the list of drives, and clicking it opens the contents of your folder.
If the drive doesn't appear right away, press F5 to refresh the view. Also check that the folder path in your command was typed correctly. After a restart, check that the drive is still there. If it has disappeared, run the same command again.
Step 5: Remove the Mounted Drive (If Needed)
Your folder and its files are not deleted. Only the drive letter goes away.
- Open Windows Terminal as you did in the first step.
- Type the command below and press Enter.
- Check This PC in File Explorer. The drive letter should no longer be listed.
subst B: /DSubstitute B: with the letter of the drive you want to remove.
Summary
Mounting folders as drives makes deeply buried files quicker to reach and keeps frequently used folders one click away. Administrators and power users often use this to give short, easy-to-remember access to the directories they open every day. Because the original folder is untouched, the setup is easy to reverse whenever you no longer need it.
Was this guide helpful?

About the Author
Richard
Tech Writer, IT Professional
Richard is a writer at Geek Rewind who turns complex IT tasks into clear, step-by-step guides. He draws on years of hands-on experience in system administration and enterprise IT operations, focusing on Windows, Linux and WordPress: the problems people actually run into, and the fixes that work. His server and WordPress guides come from systems he runs himself. Richard builds and maintains the platform behind Geek Rewind, from its Ubuntu servers and Nginx configuration to its custom WordPress plugins. Many new tutorials start with readers' questions, and he's always glad to answer them in the comments.


No comments yet — be the first to share your thoughts!