How to Change the Screen Recordings Folder for Snipping Tool in Windows 11

Screen recordings in the Windows 11 Snipping Tool save to the 📁C:\
The simplest way is to change the folder in the Snipping Tool’s own settings, and the steps below follow that route. The original version of this tutorial also mentions right-clicking the Captures folder in File Explorer and opening its properties to pick a new spot. Use whichever you prefer, but the in-app setting is the one Microsoft built for this.
Open the Snipping Tool, click the three dots menu, select Settings, then click Change next to Screen recordings are saved to. Browse to your desired folder in File Explorer and click Select Folder. Your recordings will save there automatically from now on.
What is the Snipping Tool?
The Snipping Tool is a built-in Windows 11 app for capturing screenshots and recording your desktop. It comes pre-installed, so you do not need to download anything. You can use it to grab a still image of a specific window, a freeform area, or the whole screen. It can also record video clips with sound.
Besides screenshots, the app records video clips. Its settings menus give you control over system sounds, microphone audio and where files are saved. The options include:
- Including or excluding system sounds and microphone audio, depending on whether you want to capture what your PC plays, your voice, both or neither
- Automatically saving screenshots, so you do not have to save each one by hand
- Changing where screenshots and videos are saved, which is what this tutorial covers
The exact list of options can vary slightly between Snipping Tool versions, so what you see on your PC may differ a little from the list above.
Why Change the Screen Recordings Folder?
C:\Users\UserName\Videos\Captures.That folder sits on your system drive, which is usually the drive Windows is installed on. Moving new recordings to secondary storage, such as a larger data drive, keeps your main drive from getting cluttered. It also gives you more room if you record a lot.
Changing the setting only affects recordings you make from now on. Clips you have already recorded stay where they are, so move them yourself in File Explorer if you want them all in one place.
How to Change the Screen Recordings Folder
To change the default screen recordings folder, open the Snipping Tool settings and pick a new destination. The app saves clips to your standard Videos folder unless you tell it otherwise. You can choose any other folder on your computer, including one on another drive. If the drive is removable or external, make sure it is connected before you record.
- Open the Snipping Tool app. Type Snipping Tool in the Start menu search bar and click the app in the results. The Snipping Tool window should now be open.
- Click the See more button (the three dots) in the top-right corner of the window, then select Settings. The Settings page for the app should now appear.
- In Settings, find the section labeled Screen recordings are saved to. It shows the folder currently in use. Click the Change link next to it. If you cannot find this setting, your app is probably out of date. See the version note near the end of this tutorial.
- Choose a new folder. A File Explorer window opens. Browse to the folder where you want your recordings saved. If the folder does not exist yet, create it first, then select it and click Select Folder. The new path should now appear in Settings.
- Close the Snipping Tool when you are done. The new folder setting is saved automatically, and no restart of Windows is needed. To confirm it worked, record a short clip and check that it lands in the new folder. To undo the change, repeat these steps and pick your old folder again.
In short: open Snipping Tool, click the three dots and select Settings. Click Change to pick a new folder for your recordings. Then choose your preferred folder in File Explorer.
Here are some pictures to help you:
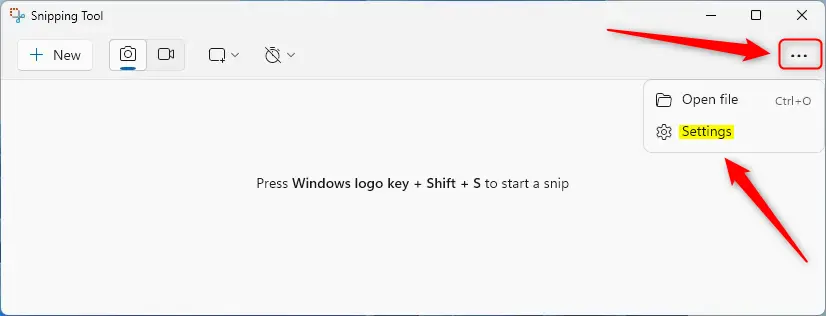
Open Snipping Tool, click the three dots, and select Settings.
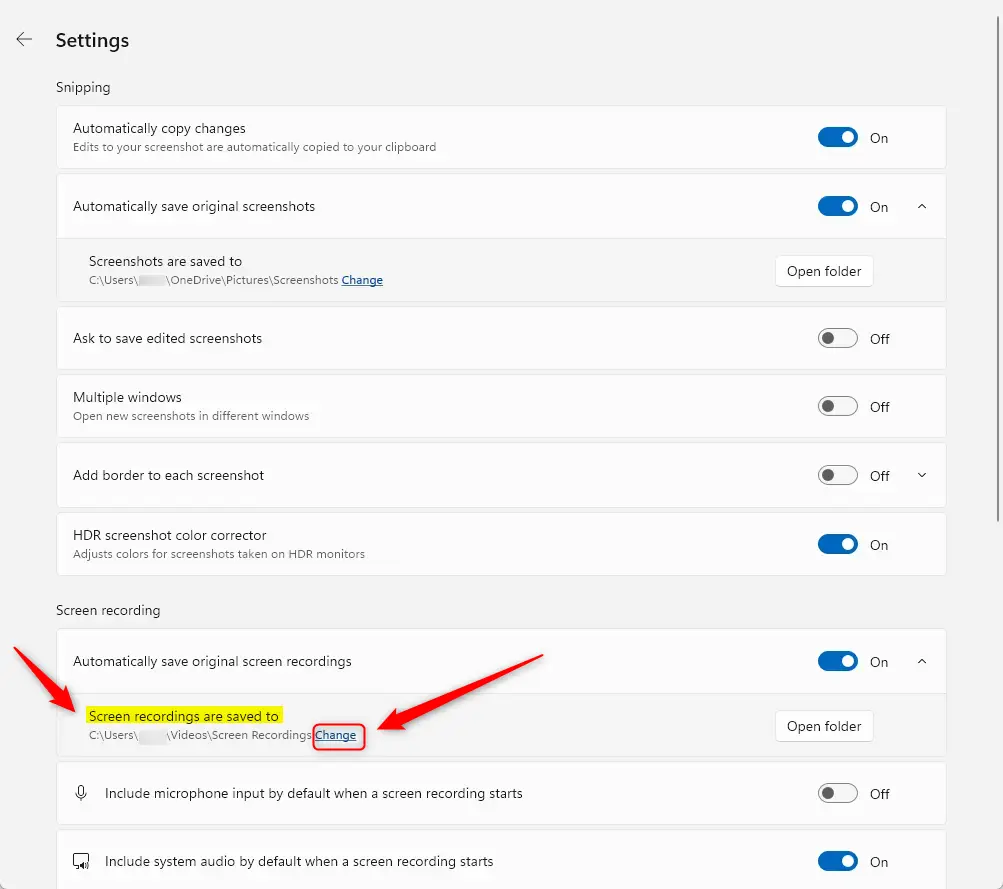
Click Change to pick a new folder for your recordings.
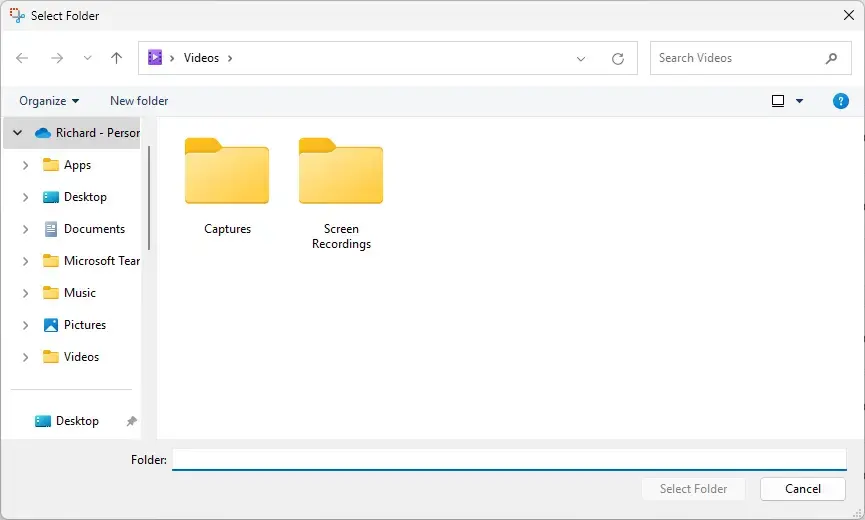
Use File Explorer to select your preferred folder, then click Select Folder.
Summary
Older versions do not have this option. If you cannot find the folder setting in your menu, update the app through the Microsoft Store. Open the Store, go to Library, check for updates, and then reopen the Snipping Tool.
Setting the path means going to Settings and updating the Screen recordings are saved to field. This is the only place the setting lives, so if you want to check or change it later, come back to the same spot.
Keep your recordings in a folder you will remember, ideally one that is backed up. A clear folder structure makes footage much harder to lose.
Once you close the app, the new setting is in place. Nothing else needs to be saved or confirmed.
With the new path set, your recordings go where you want them, and your system drive stays free for Windows and your apps.
Have a question about this guide?
Answered by AI from this guide. Good questions may be added to this page — please don't include personal details.
Did this guide fix your problem?

About the Author
Richard
Tech Writer, IT Professional
Richard is a writer at Geek Rewind who turns complex IT tasks into clear, step-by-step guides. He draws on years of hands-on experience in system administration and enterprise IT operations, focusing on Windows, Linux and WordPress: the problems people actually run into, and the fixes that work. His server and WordPress guides come from systems he runs himself. Richard builds and maintains the platform behind Geek Rewind, from its Ubuntu servers and Nginx configuration to its custom WordPress plugins. Many new tutorials start with readers' questions, and he's always glad to answer them in the comments.
No comments yet — be the first to share your thoughts!