How to Change the Screen Recordings Folder for Snipping Tool in Windows 11

The Snipping Tool in Windows 11 lets you change where it saves your screen recordings.
This means you can pick a special folder for all your video clips, instead of just using the default location.
Normally, Snipping Tool saves recordings straight to your main Videos folder. But with this setting, you can tell it to use a different spot, like a folder on another hard drive. This helps you keep your screen recordings neat and tidy.
Open Snipping Tool, click the three dots, select Settings, then click “Change” next to “Screen recordings are saved to” to select a new folder. This will update the default save location for all future screen recordings.
What is the Snipping Tool?
The Snipping Tool is a built-in Windows 11 app for taking screenshots and recording your screen. It’s perfect for capturing exactly what you see on your computer, whether it’s a quick picture or a video to show someone how to do something.
Beyond taking pictures, the Snipping Tool also records videos. You can also adjust settings for system sounds, microphone audio, automatic screenshot saving, and where your captures are saved. These include options for:
- Including or excluding system sounds and microphone audio
- Automatically saving screenshots
- Changing where screenshots and videos are saved
Why Change the Screen Recordings Folder?
C:\Users\UserName\Videos\Screen Recordings. What happens if you want to save your recordings somewhere else? Maybe you want to use another drive or folder. Good news! You can now do that.How to Change the Screen Recordings Folder
You can change the Snipping Tool screen recordings folder in Windows 11 to save your video captures wherever you like. This setting is right inside the Snipping Tool app, making it simple to pick a new location for all your saved screen recordings.
- Open the Snipping Tool app. You can find it by typing Snipping Tool in the Start menu search bar and clicking the app.
- Click the See more button (three dots) in the top-right corner. Then select Settings.
- In Settings, find the section that says “Screen recordings are saved to”. Click the Change link next to it.
- Choose a new folder. A File Explorer window will open. Browse to the folder where you want your recordings saved. Then click Select Folder.
- Close the Snipping Tool when done. Your new folder setting will be saved automatically.
Here are some pictures to help you:
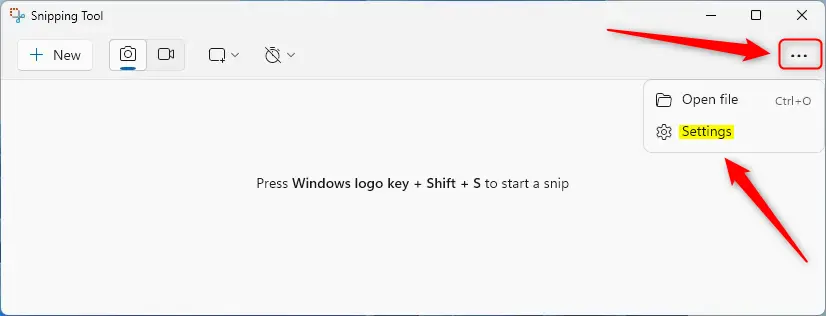
Open Snipping Tool, click the three dots, and select Settings.
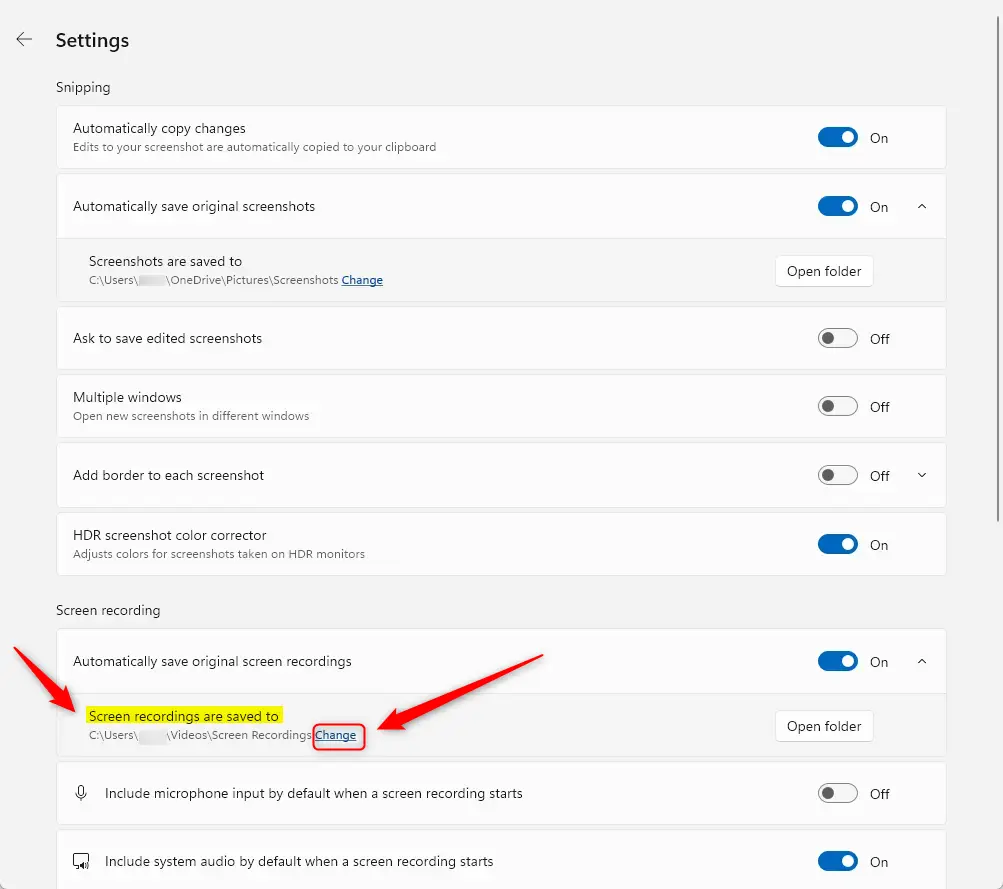
Click “Change” to pick a new folder for your recordings.
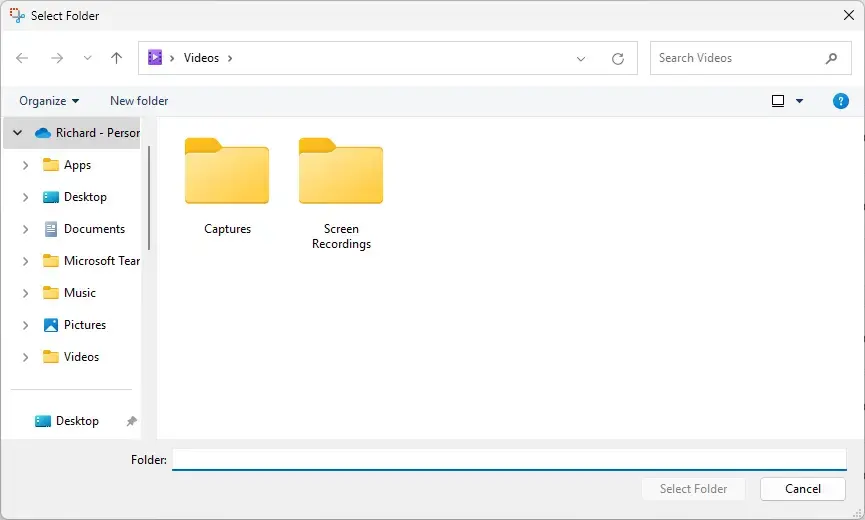
Use File Explorer to select your preferred folder.
Summary
To change the Snipping Tool screen recordings folder, open the app, click the three dots for more options, select Settings, and then choose your preferred folder. This quick process ensures your video captures are saved exactly where you want them, starting with version 11.2408.13.0.
Here’s how: Open Snipping Tool Settings Change the “Screen recordings are saved to” folder.
This helps keep your recordings organized just how you like them.
Don’t forget to close the app after making changes so they are saved.
By following these steps, you can keep your screen recordings organized and saved exactly where you want them on your PC.
Where do I find my screen recordings saved?
By default, the location should be C:\Users\(Username)\Videos\Captures.
Was this guide helpful?

About the Author
Richard
Tech Writer, IT Professional
Richard, a writer for Geek Rewind, is a tech enthusiast who loves breaking down complex IT topics into simple, easy-to-understand ideas. With years of hands-on experience in system administration and enterprise IT operations, he’s developed a knack for offering practical tips and solutions. Richard aims to make technology more accessible and actionable. He's deeply committed to the Geek Rewind community, always ready to answer questions and engage in discussions.


No comments yet — be the first to share your thoughts!