Disable Text and Image Generation Features in Windows 11 Privacy Settings

Text and image generation in Windows 11 is a privacy setting that controls which apps can use the AI models built into Windows to write text or create images. You can block every app at once, or leave the setting on and choose apps one at a time. The page lives at Settings Privacy & security Text and image generation.
To block all apps, switch off the access toggle on that page. To allow only some apps, keep the toggle on and turn off the apps you do not want in the list below it.
The change takes effect on your account straight away. You do not need to restart your PC.
To turn off text and image generation in Windows 11, open Settings , go to Privacy & security Text and image generation, and set the master access toggle at the top of the page to Off. This blocks every app from using the Windows-provided generative AI models.
What This Setting Controls (and What It Doesn’t)
The Text and image generation page is an app permission, like the ones for Camera, Microphone, and Location. It decides whether apps on your PC can call on the text and image generation models that ship with Windows. It also shows which apps have recently used them, so you can see who is asking.
It does not control everything labelled “AI”. Keep these limits in mind:
- Web-based AI tools. A chatbot or image generator you open in a browser is a website, not an app using a Windows model. Windows privacy settings do not govern it.
- Apps that bring their own models. An app that ships its own model, or sends your request to its own online service (a server run by the app’s maker, not your PC), does not ask Windows for permission. Check that app’s own settings.
- Other privacy pages. Features such as Recall & snapshots (on supported PCs) and Speech have their own pages under Privacy & security. This page does not turn them off.
Turning the permission off blocks apps from using the Windows-provided models. It does not uninstall anything, and it does not delete anything an app already created.
Before You Start: Check That Your PC Has the Page
The Text and image generation page is a recent addition to Windows 11. Older builds do not have it. Confirm what you are running before you look for it.
Check Your 🪟 Windows 11 Version
- Click Start, type winver, and press Enter.
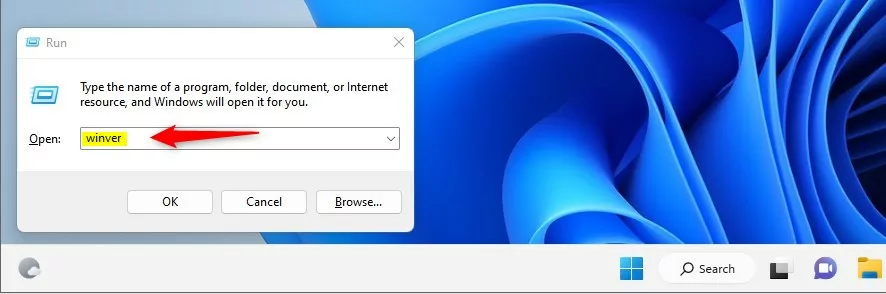
windows 11 winver in run box - Read the version line in the About Windows dialog. You should see Windows 11 with a version number such as 24H2.
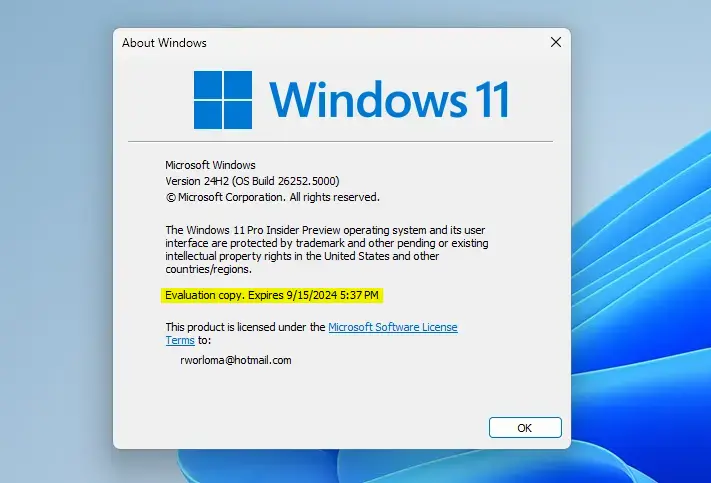
- Click OK to close the dialog.
Microsoft rolls features out in stages, so the build that added this page varies between PCs. Check your version before you look for it. If you run an older version, update first (see the next section). If you are on a current version and still don't see the page, go to the "Why the Page Is Missing or Greyed Out" section below.
Install Pending Updates
Updating is safe, but it may restart your PC, so save your work first.
- Open Settings by pressing Windows key + I.

Windows 11 Start menu with Settings gear icon highlighted. - Select Windows Update in the left pane.

Settings › Windows Update - Click Check for updates.
- Install anything offered and restart if Windows asks you to.
After the restart, open Settings again and continue with the steps below.
Disable Text and Image Generation in Settings
Do this first. It is the supported route, it needs no registry editing, and you can reverse it in seconds. These steps should not need administrator rights (permission to change settings for the whole PC) on a personal PC. If Windows asks for an administrator password, enter it or ask the person who manages the PC.
Turn Off Access for All Apps
This step blocks every app from using the Windows-provided models in one move.
- Open Settings by pressing Windows key + I.
- Select Privacy & security in the left pane.

- Scroll down to the App permissions group.
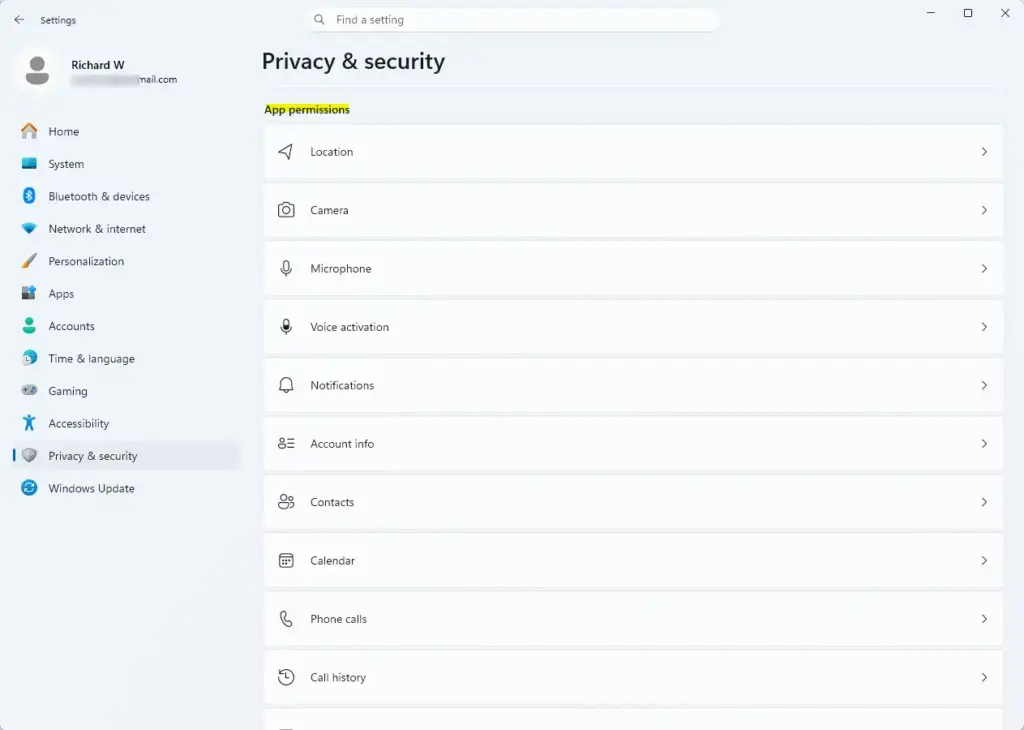
Settings › Privacy & security › App permissions - Click Text and image generation. The page opens with a short description, a master toggle for apps, and a list of apps that have used these features recently.
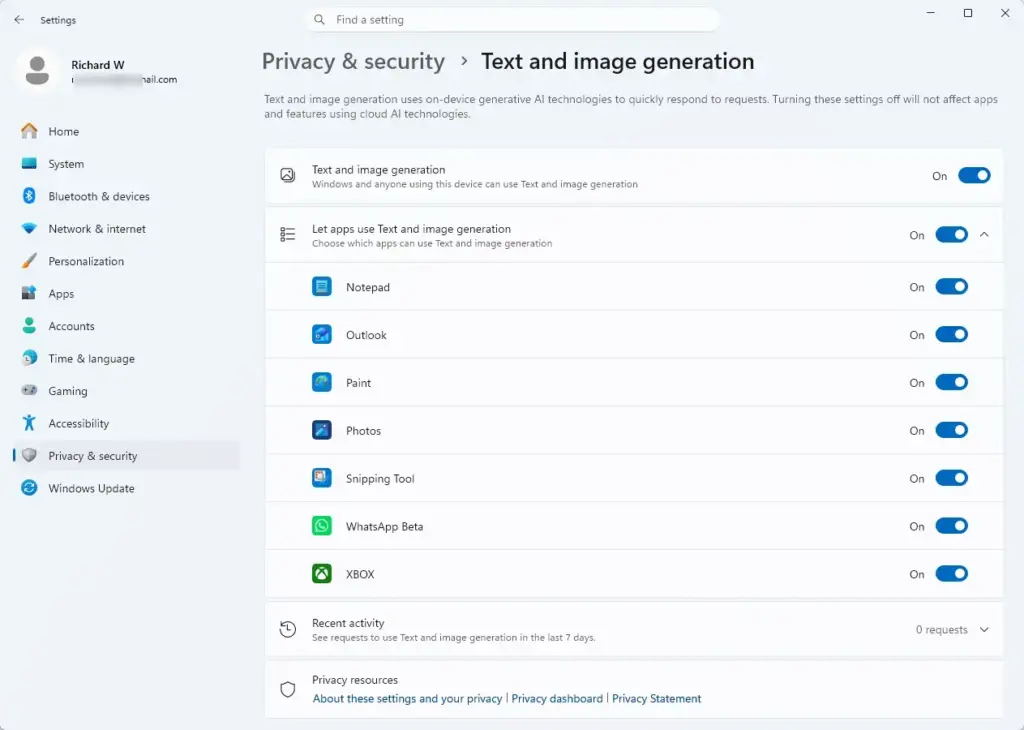
Settings › Privacy & security › Text and image generation - Set the toggle at the top of the page to Off. The toggle should now read Off. The per-app switches below it may grey out or stop responding.
The label on the master toggle varies slightly between builds. It is the main on/off switch at the top of the page, above the app list. If your label reads differently, look at where the switch sits: it is the main switch at the top of the page, above the app list.
If the toggle snaps back to On, or a banner says some settings are managed by your organization, a policy is controlling it. See the section on managed devices below.
Turn Off Individual Apps Only
Use this route when you want to keep the feature for one app and block the others, or when you want to cut off a single app you don't trust.
- Go to Settings Privacy & security Text and image generation.
- Leave the master toggle On.
- Scroll to the list of apps under the toggle.
- Find the app you want to block. The list shows apps that have used the models recently, so an app that never made a request may not appear.
- Set that app's toggle to Off. The app's switch should now read Off, and the other apps keep their current state.
An app that has not yet asked for access may not be listed. In that case, turn off the master toggle, or check back after the app has been used.
Check Which Apps Used the Feature Recently
Before you block anything, read the activity information on the page. It tells you which apps actually touch these models, so you don't switch off something you rely on.
- Open Settings Privacy & security Text and image generation.
- Look at the app list. Each entry is an app that has used, or can request, the text and image generation models.
- Note any app you don't recognise. Search for its name in Settings Apps Installed apps to see who publishes it.
If the list is empty, no app on your PC has used these models in the period Windows tracks. Switching the toggle off still stops future use.
What Stops Working After You Turn It Off
Apps that rely on the Windows-provided models lose that ability. What that looks like depends on the app. A writing assistant inside an app may show an error or a greyed-out button, or it may stay hidden. An image tool may fail to generate a result. Nothing else in the app changes.
Apps that don't use these models are unaffected. Your files, accounts, and ordinary app functions stay as they are.
If an app stops working in a way you did not expect, turn the setting back on for that app only (see the undo section) and check whether the problem goes away.
Why the Page Is Missing or Greyed Out
Other guides often skip these causes, so this section covers the common reasons the page is missing or behaves differently. These are the common reasons the page does not behave as described.
The Page Isn't in Settings
- Your build is too old. Run Windows Update as described above, then look again under App permissions.
- The feature has not reached your PC yet. Microsoft releases some Windows 11 features gradually, so two PCs on the same version can differ. Check for updates again in a few days.
- You are on a different Windows version. Windows 10 does not have this page.
I can't confirm from here whether the page is limited to certain hardware. If it is missing on a fully updated PC, treat that as an open question and do not edit the registry to force it to appear.
The Toggle Is Greyed Out or Reverts
A greyed-out toggle, or a message that some settings are managed by your organization, means a policy sets the option. This is common on work or school PCs. It can also happen on a personal PC that was once joined to a work account.
- Open Settings Accounts Access work or school.
- Check whether a work or school account is connected. If one is, the organization's IT team probably controls the setting. Ask them.
- If the account is not yours to remove, leave it connected and ask IT to change the policy.
Don't remove a work or school account from a company PC to unlock a toggle. Doing so can cut off your access to company resources.
Home vs Pro
The Settings route works the same way on Windows 11 Home and Pro, so the steps above apply to both. The difference is in the tools for managing the setting at scale. The Local Group Policy Editor (a tool for setting Windows rules across a PC) is available only on Pro, Enterprise, and Education, not Home. This article does not give a Group Policy path because the exact policy name for this page is not confirmed.
Registry and Group Policy Method
Use this section only if the Settings page is unavailable and you have a real need to enforce the setting. Editing the registry is risky: a wrong change can cause problems that are hard to trace. Back up the key first. Registry changes need administrator rights.
[Verification Required: registry key missing from source. Until it is confirmed, use the Settings route above.]
HKEY_LOCAL_MACHINE\SOFTWARE\Policies\Microsoft\Windows\AppPrivacy
This article cannot yet confirm the value name, value type, or data for this permission. Use the Settings route above until it can. [Registry method: to be verified]
Until that is confirmed, use the Settings route above. For a group of PCs, ask your IT team to apply the setting through your management tool.
How to Turn Text and Image Generation Back On
You can reverse the change at any time. The change applies immediately, with no restart.
- Open Settings Privacy & security Text and image generation.
- Set the master toggle to On.
- Scroll to the app list and set the toggle for each app you want to allow to On.
The toggles should now read On. Open the affected app and try the feature again.
What Can Change the Setting Later
Three things can undo your choice, so recheck the page after each one:
- A feature update. Large Windows 11 updates occasionally add new privacy options or reset defaults. Check the page after a major update.
- A new user profile. Permissions apply per account. A second user on the same PC needs to set their own options.
- A new app install. A newly installed app may appear in the list with its own toggle. If you turned off the master toggle, it stays blocked. If you only switched off individual apps, check new additions.
If This Didn't Work
If the toggle will not stay off, look for a work or school account under Settings Accounts Access work or school, because a policy is the most likely cause. If you also want to limit voice data sent to Microsoft, the next page to visit is Settings Privacy & security Speech, where you can turn off online speech recognition. Check Recall & snapshots in the same Privacy & security area if your PC has it.
Was this guide helpful?

About the Author
Richard
Tech Writer, IT Professional
Richard is a writer at Geek Rewind who turns complex IT tasks into clear, step-by-step guides. He draws on years of hands-on experience in system administration and enterprise IT operations, focusing on Windows, Linux and WordPress: the problems people actually run into, and the fixes that work. His server and WordPress guides come from systems he runs himself. Richard builds and maintains the platform behind Geek Rewind, from its Ubuntu servers and Nginx configuration to its custom WordPress plugins. Many new tutorials start with readers' questions, and he's always glad to answer them in the comments.


No comments yet — be the first to share your thoughts!